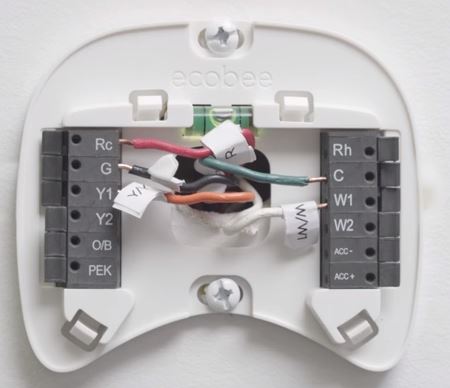
How to Install Your Ecobee Wi-Fi Thermostat
Installation Guide
Download the ecobee app. The Ecobee app has instructions, step-by-step videos, and diagrams customized to your wiring setup. Register your eco bee after installation to unlock smart features like Amazon Alexa.

First things first. Here’s what you’ll find in the box: You may also need these tools:

The installation section of this manual will describe 3 scenarios:
- How to install with a C-wire.
- How to install with multiple G wires.
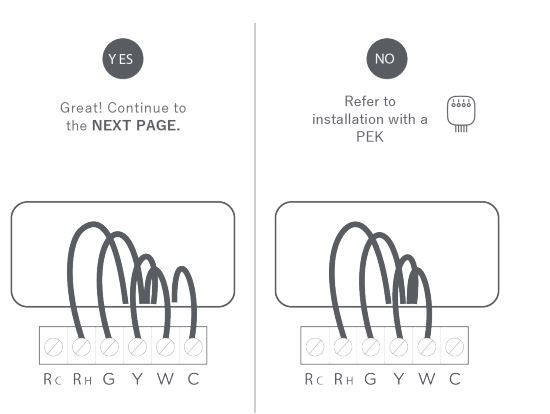
- How to install without a C-wire using the supplied PEK adaptor.
How to determine if your HVAC system is compatible and if you have a C-wire.
Power off your Heating, Ventilation, and Air Conditioning (HVAC) system by using the master switch or circuit breaker box. This is important for your safety.
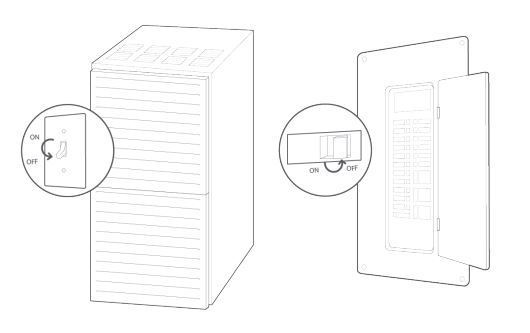
TIP:
Look for your master switch or circuit breaker box in the basement, attic, utility closet, or behind a wall panel near the thermostat.
Confirm your system is off by turning on your heat (during winter) or your AC (during summer). Wait a few minutes —you should not feel air coming from your vents.

TIP:
If you have a boiler, check to see that the main flame is extinguished.
Remove your old thermostat cover from the wall.
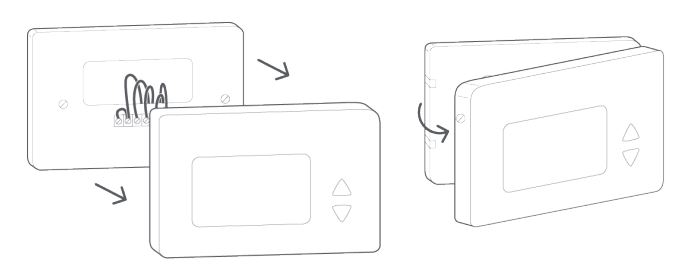
TIP:
Many thermostats simply pop off or unclip from the base, while others may have screws that you will need to remove.
What do my thermostat’s wire labels mean?
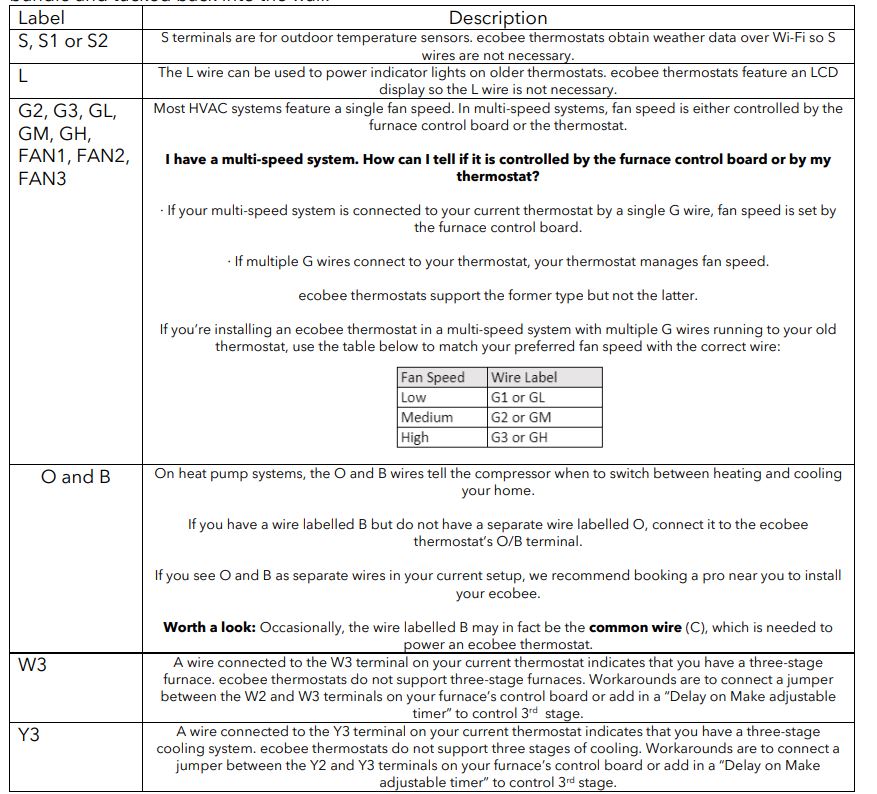
Common thermostat wires:
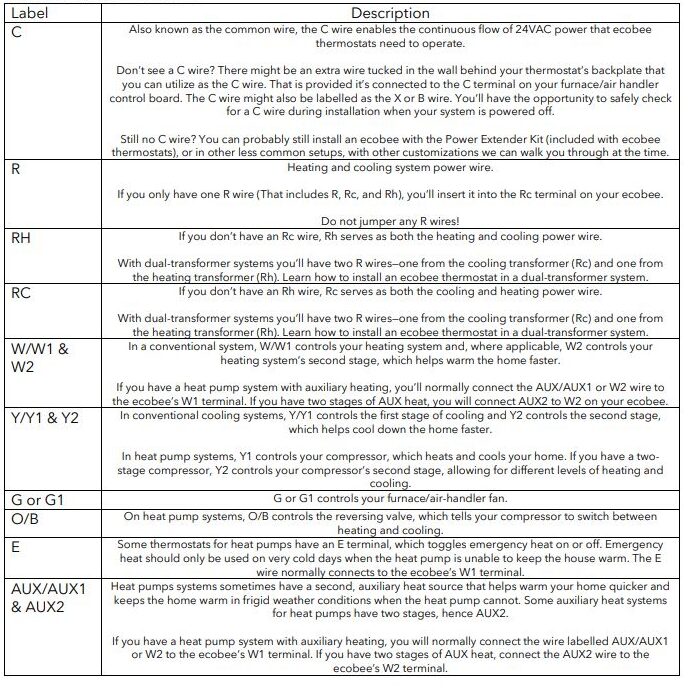
Less common thermostat wires:
Any unnecessary or spare wires not needed can be safely taped off or wrapped around the wiring bundle and tucked back into the wall.
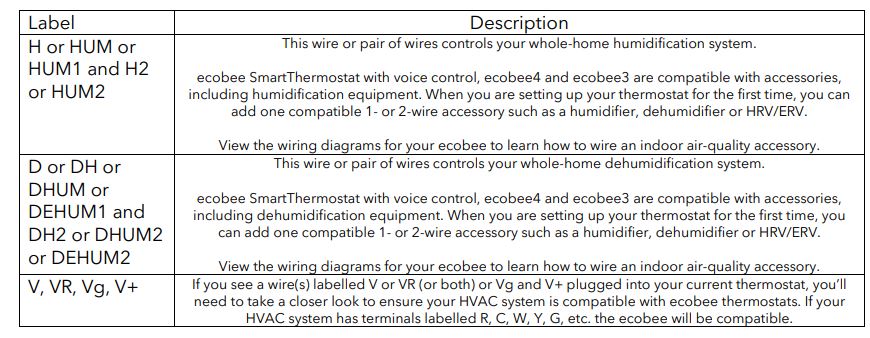
Incompatible thermostat wires:
Unfortunately, if you see any of the following wires attached to your current thermostat, your system is not compatible with Ecobee.

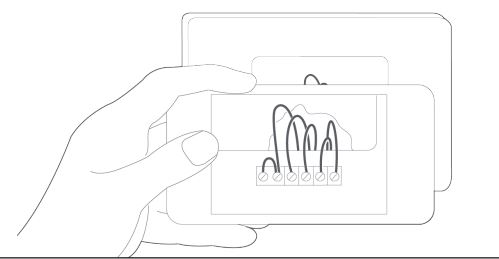
Take a picture of the wires connected to the terminals of your old thermostat. You may need to reference this photo later.
WARNING:
eco bee is designed for 24VAC with a 2A maximum current. Do not connect it to line (high) voltage or millivolt systems.
Carefully disconnect and label the wires from your old thermostat one at a time, using the labels provided.

TIP:
If you have a jumper between RC, RH, or R, leave it alone. Only label the wires that run from your wall into a terminal block.
How to install with multiple G-wires:
Installation of a system with multiple G wires means you have a multi-speed fan. Depending on the equipment in your building, this may require you to select wiring configurations that can damage your system if done incorrectly. If you would rather leave it up to a professional, we can help you find one quickly. ecobee /preinstall.
Setup Guide
Configuring your ecobee thermostat for the first time (I’m a homeowner):
Upon powering up the ecobee, it will provide step-by-step prompts to assist with the HVAC equipment configuration. This is an example of this process:
If your Ecobee thermostat has not detected the wiring correctly during the guided setup, you can manually configure the correct wiring. During the guided setup, there will be a screen displaying the wires your ecobee has detected.
These wires will be highlighted in white. It will ask you whether this information is correct. If there is an error, select No. You can:
- Remove your ecobee from the wall to adjust the wiring. Warning: Before you adjust the wiring, ensure that your system is powered off.
- If you are positive that the wires are connected to the correct terminals on your ecobee backplate, manually configure the missing wires in the guided setup.
The Pipe Sensor:
It monitors the temperature of the water going to a 2-pipe FCU, also known as a changeover sensor, changeover switch, or Aquastat, among others.
- If the water is hot (> 83 F), it signals the thermostat that the system is in heat mode;
- If the water is cold (< 65 F), it signals the thermostat that the system is in cooling mode;
- User configurable for Open or Closed activation
- Compatible with both on-Cool / on-Heat sensors (determined on 1st run setup)
- Compatible with dry-contact pipe sensors (on/off), not analog. (ex. 10K ohm thermistor)
Pipe Sensor Activation (notification & alerts):
- Aqua-stat alerts (Building mode changes)
- Aqua-stat (Switch modes)
- Aqua-stat (Alerts & Reminders)
- Informs customer of the option to switch system mode
Setting up an eco bee for dehumidification control:
This section describes how to set up an ecobee thermostat to control a standalone dehumidifier or a forced air furnace/air handler that supports a ‘Dehum’ mode. This is compawith table using ecobee3, ecobee4, or Smar Thermostat with voice control.
Once the ecobee has been wired to control the HVAC system and dehumidification system using the ACC+/ACCterminals it will require correct setup to determine how you want to enable Dehumidification control. During the first set, there are a few key settings to ensure Dehumidification is part of the HVAC control algorithms.
After the ecobee has been configured there are a few specific settings that allow you to determine when the Dehumidifier becomes active. To access these settings, on the device select MENU SETTINGS INSTALLATION SETTING EQUIPMENT DEHUMIDIFIER.
- Dehumidify with Fan (Yes or No): when Dehum is active this setting specifies if you want the furnace/air-handler fan to run as well. This will activate (G) output on the t-stat at the same time. This can work independently of a cooling cycle.
- Min Runtime Delta (2-10%): to reduce short cycling, the dehumidifier will run beyond the desired humidity by the selected amount (%). The default is 5%.
- Dehumidify in Heat Mode (Yes or No): If humidity is a concern during the heating season and have a standalone Dehumidifier, this setting can be used to activate the Dehumidifier and will work independently of a heating cycle.
- Dehumidifier Active (Open or Closed): this setting is dependent on whether the HVAC system or standalone Dehumidifier requires it to be open or closed while active. This setting is part of the 1st run setup but can be forwarded in the Dehumidifier menu.
- AC Overcool Max is another option to help control high humidity levels and works in conjunction with the Dehumidify setpoint under the System Mode menu. This setting will allow the Air Conditioner to overcool by comparing the actual RH% vs. the desired Dehumidify setpoint.
Note:
Whoever-color the cool temperature has been achieved (i.e. temperature stopover-color cool setting), the AC system will turn off, however, the dehumidifier ACC+/- relay may be still active if the Dehum setpoint has not been achieved.
Setting up an eco bee for ventilator control:
The ventilator control capabilities depend on the type of ventilator installed which can be either an HRV, ERV, or standard Ventilator. There minimum runtime setting when the home is occupied and when unoccupied.
The ventilator will also run for 60 minutes before occupancy, this is called pre-purge and is not user-adjustable but can be enabled or disabled. Regardless of the type of ventilator the minimum runtime settings are used to force the ventilator to run a specific number of minutes per hour.
This runtime is broken into 15-minute blocks to evenly spread out the runtime throughout the hour, but at a minimum 5 minutes of runtime is required. So, if the runtime was set to 10 minutes, the time is broken into two 5-minute blocks.
Free Cooling:
If a standard ventilator is installed, then it can be used to cool the house and is much cheaper to use compared to air conditioning. The thermostat will look at indoor temperature and humidity and outdoor temp and humidity to determine if free cooling can be used.
If conditions are favorable, then the ventilator will be engaged instead of the air conditioner. There are several configuration settings used to control free cooling. This feature does not apply to an HRV or ERV. To access these, Select MENU SETTINGS INSTALLATION SETTINGS EQUIPMENT VENTILATOR.
- Pre-Occupancy Purge (Enable or Disable): determines if the ventilator will be active 1 hour before expected occupancy.
- Free Cooling Max Outdoor Temperature: this setting defines the max outdoor temperature when free cooling is no longer permitted.
- Free Cooling Max Outdoor HumiThis: This setting defines the maximum outdoor humidity when free cooling is no longer permitted. (Default is disabled)
- Indoor/Outdoor Temperature Delta: permits free cooling if Indoor Temp vs. Outdoor Temp is greater than this Temp Delta setting. (Default is 2F)
- Max Desired Temperature Delta.
Setting up an eco bee for humidification control:
This section describes how to set up an ecobee thermostat to control a humidifier with a forced air furnace/air handler. This comes with a table using ecobee3, ecobee4, or Smart Thermostat with voice control.
Once the ecobee has been wired to control the HVAC system and humidification system using the ACC+/ACCterminals it will require correct setup to determine how you want to enable humidification control. During the first stage, there are a few key settings to ensure humidification is part of the HVAC control algorithms.
User Guide
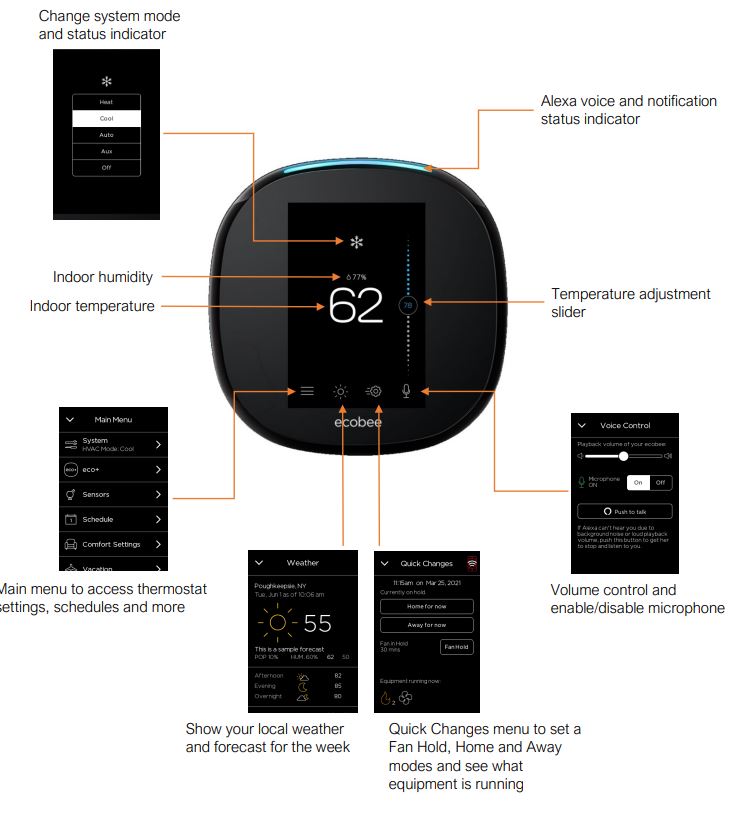
How to use temperature correction on your Ecobee thermostat:
It is important to verify that the temperature sensor is reading the indoor temperature correctly. The thermostat sensor has a sensitivity variance of +/- 1F. If the thermostat reading needs adjusting for any reason, there is a Temperature Correction function that will permanently correct the sensor reading by +/- 10F in both directions. To access this offset is as follows:
MAIN MENU SETTINGS INSTALLATION SETTINGS THRESHOLDS TEMPERATURE CORRECTION. Important! Be aware that warm or cold air from the wall cavity behind the thermostat can influence the temperature sensor. Ensure that the hole where the wires pass through the wall is sealed to avoid unwanted wall cavity air.
How do I register my Ecobee thermostat?
To register your Ecobee thermostat, you will need to obtain the 4-digit registration code from your Ecobee thermostat’s screen. This code is obtained by doing the following on your ecobee thermostat’s screen:
- Tap the three horizontal bars on the bottom left corner of the ecobee screen to open the Main Menu.
- Tap Registration. If it says “2 Steps Left” under registration, you’ll be taken to the Wi-Fi configuration screen first to connect the ecobee to your home network so that the code can be generated.
How to create and adjust a thermostat schedule:
You can program the schedule on your ecobee either on the thermostat itself or through the mobile app through the Web Portal. This section describes how to program your schedule on the thermostat and the mobile app (the process is virtually identical on both). Note: If you are looking to create a custom Comfort Setting, you’ll need to do so through the Web Portal or the mobile app.
Go to the schedule tab from the main menu: MAIN MENU SCHEDULE. You will see the schedule for the day. Tap on any of the days listed at the top to view your schedule for that specific day. If you wish to change the start time of a particular activity, simply tap on the activity (Home, Away, or Sleep) and adjust the time. The ecobee will maintain this activity/Comfort Setting until your next scheduled activity begins.
If you wish to add a new Comfort Setting to your schedule, click the + icon in the top right corner. You will be given the option to choose between your programmed Comfort Settings. Select the Comfort Setting you wish to add and tap Next in the bottom right corner.
Choose the time you would like to set for the Comfort Setting, then tap Save in the bottom right corner. You will now see the Comfort Setting you have added to/adjusted in your schedule. If you would like to copy the schedule for this specific day throughout the rest of the week, select COPY [WEEKDAY] at the bottom.
How to schedule a vacation event on your ecobee:
The Vacation feature on your ecobee helps conserve energy while you’re away and ensures your home is comfortable when you return. When you schedule a Vacation, you’ll be prompted to set a heating or cooling temperature.
This helps protect your home from frozen pipes or extreme heat damage so you can truly relax and unwind on your trip. From the Home screen, select MENU VACATION. Select the + symbol to add a vacation. Enter the Start and End dates and times of your vacation.
You can then customize your minimum and maximum threshold temperatures by tapping Vacation Settings. The ecobee will ensure that when your vacation ends, it reverts to your regular comfort settings and schedule. Scheduling a vacation can also completed from the mobile app or web portal.
Using a Hold setting on my Ecobee thermostat:
Whenever you manually adjust your ecobee to a different temperature that is not the scheduled set point, your ecobee will go into a “hold.” This means instead of following your set schedule, your thermostat will follow the hold action until the hold is manually canceled, or until your preferred hold action setting kicks in. You can set a hold action in a variety of ways – by manually changing the temperature either on the thermostat itself or the app, through the Quick Changes menu by selecting “home for now” or “away for now”, or if you are using any 3rd party apps such as Alexa, HomeKit, Smart Things, or Google.
Any manual changes made through the quick changes menu, or selecting home/ away for now, will result in indefinite holds and will need to be manually canceled. How does sensor participation work when there is a hold? Any time you make a manual adjustment and put the thermostat on hold, your sensors will follow the sensor participation of your Home comfort setting. This I hardcoded into the ecobee and these parameters cannot be changed.
How do I adjust the hold setting? You can change your hold preference to hold for 2 hours, 4 hours, Until the Next Scheduled Activity, Until I Change It, or Decide at the Time of Change. To do this, just tap MAIN MENU SETTINGS PREFERENCES HOLD ACTION, and make the changes you like. How do I cancel a hold? Easy! You will just want to tap on the “X” in the top left corner of the text box on the thermostat or select the “Cancel” text box on the app. By canceling the hold, the thermostat will resume your schedule.
Thermostat Name:
Customize the name of your ecobee thermostat to suit your needs (i.e. Main Floor). This is useful if you have multiple systems or zones and are accessing your thermostat from your personalized web portal.
- Select Main MENU > SETTINGS > PREFERENCES
- Select the Thermostat name.
- Select an existing name from the list or choose Enter your own.
- Touch Save.
- If you choose your name, enter the custom name and touch Save.
Alexa Sounds:
Sound effects include Alexa listening/has finished listening and a “barge in” sound to force Alexa to listen.
Screen Brightness:
Customize the brightness of your Ecobee thermostat’s screen. The brightness of both the active and standby screens can be configured independently. You can also configure the screen to automatically sleep (i.e. turn off) whenever your ecobee thermostat enters the Sleep activity period. For example, if your Ecobee thermostat is located in a bedroom, you may want to blank the screen when you are sleeping, whereas if Theecobee thermostat is in a hallway, you may want the screen displayed all the time.
- Select Main MENU > SETTINGS > PREFERENCES
- Select Screen brightness.
- Adjust the values of the Active and Standby screen brightness.
- Select Screen sleeps when I sleep if you want to make the screen blank during the Sleep activity period.
Active to Standby Screen Timer:
Configure how long it takes for the standby screen to activate after you have finished using the Ecobee thermostat.
- Select Main MENU > SETTINGS > PREFERENCES
- Select Active to standby screen timer.
- Adjust the activation time as required.
Hold Action Duration:
Configure how long a manual change to the set point will remain in effect.
- Select Main MENU > SETTINGS > PREFERENCES
- Select Hold action.
- Select the hold action from the list:
- 2 hours
- 4 hours
- Until the next scheduled activity
- Until you change it (default value)
- Decide at time of change
Smart Recovery:
Your ecobee thermostat learns how you’re heating and cooling system works, taking into account weather and historical operating performance so that your home reaches the scheduled set point at the time in which the change occurs (i.e. not afterward). For example, if you wake up at 6:00 AM, you do not need to schedule your Home period to start at 5:30 AM. Smart Recovery will start the HVAC equipment to ensure that at 6:00 AM, the house is at your desired temperature.
- Select Main MENU SETTINGS PREFERENCES
- Select Heating Smart Recovery or Cooling Smart Recovery.
- Touch Enable or Disable.
Access Control:
Control who can adjust your ecobee. You may find this feature useful if you have curious children or if you’re renting out a unit with an ecobee installed and want to prevent the tenant from making any drastic changes.
All:
This will prevent someone from adjusting any of the settings previously listed (schedule, vacation, system, settings, temperature, quick changes).
Temperature and Quick Changes:
This will prevent someone from adjusting the temperature set point and accessing the Quick Changes menu to set holds.
System Mode:
This will prevent someone from changing the system mode on your ecobee (switching from heat mode to cool mode and vice versa).
Schedule:
This will prevent someone from making any adjustments to your ecobee’s schedule on the thermostat.
Vacation:
This will prevent someone from creating a vacation schedule or adjusting any pre-existing vacation schedule.
Other Settings:
This will prevent someone from adjusting the thermostat settings—this includes the date and time, preferences (thermostat name, heating, and cooling range, hold action, etc.), Wi-Fi configuration, equipment, and threshold settings, and resetting the eco bee’s equipment settings and/or registration.
How to control your HVAC system’s fan:
eco bee thermostats can control your fan in a variety of ways to maximize your comfort. Below are the five methods available.
- Fan Control in Heat Mode
- Fan Minimum On-Time
- Quick Changes (used to turn the fan ON for a limited amount of time)
- Heat/Cool Dissipation Time
- Fan Mode in Comfort Settings
Fan Control in Heat Mode:
You can choose either the Ecobee thermostat or your furnace to control your system’s fan during furnace/aux heating cycles. When set to “thermostat”, the ecobee will operate your system fan differently than your furnace during heating cycles by sending the signal to run the fan itself rather than relying on the furnace to do so. To adjust this setting, go to MAIN MENU > SETTINGS > INSTALLATION SETTINGS > EQUIPMENT > FURNACE > FAN CONTROL IN HEAT MODE.
NOTE:
This option is only accessible through the thermostat interface. Neither the mobile apps nor the Web Portal provide access to adjust this option.
Set to eco bee thermostat:
By choosing this option, your ecobee will energize the fan directly during heating cycles. This will cause the fan to immediately turn on when a heating cycle is initiated and continue to run until the heating cycle ends.
Set to HVAC:
By choosing this option, your ecobee will relinquish control of the fan to the furnace during heating cycles. In this case, there will usually be a brief delay before the fan engages after a heating cycle is initiated. This option is recommended if you have a variable fan speed furnace.
Fan Minimum On Time:
This feature allows you to define the minimum amount of time each hour that the system fan will run. This feature is useful if you wish to circulate the air throughout your home automatically outside of heating or cooling cycles. The ecobee will divide the “Fan Min On time” you select throughout each hour.
If the Fan Min On Time is set for 15 minutes or lower, the fan will operate in two separate segments across the hour; if the Fan Min On Time is set for 20 minutes or higher, the fan will run in four equal segments across the hour. If a heating or cooling cycle operates within any given hour, the length of either cycle will be deducted from the Fan Min On Time.
For example, if your cooling runs for 5 minutes and your Fan Min On Time is set to 20 minutes, 5 minutes will be deducted from the Fan Min On Time. To adjust this setting go to MAIN MENU > SYSTEM > FAN.
NOTE:
If you are adjusting the Fan Minimum On-Time value and you have a Hold on your thermostat (meaning, you have set a temperature manually), you will first need to cancel the existing Hold before the new Fan Minimum On-Time value will be applied. Afterwards, you can set a Hold again.
With the release of firmware version 4.6.25 and up, the Quick Changes menu has changed to accommodate the following new features:
- The ability to set timed Fan Holds rather than having to set the fan to ON until canceled/toggled back to Auto
- The ability to set a specified fan speed if your ecobee is configured for multi-speed fan support (for more information on multi-speed fan installations, please see the “I’m a Pro” section)
Fan Holds can be set for the following durations: 15 minutes, 30 minutes, 45 minutes, 1 hour, 2 hours, or Indefinitely (keeps the ecobee in ON fan mode until the Hold is canceled from the main screen with the temperature displayed)
To use this new feature (currently only available on the thermostat screen, coming soon to the app.
- Tap the Quick Changes menu icon
- Tap the Fan Hold button
- Using the horizontal slider, select a preferred time duration for the fan to run in ON mode (Optional) If you have multi-speed fan capability on your ecobee, select a fan speed from the menu below.
Pause when Open:
What is it?
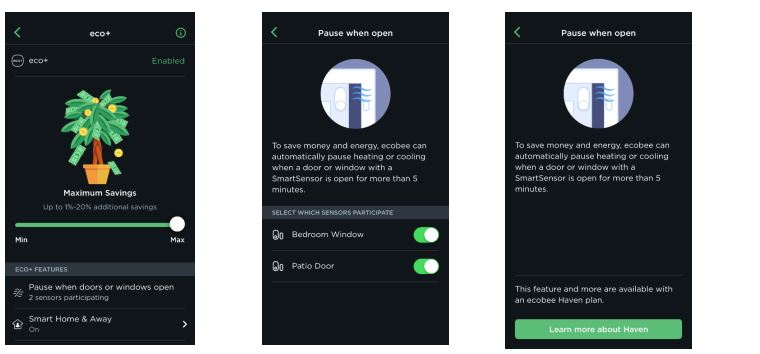
To save money and energy, ecobee automatically pauses heating or cooling when a door or window with a SmartSensor is open for more than 5 minutes. A notification is sent with information about which door or window has been left open.
When a door or window has been closed again for 30 seconds, heating and cooling resumes. When the heating or cooling is paused, the eco+ icon will show on your app and thermostat. You can override this automation from the push notification directly, or by clicking on the eco+ icon on your app or thermostat and turning the system back on.

You can also select which sensors are participating in this feature. All sensors will be included by default. Unselecting all sensors will turn the feature off completely.
How do I access this feature?
This feature is only available to Haven customers who have a SmartSensor for doors and windows. This feature may take up to 24 hours to become active once you subscribe to Haven during weekdays and 72 hours during weekends. If you have a Smart Sensor for doors and windows but are not a Haven customer yet, you will be able to see this feature appear under your eco+ settings. From there you can subscribe to Haven and get access to the feature.
Note:
this feature is not affected by the eco+ savings preferences slider.
I paired my Smart Sensor for doors and windows to my Smart camera with voice, do I have to repair my sensor to my eco bee thermostat for a pause on the door/window to work?
No, your Smart Sensor will appear under the eco+ feature regardless of what you paired it with.
Does my thermostat have to be connected online all the time for this feature to work?
If the thermostat is not connected to the internet, the HVAC will not pause when the sensor is open for more than 5 minutes. However, once the internet returns it will engage immediately and the HVAC will pause. If a Smart Sensor is open and triggers the thermostat to pause, and then the internet is lost, the HVAC will still resume when the sensor is closed.
What do all the icons on my eco bee mean?
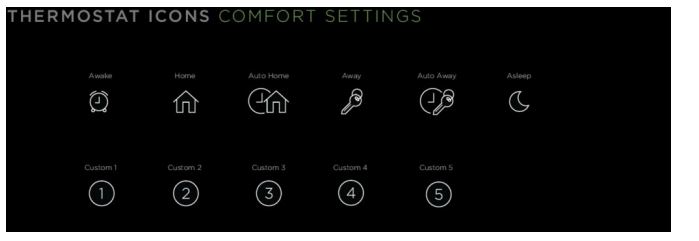
Comfort Setting icons
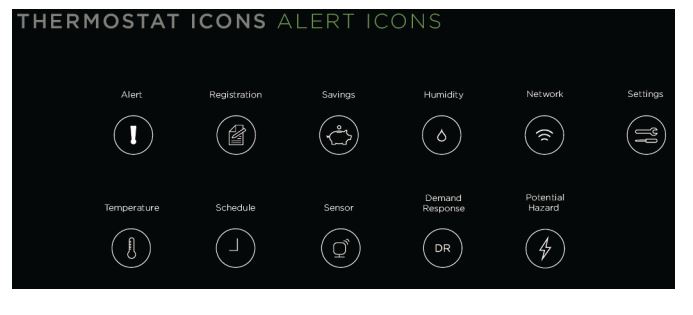
Alert icons
Home Screen icons

Menu icons
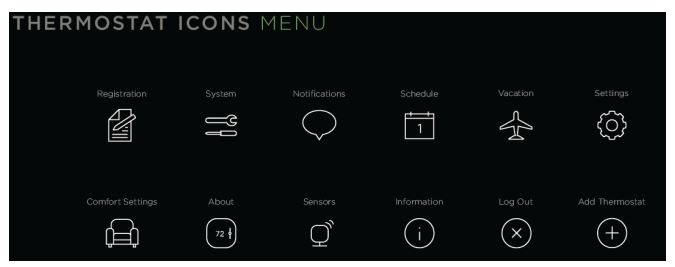
System icons
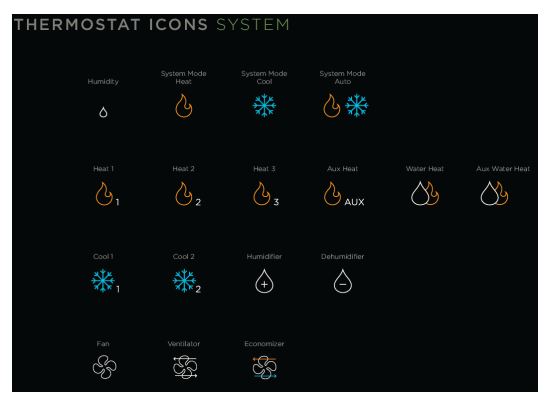
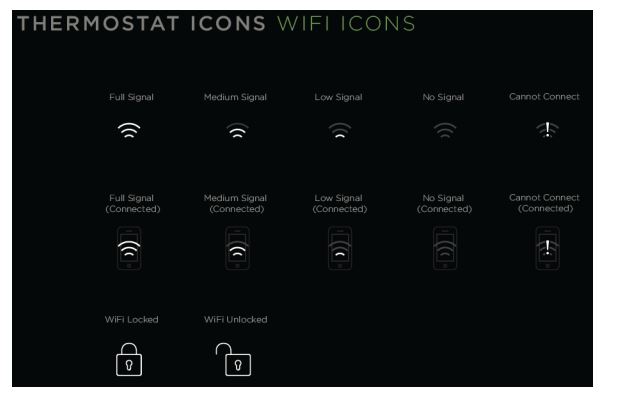
Weather icons

Wi-Fi icons
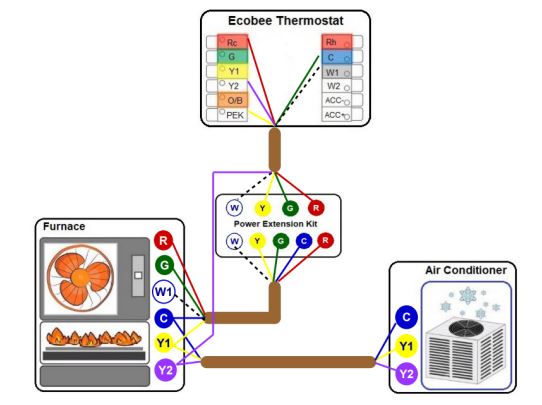
Wiring Diagrams
- Diagram 1. Furnace (1-stage) + AC (1-stage) using PEK

- Diagram 2. Furnace (2-stage) + AC (1-stage) using PEK
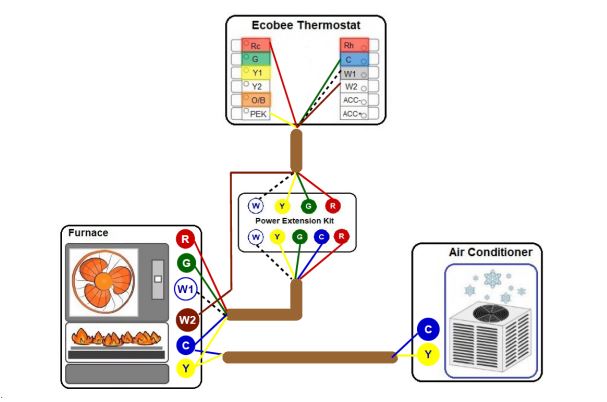
- Diagram 3. Furnace (1-stage) + AC (2-stage) using PEK
FOR MORE MANUALS BY Ecobee, visit MANUALSDOCK
FAQS About How to Install your Ecobee Wi-Fi Thermostat
Is it difficult to install an Ecobee Wi-Fi thermostat?
Installing an Ecobee Wi-Fi thermostat can vary in difficulty depending on your existing wiring setup and familiarity with HVAC systems. Ecobee provides detailed instructions, and many users find the installation process straightforward. However, if you’re unsure or uncomfortable with electrical work, it’s best to hire a professional HVAC technician.
What tools are needed for installing an Ecobee Wi-Fi thermostat?
Basic tools such as a screwdriver, wire cutter/stripper, and possibly a drill may be needed for installation. Ecobee provides a list of recommended tools in their installation guide.
Do I need to turn off power to my HVAC system before installing the Ecobee thermostat?
Yes, it’s important to turn off power to your HVAC system at the circuit breaker before beginning the installation process to ensure safety.
Can I install an Ecobee thermostat myself, or do I need professional help?
Many homeowners successfully install Ecobee thermostats themselves by following the provided instructions. However, if you’re uncomfortable with electrical work or unsure about your HVAC system’s compatibility, it’s wise to hire a professional technician to ensure proper installation.
Does Ecobee provide customer support for installation assistance?
Yes, Ecobee offers customer support to assist with any questions or issues you may encounter during the installation process. You can contact their support team via phone, email, or live chat for assistance.
Does the Ecobee thermostat require a C-wire for installation?
While not always required, having a C-wire (common wire) can provide continuous power to your Ecobee thermostat, ensuring optimal performance and preventing issues like battery drain. Ecobee provides options for installation with or without a C-wire, and their support team can offer guidance based on your specific setup.
Can I use the existing wiring from my old thermostat with the Ecobee thermostat?
In most cases, yes. Ecobee thermostats are compatible with a wide range of HVAC systems, and they provide compatibility check tools on their website to help determine if your existing wiring is compatible.
How long does it typically take to install an Ecobee Wi-Fi thermostat?
Installation time can vary depending on factors such as your HVAC system’s complexity and your familiarity with electrical work. On average, installation can take anywhere from 30 minutes to a couple of hours.
What if I encounter issues during the installation process?
If you encounter any issues or have questions during the installation process, Ecobee’s customer support team is available to assist you. They can provide troubleshooting tips or connect you with a professional technician if needed.
Is it necessary to download the Ecobee app before or after installation?
You can download the Ecobee app before or after installation. The app is used to set up and control your thermostat remotely, monitor energy usage, and access other features. Following installation, you’ll need to connect your thermostat to your Wi-Fi network and create an Ecobee account to begin using the app.

