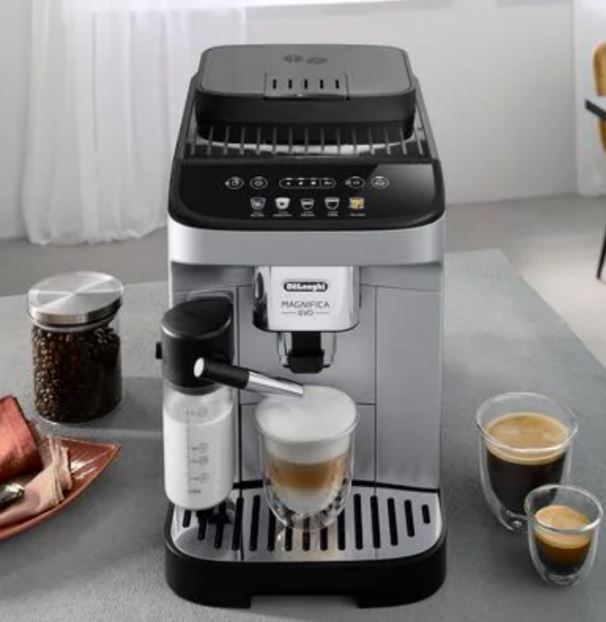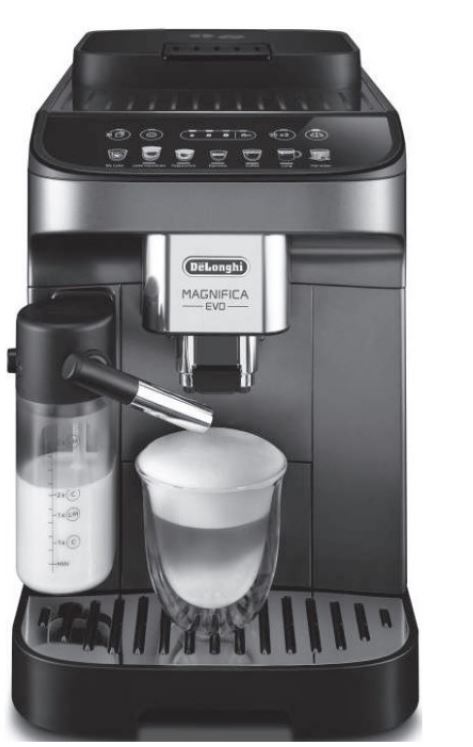
De’Longhi ECAM29X6Y Magnifica Evo Coffee Maker
I M P O R T A N T S A F E G U A R D S
When using electrical appliances, basic safety precautions should always be followed, including the following.
- Read all instructions carefully.
- Make sure the voltage of your electrical system corresponds to the voltage shown on the bottom of the machine.
- Do not touch hot surfaces. Use handles or knobs.
- To protect against #re, electrical shock, and personal injury, do not immerse the cord, plug, or appliance in water or other liquid.
- Keep the appliance out of the reach of children and do not leave the appliance unattended while in operation.
- Unplug from the outlet when not in use and before cleaning.
- Do not operate with a damaged cord or plug, or after the appliance malfunctions, or has been damaged in any manner. Return the appliance to the nearest authorized service facility for examination, repair, or adjustment.
- The use of accessory attachments not recommended by the manufacturer may result in #re, electrical shock, or personal injury.
- Do not use outdoors.
- Make sure the power cord does not hang over the edge of the table or countertop to avoid getting accidentally caught or entangled.
- Do not place the appliance or its electrical parts on or near electric stoves, cooking surfaces, or gas burners.
- Plug the cord into the wall outlet. To disconnect, #rst turn machine “o”, then remove the plug from the wall outlet.
- Do not use the appliance for other than the intended use. This appliance is to be utilized for domestic use only. The manufacturer declines all responsibility for any damage caused by improper, incorrect, or irresponsible use.
WARNING:
To reduce the risk of #re or electric shock, do not remove the cover or the exterior of the unit. Don’t attempt to repair or modify the machine, doing so will void the warranty. Repair should be done by authorized service personnel only.
SHORT CORD INSTRUCTIONS
- A short power cord is provided to reduce risks resulting from becoming entangled in or tripping over a longer cord.
- Longer, detachable power supply cords or extension cords are available and may be used if care is exercised in their use.
- If an extension cord is used, the marked electrical rating should be at least as great as the electrical rating of the appliance. If the appliance is provided with 3- 3-wire, grounding type cord, the extension should be a GROUNDING TYPE 3-WIRE CORD. The longer cord should be arranged so that it will not drape over the countertop or tabletop where it can be pulled on by children or tripped over.
- Your product is equipped with a polarized alternating current line plug (a plug having one blade wider than the other). This plug will #t into the power outlet only one way. This is a safety feature. If you are unable to insert the plug fully into the outlet, try reversing the plug. If the plug should still fail to # work, contact your electrician to replace your obsolete outlet. Do not defeat the safety purpose of the polarized plug.
SAFETY WARNINGS
Danger!
This is an electrical appliance and may cause electric shock. You should therefore follow these safety warnings:
- Never touch the appliance with damp hands or feet.
- Never touch the plug with damp hands.
- Make sure the socket used is freely accessible at all times, enabling the appliance to be unplugged when necessary.
- Unplug directly from the plug only. Never pull the cord as you could damage it.
- To disconnect the appliance completely you must unplug it from the mains socket.
- If the appliance is faulty, do not attempt to repair it. Turn it off”, unplug from the mains socket, and contact Customer Services.
- Before cleaning the appliance, turn it off”, unplug it from the mains socket, and allow it to cool.
Important!
Keep all packaging (plastic bags, polystyrene foam) away from children. CHOKING HAZARD. The appliance might contain small parts. Some of those small parts might be required to get disassembled during cleaning and maintenance operations. Handle with care and keep small parts out of reach of children.
The danger of burns!
This appliance produces hot water and steam may form while it is in operation.
GENERAL INFORMATION
Instruction for Use
Read all the Instructions for Use carefully before using the appliance. Failure to follow this Instruction for Use may result in burns or damage to the appliance. The manufacturer is not liable for damage deriving from failure to respect this Instruction for Use.
BEFORE USE
Checking the appliance
After removing the packaging, make sure the product is complete and undamaged and that all accessories are present. Do not use the appliance if it is visibly damaged. Contact De’Longhi Customer Services.
Installing the appliance
When you install the appliance, you should respect the following safety warnings:
- The appliance gives o” heat. After positioning the appliance on the worktop, leave a space of at least 1.18 in / 3 cm between the surfaces of the appliance and the side and rear walls and at least 5.9 in / 15 cm above the co” ee maker.
- Water penetrating the appliance could cause damage. Do not place the appliance near taps or sinks.
- The appliance could be damaged if the water it contains freezes. Do not install the appliance in a room where the temperature could drop below freezing point.
- Arrange the power cord in such a way that it cannot be damaged by sharp edges or contact with hot surfaces (e.g. electric hot plates).
Connecting the appliance
Check that the mains power supply voltage corresponds to that indicated on the rating plate on the bottom of the appliance. Connect the appliance to an e$ciently earthed and correctly installed socket with a minimum current rating of 13A only. If the power socket does not match the plug on the appliance, have the socket replaced with a suitable type by a qualified professional?
Cleaning and maintenance of materials in contact with food
- When used for the # first time, or after 3 or 4 days without use, clean the appliance and the removable accessories that come into contact with water, co” ee, and milk, as indicated in the instructions for use. Check in the instructions which accessories are dishwasher safe.
- If the appliance is not used for more than 3 or 4 days, before making the #rst beverage, rinse the water circuit as described in this Instruction for Use.
- Be certain to take maximum care when carrying out all cleaning and maintenance operations described in the instructions for use and/or prompted by the display or warning lights of the appliance itself.
Making cappuccinos and milk-based co%ees
- The appliance has been tested for use with cow’s milk and the following products of plant origin: soya, rice, and almond. No other type of milk or product of plant origin may be used.
- To clean the system, following use with any type of milk, please follow the standard procedures described in the instruction manual
- The cleaning methods provided by the manufacturer and described in the instructions do not guarantee the complete removal of allergens.
- In the case of con#rmed or suspected allergies and intolerances, make sure that your machine has not been previously used with any milk or product of plant origin containing the allergens you are allergic to or the substances you are intolerant to.
INTRODUCTION
The principal functions of the machine are summarized in the Quick Guide. Take a few minutes to read this Instruction for Use. This will avoid all risks and damage to the appliance. The LEDs and indicator lights on the panel will help you interact with the machine and use the various functions correctly:
Description of the appliance – A
- A1. Beans container
- A2. Pre-ground co” ee funnel lid
- A3. Beans container lid
- A4. Grinding adjustment dial
- A5. Pre-ground co” ee funnel
- A6. Milk container/ Water spout connector door
- A7. Co”ee spouts (adjustable height)
- A8. Sensor window
- A9. Condensate tray
- A10. Grounds container
- A11. Cup tray
- A12. Drip tray water level indicator
- A13. Drip tray grille
- A14. Drip tray
- A15. Water tank lid
- A16. Water tank
- A17. Water #lter housing
- A18. Power cord
- A19. Infuser door
- A20. Infuser
Please note:
- Never add pre-ground co” ee when the machine is o” or it could spread through the inside of the machine and dirty it. This could damage the machine.
- Never use more than one measuring spoon as it could dirty the inside of the machine or block the funnel.
- Making lock t LONG coffee: halfway through preparation, when the +lights come on, add one measuring spoon of pre-ground co” ee and press the Long button again.
- You cannot make Doppio+ co “ee using preground co” ee.
Which milk to use?
- For a richer, denser froth, use skimmed or partially skimmed milk at refrigerator temperature (about 5°C). To avoid producing milk with poor froth or large bubbles, always clean the Lattecrema System after use.
- The quality of the froth may vary depending on:
- the type of milk or vegetable beverage;
- the brand used;
- the ingredients and nutritional values.
How much milk to add to make My Latte?
Your machine is #tted with a system to detect and use all the milk poured into the milk container. You can then deliver your My Latte using the exact amount of milk you want. Refer to the graduated scale of the milk container to add the correct quantity, bearing in mind that:
MEASURING WATER HARDNESS
The descaling alarm is displayed after a period established according to water hardness. The machine is set by default for a hardness value of “4”. The machine can also be programmed according to the hardness of the water supply in the various regions so that descaling is required less often.
- Remove the indicator paper from its packaging. If provided with your model, you will #nd it attached to the Quick
Guide. - Immerse the paper completely in a glass of water for
about one second. - Remove the strip from the water and shake lightly. After about a minute, 1, 2, 3, or 4 red squares appear, depending on the hardness of the water. Each square corresponds to one level.
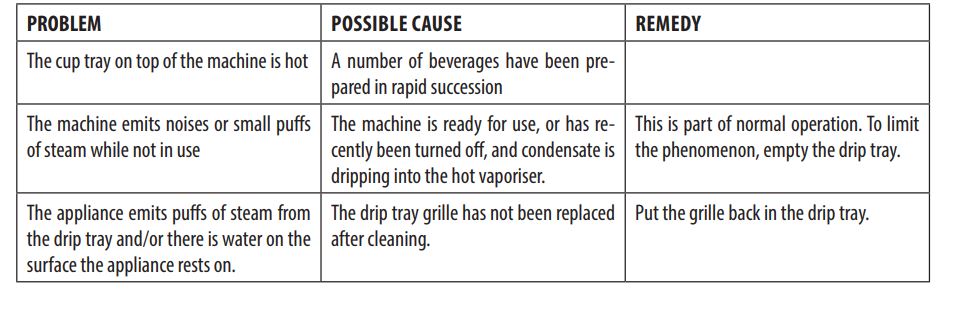
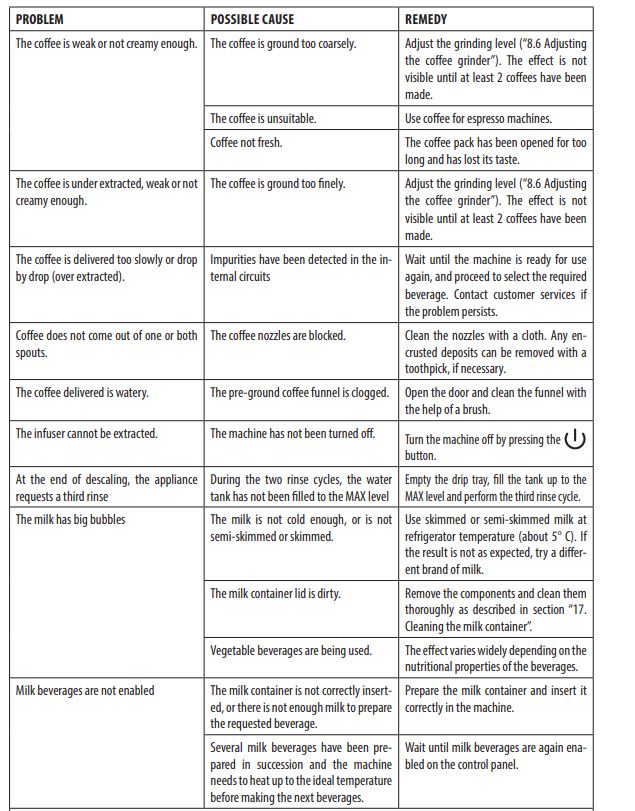
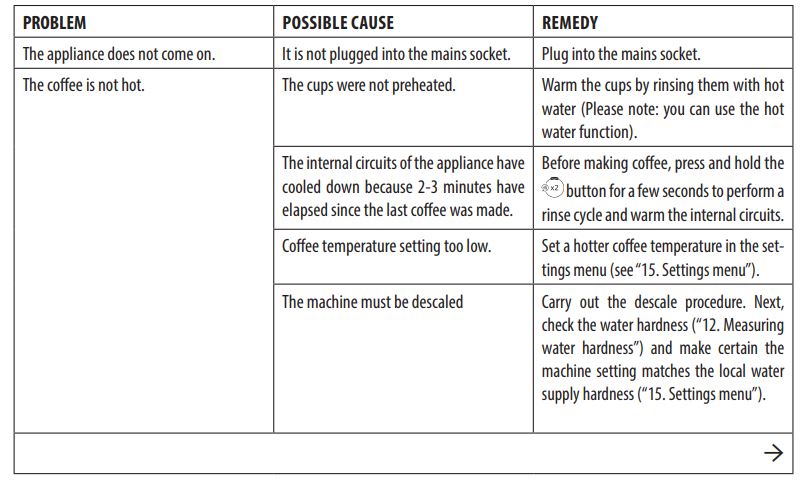
TROUBLESHOOTING
Below is a list of some possible malfunctions. If the problem cannot be resolved as described, contact customer services.
FOR MORE MANUALS BY DE LONGHI, VISIT MANUALSDOCK

