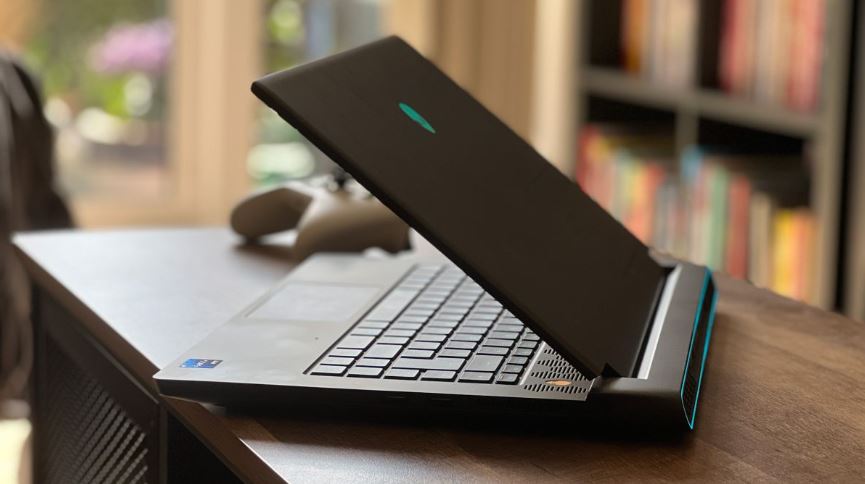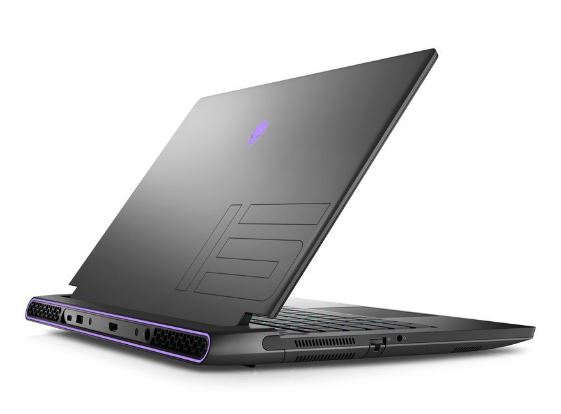
Dell Alienware M15 R7 Gaming Laptop
About DELL Technologies
Technology company Dell is based in the United States. It creates, markets, fixes, and supports computers as well as associated goods and services. The parent business of Dell, Dell Technologies, owns Dell.
Safety instructions
Use the following safety guidelines to protect your computer from potential damage and ensure your personal safety.
- WARNING: Before working inside your computer, read the safety information that shipped with your computer. For more safety best practices, see the Regulatory Compliance home page at dell.com/regulatory_compliance.
- WARNING: Disconnect all power sources before opening the computer cover or panels. After you finish working inside the computer, replace all covers, panels, and screws before connecting to the power source.
CAUTION: To avoid damaging the computer, ensure that the work surface is flat and clean. - CAUTION: To avoid damaging the components and cards, handle them by their edges and avoid touching pins and contacts.
- CAUTION: You should only perform troubleshooting and repairs as authorized or directed by the Dell technical assistance team. Damage due to servicing that is not authorized by Dell is not covered by your warranty. See the safety instructions that shipped with the product or at dell.com/regulatory_compliance.
- CAUTION: Before touching anything inside your computer, ground yourself by touching an unpainted metal surface, such as the metal at the back of the computer. While you work, periodically touch an unpainted metal surface to dissipate static electricity, which could harm internal components.
- CAUTION: When you disconnect a cable, pull on its connector or on its pull tab, not on the cable itself. Some cables have connectors with locking tabs or thumb screws that you must disengage before disconnecting the cable.
- When disconnecting cables, keep them evenly aligned to avoid bending any connector pins. When connecting cables, ensure that the ports and connectors are correctly oriented and aligned.
- CAUTION: To disconnect a network cable, first unplug the cable from your computer and then unplug the cable from the network device.
- CAUTION: Press and eject any installed card from the media-card reader.
Recommended tools
The procedures in this document may require the following tools:
- Philips screwdriver
- Flat-head screwdriver
- Torx #5 (T5) screwdriver
- Plastic scribe
After working inside your computer
CAUTION:
Leaving stray or loose screws inside your computer may severely damage your computer.
- Replace all screws and ensure that no stray screws remain inside your computer.
- Connect any external devices, peripherals, and cables you removed before working on your computer.
- Replace any media cards, discs, and any other parts that you removed before working on your computer.
- Connect your computer and all attached devices to their electrical outlets.
- Turn on your computer.
Removing the base panel
WARNING:
Before working inside your computer, read the safety information that shipped with your computer and follow the steps in Before working inside your computer. After working inside your computer, follow the instructions in After working inside your computer. For more safety best practices, see the Regulatory Compliance home page at www.dell.com/regulatory_compliance.
Procedure
- Close the display and turn the computer over.
- Loosen the captive screws that secure the base panel to the computer
base. - Using a plastic scribe, gently release the tabs that secure the base panel to the computer base.
- Slide and remove the base panel from the computer base.
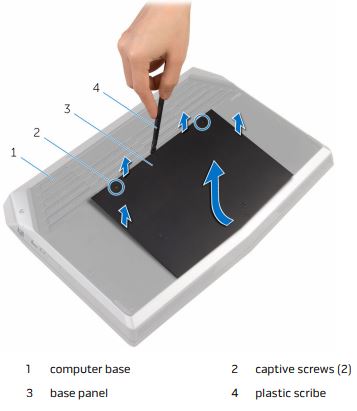
- Disconnect the battery cable from the system board.
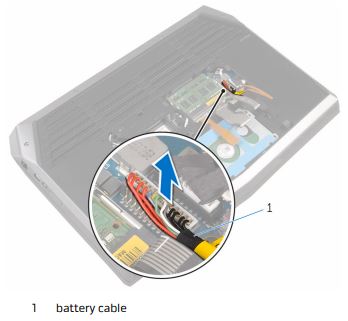
- Turn the computer over and open the display as far as possible.
- Press and hold the power button for 4 seconds to ground the system board.
Replacing the base panel
WARNING:
Before working inside your computer, read the safety information that shipped with your computer and follow the steps in Before working inside your computer. After working inside your computer, follow the instructions in After working inside your computer. For more safety best practices, see the Regulatory Compliance home page at www.dell.com/regulatory_compliance.
Procedure
- Close the display and turn the computer over.
- Connect the battery cable to the system board.
- Slide the tabs on the base panel into the slots on the computer base and snap the base panel into place.
- Tighten the captive screws that secure the base panel to the computer base.
Removing the memory modules
WARNING: Before working inside your computer, read the safety information that shipped with your computer and follow the steps in Before working inside your computer. After working inside your computer, follow the instructions in After working inside your computer. For more safety best practices, see the Regulatory Compliance home page at www.dell.com/regulatory_compliance.
Prerequisites
Remove the base panel.
Procedure
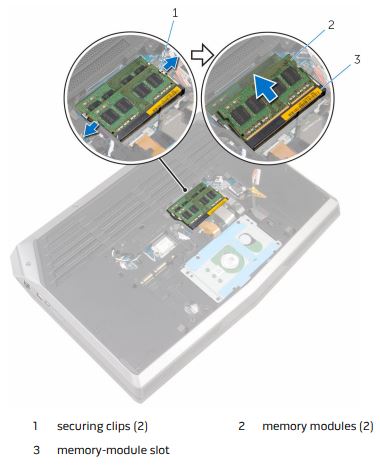
- Using your fingertips, carefully spread apart the securing clips on each end of the memory module slot until the memory module pops up.
- Slide and remove the memory module from the memory-module slot.
Replacing the memory modules
WARNING:
Before working inside your computer, read the safety information that shipped with your computer and follow the steps in Before working inside your computer. After working inside your computer, follow the instructions in After working inside your computer. For more safety best practices, see the Regulatory Compliance home page at www.dell.com/regulatory_compliance.
Procedure
- Align the notch on the memory module with the tab on the memory-module slot.
- Slide the memory module firmly into the slot at an angle and press the memory module down until it clicks into place.
NOTE: If you do not hear the click, remove the memory module and reinstall it.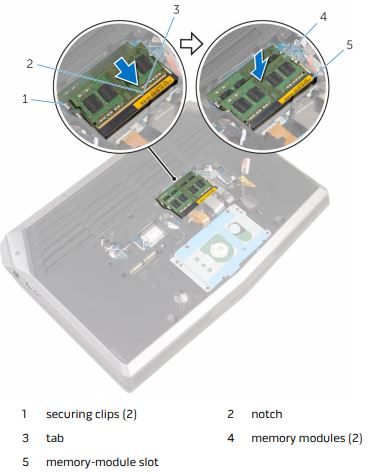
Post-requisites
Replace the base panel.
Removing the solid-state drives
WARNING:
Before working inside your computer, read the safety information that shipped with your computer and follow the steps in Before working inside your computer. After working inside your computer, follow the instructions in After working inside your computer. For more safety best practices, see the Regulatory Compliance home page at www.dell.com/regulatory_compliance.
CAUTION:
Solid-state drives are fragile. Exercise care when handling the hard drive.
CAUTION:
To avoid data loss, do not remove the solid-state drive while the computer is in sleep or on state.
Prerequisites
Remove the base panel.
Procedure
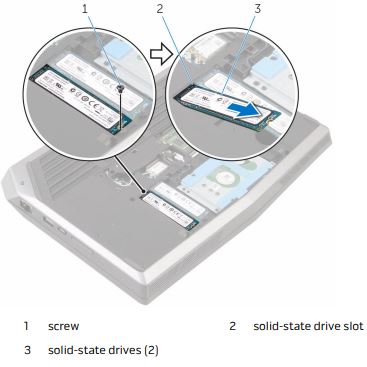
- Remove the screw that secures the solid-state drive to the computer base.
- Slide and remove the solid-state drive from the solid-state drive slot.
Replacing the solid-state drives
WARNING:
Before working inside your computer, read the safety information that shipped with your computer and follow the steps in Before working inside your computer. After working inside your computer, follow the instructions in After working inside your computer. For more safety best practices, see the Regulatory Compliance home page at www.dell.com/regulatory_compliance.
CAUTION:
Solid-state drives are fragile. Exercise care when handling the hard drive.
Procedure
- Slide the solid-state drive into the solid-state drive slot.
- Align the screw hole on the solid-state drive with the screw hole on the
computer base. - Replace the screw that secures the solid-state drive to the computer base.
Post-requisites
Replace the base panel.
Removing the hard drive
WARNING:
Before working inside your computer, read the safety information that shipped with your computer and follow the steps in Before working inside your computer. After working inside your computer, follow the instructions in After working inside your computer. For more safety best practices, see the Regulatory Compliance home page at www.dell.com/regulatory_compliance.
CAUTION:
Hard drives are fragile. Exercise care when handling the hard drive.
CAUTION:
To avoid data loss, do not remove the hard drive while the computer is in sleep or on state.
Prerequisite
Remove the base panel.
Procedure
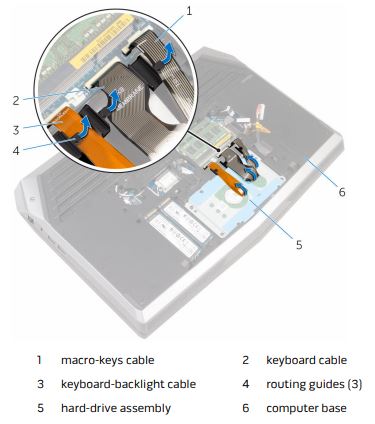
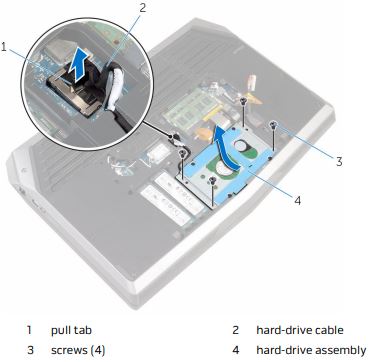
- Remove the keyboard-backlight cable, keyboard cable, and macro-keys cable from the routing guides on the computer base.
- Remove the screws that secure the hard-drive assembly to the computer
base. - Using the pull tab, disconnect the hard-drive cable from the system board.
- Note the hard-drive cable routing and remove the cable from the routing guides on the computer base.
- Lift and slide the hard-drive assembly off the computer base.
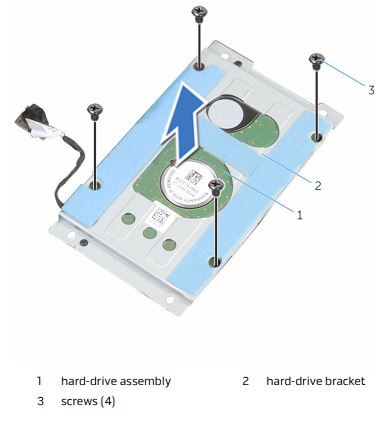
- Remove the screws that secure the hard-drive bracket to the hard-drive assembly.
- Lift the hard-drive bracket off the hard-drive assembly.
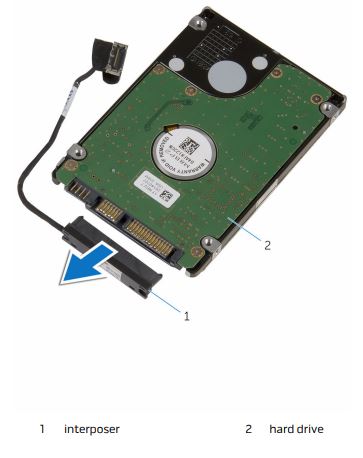
- Disconnect the interposer from the hard drive.
Replacing the hard drive
WARNING:
Before working inside your computer, read the safety information that shipped with your computer and follow the steps in Before working inside your computer. After working inside your computer, follow the instructions in After working inside your computer. For more safety best practices, see the Regulatory Compliance home page at www.dell.com/regulatory_compliance.
CAUTION:
Hard drives are fragile. Exercise care when handling the hard drive.
Procedure
- Connect the interposer to the hard drive.
- Align the screw holes on the hard-drive bracket with the screw holes on the hard-drive assembly.
- Replace the screws that secure the hard-drive bracket to the hard-drive assembly.
- Slide the hard-drive assembly under the tab on the computer base and align the screw holes on the hard-drive assembly with the screw holes on the computer base.
- Replace the screws that secure the hard-drive assembly to the computer base.
- Route the hard-drive cable through the routing guides on the computer base.
- Connect the hard-drive cable to the system board.8
Route the keyboard-backlight cable, keyboard cable, and macro-keys cable through the routing guides on the computer base.
Post-requisites
Replace the base panel.
FAQs About Dell Alienware M15 R7 Gaming Laptop
Q: What are the key features of the Dell Alienware M15 R7 Gaming Laptop?
A: Dell Alienware M15 R7 Gaming Laptop features include an Intel Core i7 processor, NVIDIA GeForce RTX 3070 graphics, 16GB DDR4 RAM, 512GB PCIe M.2 SSD, a 15.6-inch FHD display, and a 6-cell 86Whr battery.
Q: Can I upgrade the RAM on the Dell Alienware M15 R7 Gaming Laptop?
A: Yes, the Dell Alienware M15 R7 Gaming Laptop has two memory slots that can support up to 32GB of DDR4 RAM.
Q: Does the Dell Alienware M15 R7 Gaming Laptop have Thunderbolt 3 ports?
A: Yes, the Dell Alienware M15 R7 Gaming Laptop has two Thunderbolt 3 ports.
Q: What is the battery life of the Dell Alienware M15 R7 Gaming Laptop?
A: The Dell Alienware M15 R7 Gaming Laptop has a 6-cell 86Wh battery that can provide up to 6 hours of battery life.
Q: Does the Dell Alienware M15 R7 Gaming Laptop has a built-in webcam?
A: Yes, the Dell Alienware M15 R7 Gaming Laptop has a built-in HD webcam with dual-array microphones.
Q: Is the Dell Alienware M15 R7 Gaming Laptop VR ready?
A: Yes, the Dell Alienware M15 R7 Gaming Laptop is VR-ready and can support virtual reality gaming.
Q: What is the weight of the Dell Alienware M15 R7 Gaming Laptop?
A: The Dell Alienware M15 R7 Gaming Laptop weighs approximately 2.5kg.
Q: Does the Dell Alienware M15 R7 Gaming Laptop have a backlit keyboard?
A: Yes, the Dell Alienware M15 R7 Gaming Laptop has a backlit keyboard with customizable RGB lighting.
Q: What is the operating system of the Dell Alienware M15 R7 Gaming Laptop?
A: The Dell Alienware M15 R7 Gaming Laptop comes with Windows 10 Home pre-installed.
Q: What is the warranty period for the Dell Alienware M15 R7 Gaming Laptop?
A: The Dell Alienware M15 R7 Gaming Laptop comes with a one-year hardware warranty.
For more manuals by DELL, Visit Manualsdock
[embeddoc url=”https://manualsdock.com/wp-content/uploads/2023/04/Dell-Alienware-M15-R7-Gaming-Laptop-Service-Manual.pdf” download=”all”]

