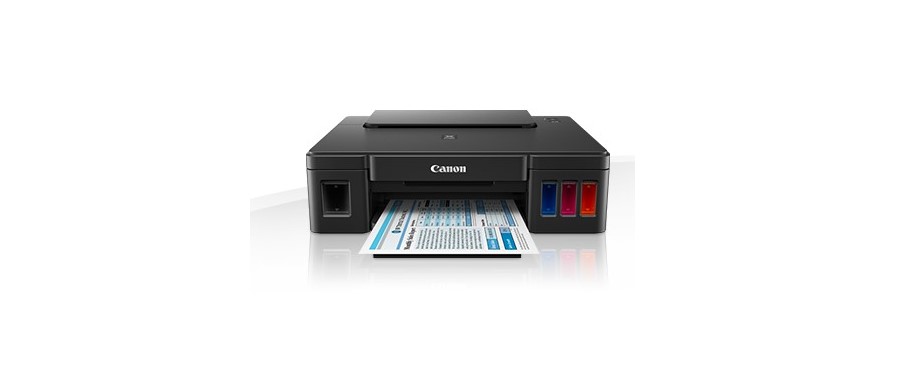
Canon PIXMA MG500 Series Inkjet Printer
ABOUT Canon
Canon is a well-known multinational corporation based in Japan that specializes in the manufacture of imaging and optical products. It was founded in 1937 and has since become one of the leading companies in the imaging industry. Canon produces a wide range of products, including cameras, camcorders, printers, photocopiers, scanners, projectors, and medical equipment.
In the field of cameras, Canon offers a diverse lineup catering to different user needs and skill levels. They produce both digital single-lens reflex (DSLR) cameras and mirrorless cameras. Canon’s DSLR cameras are popular among professional photographers and enthusiasts, known for their robust build quality, excellent image quality, and wide selection of lenses. Canon’s mirrorless cameras, on the other hand, are more compact and lightweight, offering advanced features like electronic viewfinders and fast autofocus systems.
Notes on Site Usage and Cookies
- Five years after a product is discontinued, its setup file is made unavailable. The Online Manual remains available, but as a rule, it is not updated.
- When viewing this site, note the following:
- For best results, enable JavaScript in your browser settings.
- To display web pages tailored to your environment, Canon may send one or more cookies to your computer, smartphone, or tablet. Most browsers automatically accept cookies, but you can modify your browser setting so as not to accept cookies.
- If you have set not to accept cookies, some of the functions of this website may be inoperative.
- If you are using Compatibility Mode in Internet Explorer 8, some pages may not be displayed correctly.
- In this case, turn off Compatibility Mode.
- Reproduction, diversion, or copying of any text, photo, or image published on this site, in whole or in part, is prohibited.
- In principle, Canon shall change or delete the contents of this site without prior notice to customers. In addition, Canon may suspend or stop the disclosure of this site due to unavoidable reasons. Canon shall not be liable for any damage suffered by customers as a result of changes in or deletion of information on this site, or suspension/stoppage of disclosure of this guide.
- Although the contents of this site have been prepared with the utmost care, please contact the service center if you find any incorrect or missing information.
- In principle, the descriptions on this site are based on the product at the time of its initial sale.
- This site does not disclose the manuals of all the products sold by Canon. See the manual supplied with the product when using a product that is not described on this site.
Printing Photos from a Computer
This section describes how to print photos with My Image Garden. This section uses Windows displayed when the Windows 8.1 operating system (hereinafter referred to as Windows 8.1) is used.
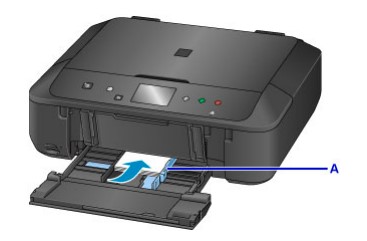
- Open the front cover.
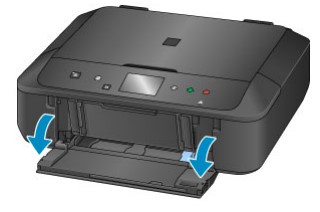
- Pull out the cassette until it stops.
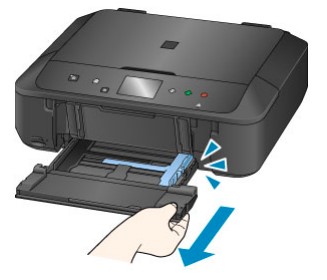
- Slide the paper guides (A) all the way out.
- Load paper vertically WITH THE PRINT SIDE FACING DOWN. Push the paper stack all the way to the back of the cassette.
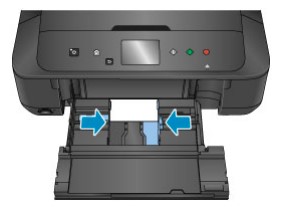
- Align the paper guides with the paper width.
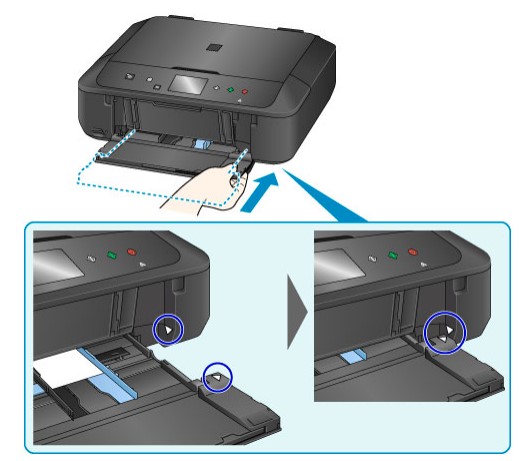
- Push the cassette back until the arrow (Left Arrow) is aligned with the arrow (Right Arrow). After pushing the cassette back, the paper information registration screen is displayed on the touch screen.
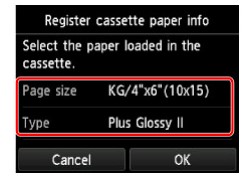
- Select the size and type of the loaded paper in the cassette at Page size and Type, then tap OK. If a message is displayed on the screen, follow the directions in the message to complete registration.
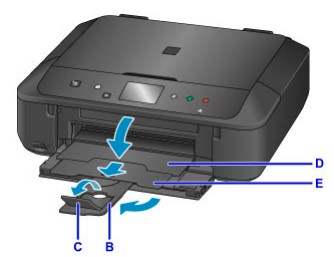
- Extend the paper support (B).
- Open the output tray extension (C).
- Open the paper output tray (D) gently.
- Extend the paper output support (E).
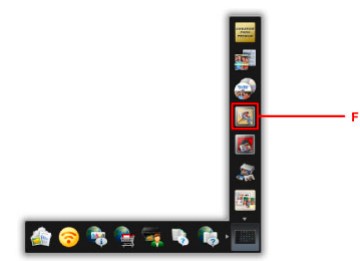
- Click the My Image Garden icon (F) in Quick Menu. The Guide Menu screen is displayed.
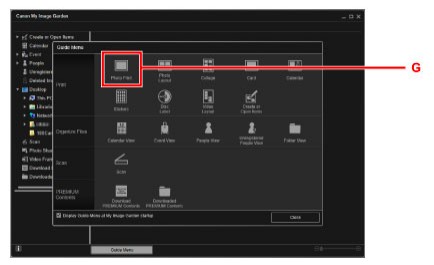
Note The number and types of icons displayed vary depending on your region, the registered printer/scanner, and the installed applications. - Click the Photo Print icon (G).
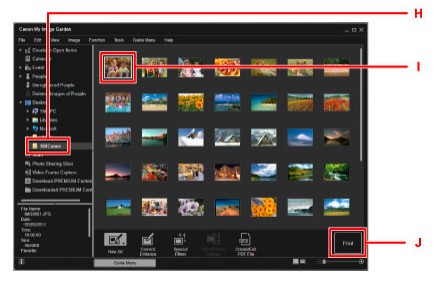
- Click the folder (H) with the photos you want to print.
- Click the photos (I) you want to print.
- For Windows: To select two or more photos at a time, click photos while pressing the Ctrl key.
- For Mac OS: To select two or more photos at a time, click photos while pressing the command key.
- Click Print (J).
- Specify the number of copies, your machine name, media type, etc. (K).
- Click Print (L).
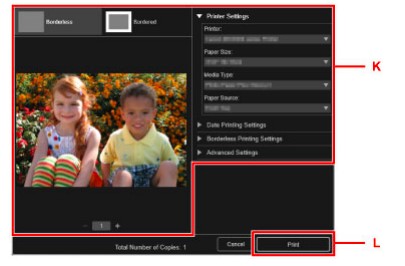
- For Mac OS: Click OK when the confirmation message appears, then click Print.
Note My Image Garden lets you use images on your computer, such as photos taken with a digital camera, in
a number of ways.
- My Image Garden Guide (Windows)
- My Image Garden Guide (Mac OS)
Printer Functions
- Connect Wirelessly with Ease in “Direct Connection”
- Print Photos Easily Using My Image Garden
- Download a Variety of Content Materials
- Print Items with Easy-PhotoPrint+ (Web Application)
- Available Connection Methods
- Easy Scan with the Auto Function
- Scan Originals Larger than the Platen
- Scan Multiple Originals at One Time
- Using PIXMA/MAXIFY Cloud Link
- Print Easily from a Smartphone or Tablet with Canon PRINT Inkjet/SELPHY
- Printing with Windows RT
- Checking Printer Information
Restrictions
When connecting another device while a device (such as a smartphone) is already connected to the printer, connect it using the same connection method as the connected device. If you connect using a different connection method, the connection to the device in use will be disabled. Connection Using a Wired Network cannot be performed on printers that do not support a wired connection.
Connect via wireless router
- You cannot establish a printer with wireless and wired connections at the same time.
- Make sure your device and the wireless router are connected. For details on checking these settings, see the manual supplied with the wireless router or contact its manufacturer.
- As for a device already connected to the printer without using a wireless router, reconnect it via a wireless router.
- Configuration, router functions, setup procedures and security settings of network devices vary depending on the system environment. For details, see the manual for your network device or contact its manufacturer.
- Check if your device supports IEEE802.11n (2.4 GHz), IEEE802.11g or IEEE802.11b.
- If your device is set to the “IEEE802.11n only” mode, WEP or TKIP cannot be used as a security protocol. Change the security protocol for your device to something other than WEP and TKIP or change the setting to something other than “IEEE802.11n only.”
- The connection between your device and the wireless router will be temporarily disabled while the setting is changed. Do not proceed to the next screen of this guide until setup is complete.
- For office use, consult your network administrator.
Note that if you connect to a network with no security protection, your personal information could be disclosed to a third party.
Direct Connection
Important
- If a device is connected to the Internet via a wireless router, and you then connect it to a printer in Direct Connection mode, the existing connection between the device and the wireless router will be disabled. In that case, the connection of the device may switch to a mobile data connection automatically depending on your device. When you connect to the Internet using a mobile data connection, charges may apply depending on your contract.
- When you connect a device and the printer using Direct Connection, the connection information will be saved to Wi-Fi settings. The device may be connected to the printer automatically even after disconnecting it or connecting it to another wireless router.
- You cannot connect to a wireless router and a printer in Direct Connection mode at the same time. If you have a wireless router, it is recommended that you use the wireless router to connect to the printer.
- To prevent automatic connection to the printer in Direct Connection mode, change the connection mode after using the printer, or set it not to connect automatically in the Wi-Fi settings of the device.
- For details on checking or changing wireless router settings, see the wireless router manual or contact its manufacturer.
- If you connect a device and the printer using Direct Connection, the Internet connection may become unavailable depending on your environment. In that case, web services for the printer cannot be used.
- In Direct Connection mode, you can connect up to five devices at the same time. If you try to connect a sixth device while five devices are already connected, an error will appear. If an error appears, disconnect a device that does not use the printer, then configure settings again.
- Devices connected to the printer using Direct Connection cannot communicate with each other.
- Firmware updates for the printer are not available while using Direct Connection.
- When a device has been connected to the printer without using a wireless router and you want to set it up again using the same connection method, disconnect it first. Disable the connection between the device and printer in the Wi-Fi setting screen.
Connection Using a Wired Network
- You cannot establish a printer with wireless and wired connections at the same time.
- When using a router, connect the printer and a device to the LAN side (same network segment).
Notice for Web Service Printing
When Using Web Service
- Canon does not guarantee the continuity and reliability of the web services provided, the availability of site access, or permission to download the materials.
- Canon may at any time update, change, or delete the information provided through the web service, or may suspend or discontinue the service without prior notice. Canon shall not be held responsible for any damages resulting from such actions.
- In no event shall Canon be liable for any damages whatsoever resulting from the use of the web services.
- User registration is necessary before you can use the external link site. When you use the external link site, observe the conditions of use of the site and use the service within your own responsibility.
- All or part of the web service may not be available depending on the country or region you live in.
- Depending on your network environment, some functions on web service are not available. Even if they are available, it may take a while to print or display the contents, or communication may be interrupted while the operation is in progress.
- When you use a web service, your machine’s name, information of your region or country, your selected language, and what kind of service you use (e.g. photo sharing site) is sent to and saved in our server. Canon is unable to identify specific customers using this information.
- Before you transfer ownership or dispose of a printer that supports a color LCD monitor, select Device settings -> Reset setting -> Reset all and delete your login name and password.
- For details, contact a Canon-authorized sales representative in the country or region you live in.
To Those Living in Mainland China
PIXMA/MAXIFY Cloud Link, Easy-PhotoPrint+, and some functions of PIXMA/MAXIFY Printing Solutions, which are included with this machine, are provided by Canon Inc. However, as the server is installed outside of mainland China, some of these services may not be available yet.
Technical Terms
In this section, technical terms used in the manual are explained.
- Access point mode The machine is used as a wireless router to connect external wireless communication devices (e.g. computers, smartphones, or tablets) in an environment where no wireless router is available. You can connect up to 5 devices to the machine using the access point mode (direct connection).
- Ad-hoc Client computer and machine setting where wireless communication occurs on a peer-to-peer basis, i.e., all clients in with the same SSID/network name communicate directly with each other. No wireless router is required. This machine does not support ad-hoc communication.
- Admin Password Administrator password in IJ Network Tool to restrict access to network users. It must be entered to
access the printer and change printer settings. - AES An encryption method. It is optional for WPA/WPA2. The strong cryptographic algorithm adopted within U.S. government organizations for information processing.
- Authentication Method The method that a wireless router uses to authenticate a printer through a wireless LAN. The methods are agreeable to each other.
- Channel Frequency channel for wireless communication. In the infrastructure mode, the channel is automatically adjusted to match that set to the wireless router. This machine supports channels 1 to (Channels 12 and 13 are not supported depending on the country or region of purchase.) Note that the number of channels that can be used for your wireless LAN varies depending on the region or country.
- Default Gateway A relay device to connect to another network such as a router or a computer.
- Direct connection (Access point mode) The machine is used as a wireless router to connect external wireless communication devices (e.g. computers, smartphones, or tablets) in an environment where no wireless router is available. You can connect up to 5 devices to the machine using the direct connection (access point mode).
- DHCP server functionality The router assigns an IP address automatically whenever the printer or the personal computer on a network starts up.
- DNS server A server that converts device names into IP addresses. When specifying IP addresses manually, specify the addresses of both a primary and a secondary server.
- Signal Strength The strength of the signal received by the printer from the wireless router is indicated with a value from 0 to 100%.
- SSID Unique label for wireless LAN. It is often represented as a network name or a wireless router name. SSID distinguishes one wireless LAN from another to prevent interference. The printer and all clients on a wireless LAN must use the same SSID in order to communicate with each other. The SSID can be up to 32 characters long and is made up of alphanumeric characters. The SSID may also be referred to by its network name.
- Stealth In stealth mode, a wireless router hides itself by not broadcasting its SSID. The client must specify the SSID set to the wireless router to detect it.
- Subnet Mask IP address has two components, the network address, and the host address. Subnet Mask is used to calculate the Subnet Mask address from the IP address. A Subnet Mask is usually assigned by a wireless router or a DHCP server of the router automatically.
- WEP/WEP Key An encryption method employed by IEEE 802.11. A shared security key is used to encrypt and decrypt data sent over wireless networks. This printer supports a key length of 64 bits or 128 bits, the key format of ASCII code or Hexadecimal, and a key number of 1 to 4.
- Wi-Fi International association that certifies interoperability of wireless LAN products based on the IEEE 802.11 specification. This machine is a Wi-Fi-authorized product.
- Wireless LAN A network that, instead of being connected by physical wires, is connected by wireless technology, such as Wi-Fi.
- Wireless Router A wireless transceiver or base station that receives information from wireless clients/the machine and rebroadcasts it. Required in an infrastructure network.
Safety Precautions
Choosing a location
- Do not install the machine in a location that is unstable or subject to excessive vibration.
- Do not install the machine in locations that are very humid or dusty, in direct sunlight, outdoors, or close to a heating source. To avoid the risk of fire or electric shocks, use the machine under the operating environment specified in the Specification.
- Do not place the machine on a thick rug or carpet.
- Do not place the machine with its back attached to the wall.
Power supply
- Ensure that the area around the power outlet is kept clear at all times so you can easily unplug the power cord if necessary.
- Never remove the plug by pulling on the cord. Pulling the cord may damage the power cord, leading to possible fire or electrical shock.
- Do not use an extension lead/cord.
Working around the machine
- Never put your hands or fingers in the machine while it is printing.
- When moving the machine, carry the machine at both ends. In case the machine weighs more than 14 kg, it is recommended to have two people lifting the machine. The accidental dropping of the machine causes injury. For the machine’s weight, refer to the Specification.
- Do not place any object on the machine. Especially do not place metal objects (paper clips, staples, etc.) or containers of flammable solvents (alcohol, thinners, etc.) on top of the machine.
- Do not transport or use the machine on a slant, vertically or upside-down, as the ink may leak and damage the machine.
Working around the machine (For the multifunction printer)
- When loading a thick book on the Platen Glass, do not press hard on the Document Cover. The Platen Glass may break and cause injury.
Print Heads/ink tanks and FINE Cartridges
- Keep ink tanks out of the reach of children. In case of ink* is accidentally licked or swallowed, rinse out your mouth or give one or two glasses of water to drink. If irritation or discomfort occurs, obtain medical advice immediately.
- Clear Ink contains nitrate salts (For models containing Clear Ink).
- In case ink gets in contact with the eyes, rinse with water immediately. In case ink gets in contact with the skin, wash with soap and water immediately. If irritation to the eyes or skin persists, obtain medical advice immediately.
- Never touch the electrical contacts on a Print Head or FINE Cartridges after printing. The metal parts may be very hot and could cause burns.
- Do not throw ink tanks and FINE Cartridges into the fire.
- Do not attempt to disassemble or modify the Print Head, ink tanks, and FINE Cartridges.
Federal Communications Commission
This device complies with Part 15 of the FCC Rules.
Operation is subject to the following two conditions:
- This device may not cause harmful interference, and
- This device must accept any interference received, including interference that may cause undesired operation.
Note: This equipment has been tested and found to comply with the limits for a Class B digital device, pursuant to Part 15 of the FCC Rules. These limits are designed to provide reasonable protection against harmful interference in a residential installation. This equipment generates, uses, and can radiate radio frequency energy and, if not installed and used in accordance with the instructions, may cause harmful interference to radio communications.
However, there is no guarantee that interference will not occur in a particular installation. If this equipment does cause harmful interference to radio or television reception, which can be determined by turning the equipment off and on, the user is encouraged to try to correct the interference by one or more of the following measures:
- Reorient or relocate the receiving antenna.
- Increase the separation between the equipment and the receiver.
- Connect the equipment to an outlet on a circuit different from that to which the receiver is connected.
- Consult the dealer or an experienced radio/TV technician for help.
The use of a shielded cable is required to comply with Class B limits in Subpart B of Part 15 of the FCC Rules. Do not make any changes or modifications to the equipment unless otherwise specified in the manual. If such changes or modifications should be made, you could be required to stop the operation of the equipment.
FAQS Canon PIXMA MG500 Series Inkjet Printer
What is the Canon PIXMA MG500 series inkjet printer?
The Canon PIXMA MG500 series inkjet printer is a line of all-in-one printers designed for home and small office use. It offers printing, scanning, and copying functionalities in a compact and user-friendly design.
What ink cartridges does the Canon PIXMA MG500 series inkjet printer use?
The Canon PIXMA MG500 series inkjet printer usually utilizes separate ink cartridges for different colors. The specific cartridge models may vary depending on the printer model, but commonly used cartridges for this series include Canon PG-245 (black) and Canon CL-246 (color) cartridges.
Can I use third-party ink cartridges with the Canon PIXMA MG500 series inkjet printer?
While it is possible to use third-party ink cartridges with the Canon PIXMA MG500 series printer, it is generally recommended to use genuine Canon ink cartridges. Third-party cartridges may not provide the same print quality or reliability as genuine Canon cartridges, and they can sometimes cause compatibility issues or damage the printer.
What are the supported paper sizes for printing with the Canon PIXMA MG500 series inkjet printer?
The supported paper sizes may vary depending on the printer model, but the Canon PIXMA MG500 series inkjet printers typically support a range of standard paper sizes, including letter (8.5″ x 11″), legal (8.5″ x 14″), A4, 4″ x 6″ photo paper, and 5″ x 7″ photo paper. Some models may also support larger paper sizes like A3 or A3+.
Is the Canon PIXMA MG500 series inkjet printer compatible with mobile printing?
Yes, the Canon PIXMA MG500 series inkjet printer is compatible with mobile printing. You can connect your smartphone or tablet to the printer wirelessly and print documents or photos directly from your mobile device using various mobile printing apps or services. The printer may support popular mobile printing technologies such as AirPrint (for iOS devices) and Mopria Print Service (for Android devices).
Does the Canon PIXMA MG500 series inkjet printer support borderless printing?
Yes, many models in the Canon PIXMA MG500 series inkjet printer support borderless printing. Borderless printing allows you to print photos or documents without any white borders, providing a seamless and professional look. The supported borderless printing sizes may vary depending on the specific printer model.
Can the Canon PIXMA MG500 series inkjet printer be used for photo printing?
Yes, the Canon PIXMA MG500 series inkjet printer is suitable for photo printing. It is capable of delivering high-quality prints with vibrant colors and fine details, making it suitable for printing photographs at home. Some models in the series may even offer additional features specifically designed for photo printing, such as support for different photo paper sizes and specialized photo printing modes.
Are there any additional features or software that come with the Canon PIXMA MG500 series inkjet printer?
Yes, the Canon PIXMA MG500 series inkjet printer often comes with additional features and software to enhance the printing experience. This may include software for organizing and editing photos, scanning utilities, and other applications designed to optimize printing and scanning workflows. The specific software included may vary depending on the printer model.
For more manuals for Canon, Visit Manualsdock

