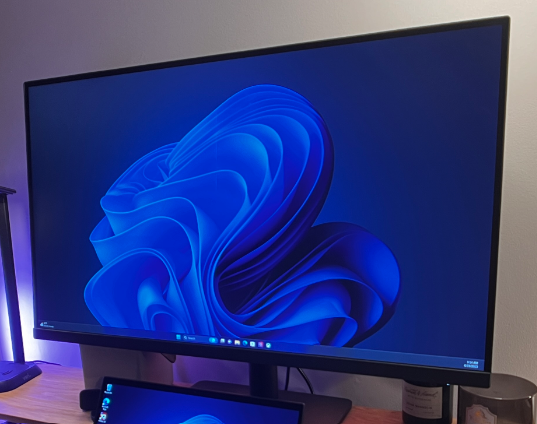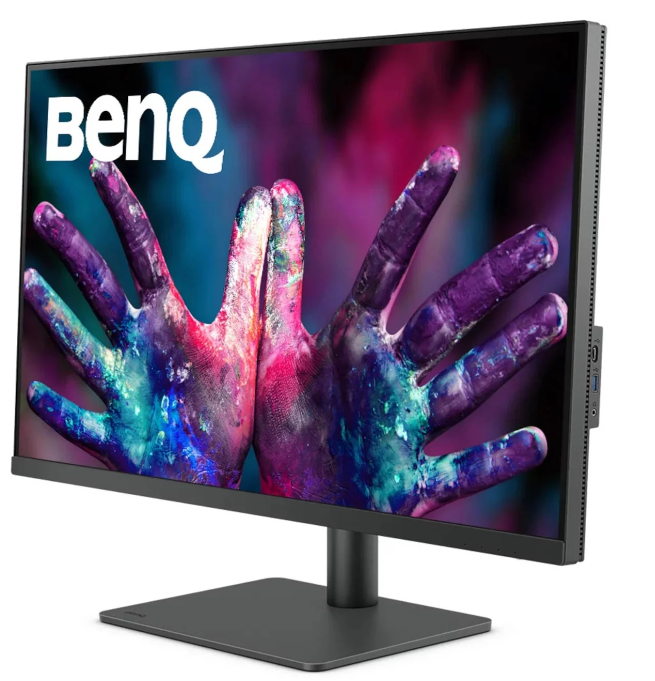
BenQ PD3205U 32-inch 4K UHD LCD Monitor
Product support
This document aims to provide the most updated and accurate information to customers, and thus all contents may be modified from time to time without prior notice. Please visit the website for the latest version of this document and other product information. Available files vary by model.
- Make sure your computer is connected to the Internet.
- Visit the local website from Support.BenQ.com. The website layout and content may vary by region/country.
- User manual and related document
- Drivers and applications
- (EU only) Dismantled information: Available on the user manual download page. This document is provided based on Regulation (EU) 2019/2021 to repair or recycle your product. Always contact the local customer service for servicing within the warrant period. If you wish to repair an out-of-warranty product, you are recommended to go to qualified service personnel and obtain repair parts from BenQ to ensure compatibility. Do not disassemble the product unless you are aware of the consequences. If you cannot find the dismantled information on your product, contact the local customer service for assistance.
Safety precautions
Power safety
- The AC plug isolates this equipment from the AC supply.
- The power supply cord serves as a power disconnect device for pluggable equipment. The socket outlet should be installed near the equipment and be easily accessible.
- This product should be operated from the type of power indicated on the marked label. If you are not sure of the type of power available, consult your dealer or local power company.
- The Class I pluggable equipment Type A must be connected to protective earth.
- An approved power cord greater or equal to H03VV-F or H05VV-F, 2G or 3G, 0.75mm2 must be used.
- Use only the power cord provided by BenQ. Never use a power cord that appears to be damaged or frayed.
- To avoid possible damage to the monitor, do not use it in a region where the power supply is unstable.
- Ensure that the power cord is connected to a grounded power outlet before turning on the monitor.
- To avoid possible danger, observe the total electric load when using the monitor with a (multi-outlet) extension cord.
- Always turn off the monitor before unplugging the power cord.
For Germany only
- (If the weight of the product is less than or equal to 3 kg) An approved power cord greater or equal to H03VV-F, 3G, 0.75mm2 must be used.
- (If the weight of the product is more than 3 kg) An approved power cord greater or equal to H05VV-F or H05RR-F, 3G, 0.75mm2 must be used.
- (If a remote control is provided) RISK OF EXPLOSION IF BATTERY IS REPLACED BY AN INCORRECT TYPE. DISPOSE OF USED BATTERIES ACCORDING TO THE INSTRUCTIONS.
For models with an adapter
- Use only the power adapter supplied with your LCD Monitor. Use of another type of power adapter will result in malfunction and/or danger.
- Allow adequate ventilation around the adapter when using it to operate the device or charge the battery. Do not cover the power adapter with paper or other objects that will reduce cooling. Do not use the power adapter while it is inside a carrying case.
- Connect the power adapter to a proper power source.
- Do not attempt to service the power adapter. There are no service parts inside. Replace the unit if it is damaged or exposed to excess moisture.
Installation
- Do not use your monitor under any of the following environmental conditions:
- Extremely high or low temperatures, or in direct sunlight
- Dusty places
- Highly humid, exposed to rain, or close to water
- Exposed to vibrations or impacts in places such as cars, buses, trains, and other rail vehicles
- Near heating appliances such as radiators, heaters, fuel stoves, and other heat-generating items (including audio amplifiers)
- An enclosed place (such as a closet or bookcase) without appropriate ventilation
- An uneven or sloping surface
- Exposed to chemical substances or smoke
- Carry the monitor carefully.
- Do not place heavy loads on the monitor to avoid possible personal injury or damage
to the monitor. - Ensure that children do not hang or climb onto the monitor.
- Keep all packing bags out of reach of children.
Operation
- To protect your eyesight, please refer to the user manual to set the optimal screen resolution and viewing distance.
- To reduce eye fatigue, take a break regularly while using the monitor.
- Avoid taking either one of the following actions for a long time. Otherwise, burn marks may occur.
- Play images that cannot occupy the screen entirely.
- Place a still image on the screen.
- To avoid possible damage to the monitor, do not touch the monitor panel with a fingertip, pen, or any other sharp objects.
- Excessively frequent plugging and unplugging of video connectors may cause damage to the monitor.
- This monitor is designed mainly for personal use. If you want to use the monitor in a public place or a harsh environment, contact your nearest BenQ service center for assistance.
- To avoid possible electric shock, do not dissemble or repair the monitor.
- If a bad smell or an abnormal sound appears to come from the monitor, contact your nearest BenQ service center for assistance immediately.
Care and cleaning
- Do not place the monitor face down on the floor or a desk surface directly. Otherwise, scratches on the panel surface may occur.
- The equipment is to be secured to the building structure before operation.
- (For models that support wall or ceiling mounting)
- Install your monitor and monitor mounting kit on a wall with a flat surface.
- Ensure that the wall material and the standard wall mount bracket (purchased separately) are stable enough to support the weight of the monitor.
- Turn off the monitor and the power before disconnecting the cables from the LCD monitor.
- Always unplug the product from the power outlet before cleaning. Clean the LCD monitor surface with a lint-free, non-abrasive cloth. Avoid using any liquid, aerosol, or glass cleaners.
- Slots and openings on the back or top of the cabinet are for ventilation. They must not be blocked or covered. Your monitor should never be placed near or over a radiator or heat source, or in a built-in installation unless proper ventilation is provided.
- Do not place heavy loads on the monitor to avoid possible personal injury or damage to the monitor.
- Consider keeping the box and packaging in storage for use in the future when you may need to transport the monitor.
- refer to the product label for information on power rating, manufacture date, and identification markings.
Servicing
- Do not attempt to service this product yourself, as opening or removing covers may expose you to dangerous voltages or other risks. If any of the above-mentioned misuse or other accident such as dropping or mishandling occurs, contact qualified service personnel for servicing.
- Contact your place of purchase or visit the local website from Support.BenQ.com for more support.
Typographic
Getting started
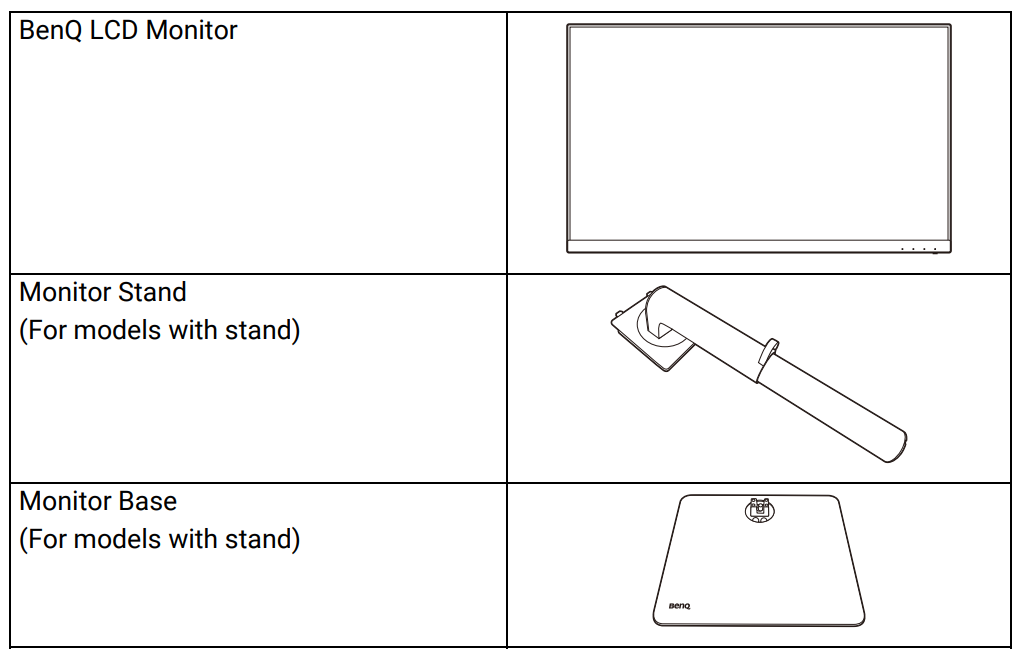
When unpacking please check you have the following items. If any are missing or damaged, please contact the place of purchase for a replacement.
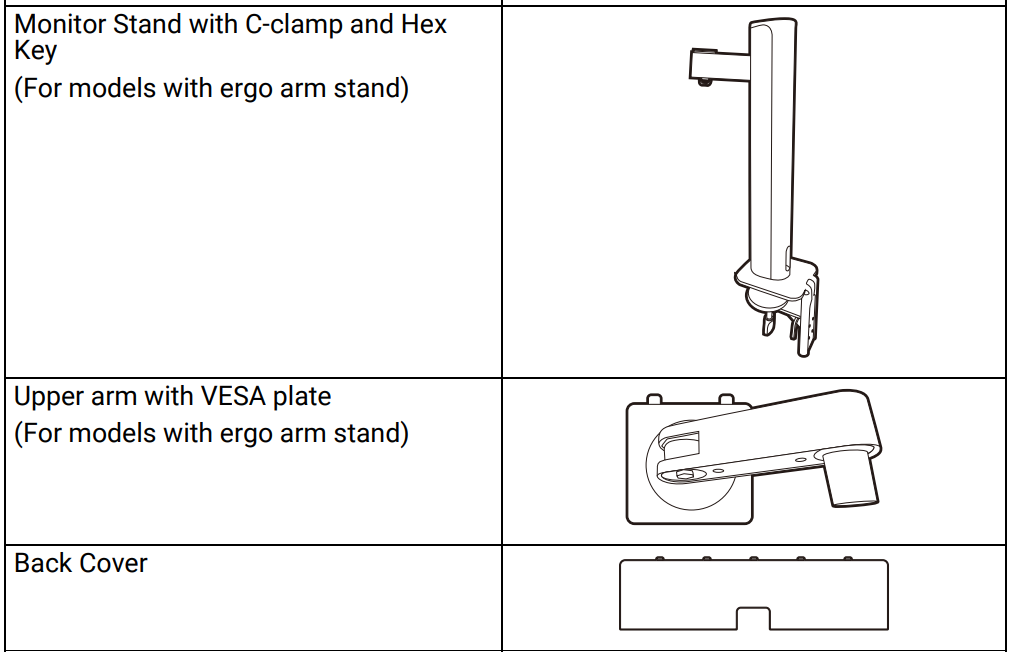

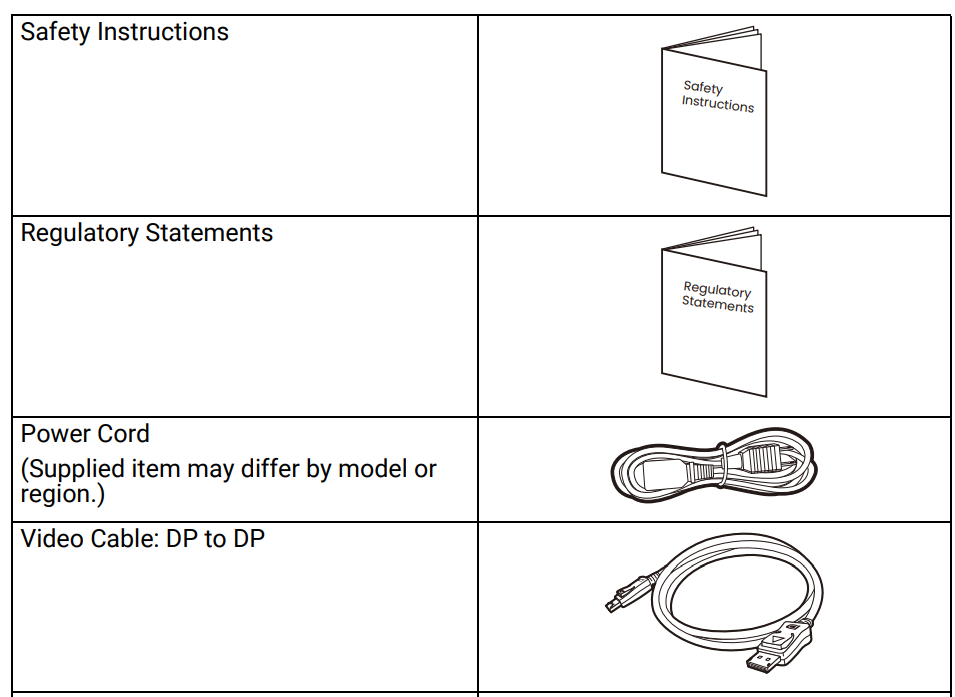
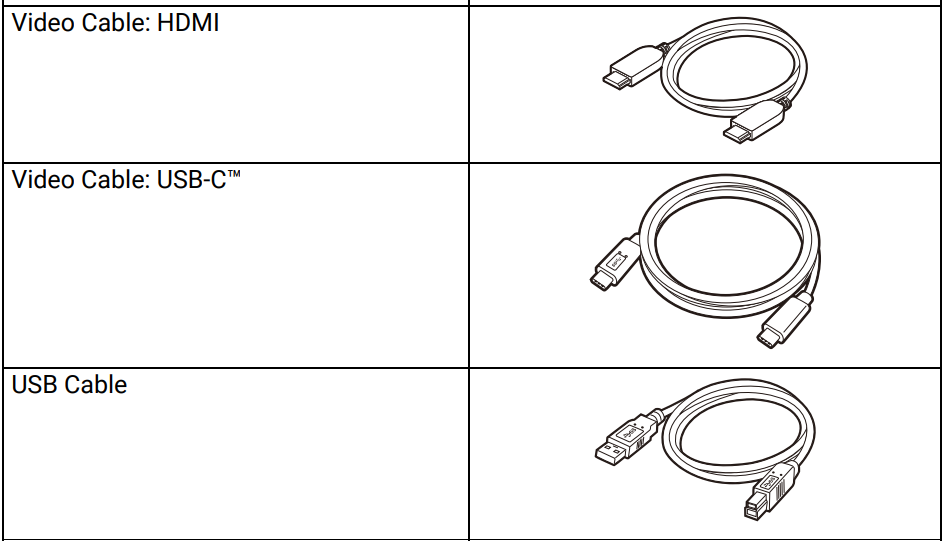

Getting to know your monitor
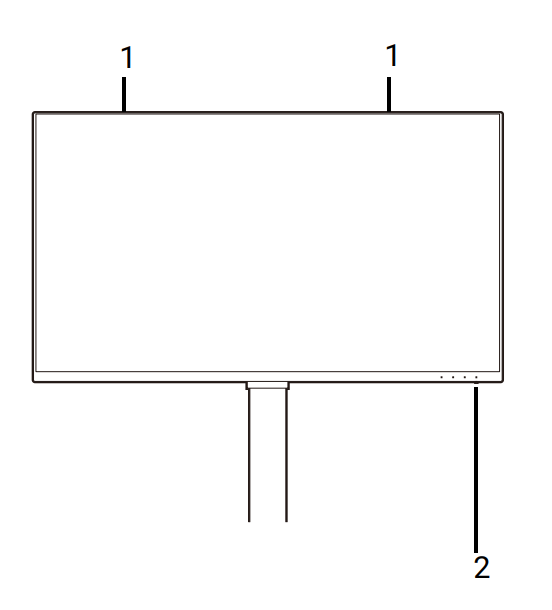
- Speakers
- Power LED indicator
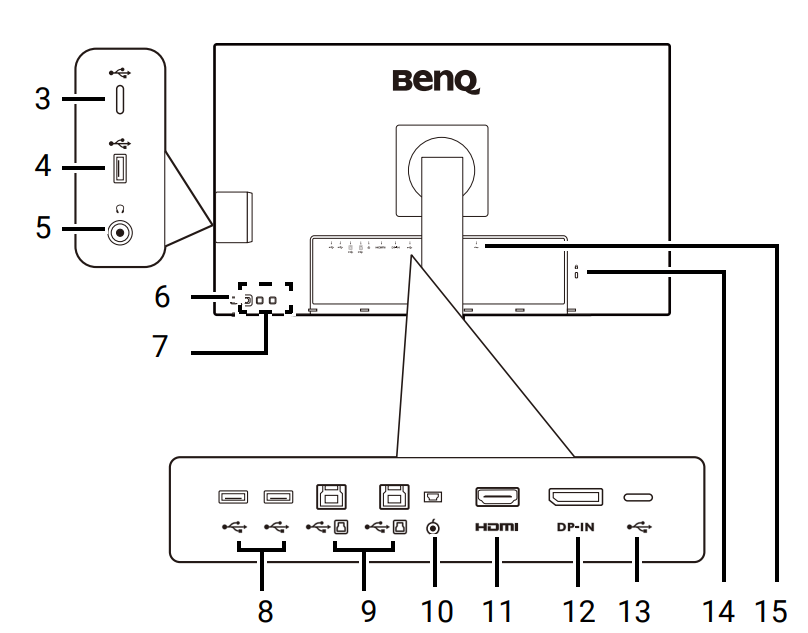 USB-C™ port (for data transfer only)
- USB 3.2 Gen 1 ports (downstream; connecting to the USB devices)
- Headphone jack
- Power button
- Control keys
- USB 3.2 Gen 1 ports (downstream; connecting to the USB devices)
- USB 3.2 Gen 1 ports (upstream; connecting to the PC)
- Hotkey Puck G2 socket
- HDMI socket
- DisplayPort socket
- USB-C™ port (for video, data transfer, and power delivery)
- Kensington lock slot
- AC power input jack
Connections
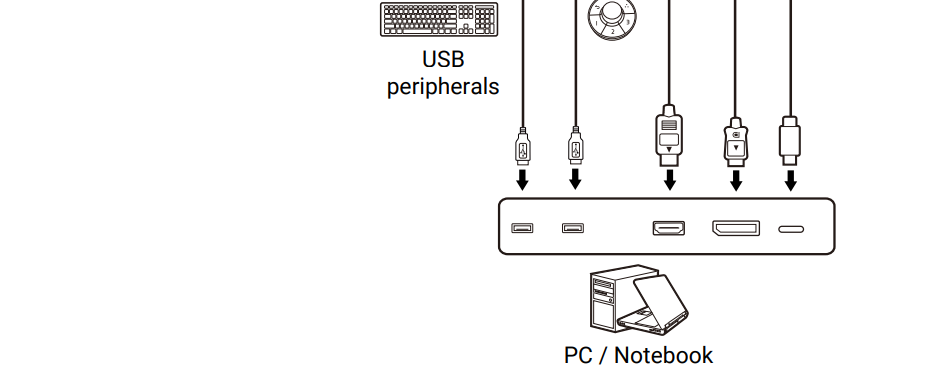
The following connection illustrations are for your reference only. For cables that are not supplied with your product, you can purchase them separately. For detailed connection methods.

The power delivery of USB-C™ ports on your monitor
With the power delivery function, your monitor helps supply power to the connected USB-C™ devices. Available power varies by port. Make sure the devices are connected to the appropriate ports to be activated properly with sufficient power
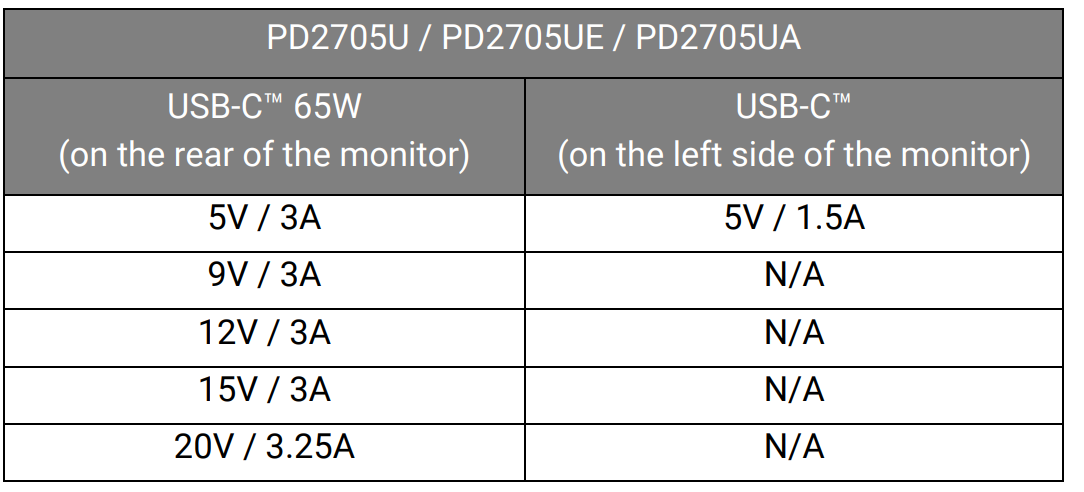
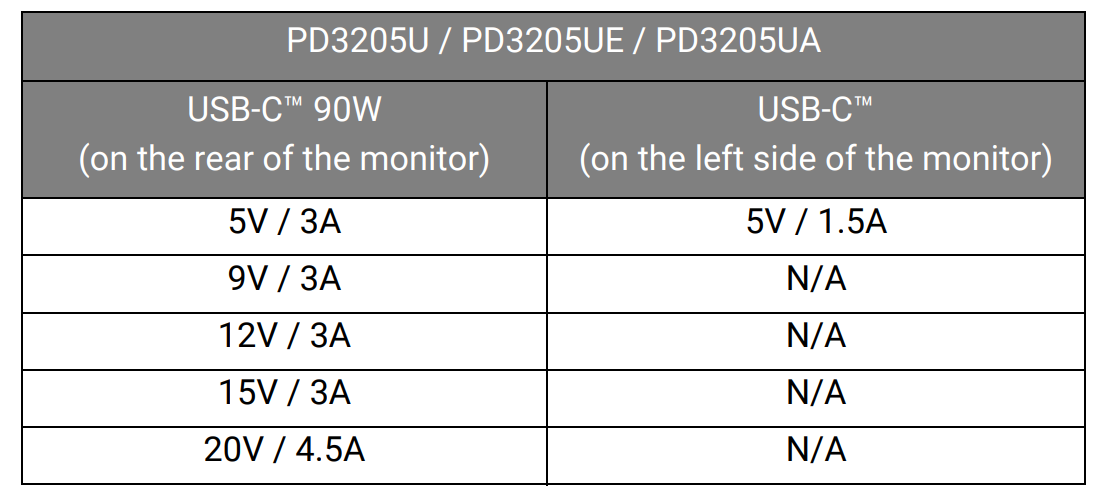
- A connected device needs to be equipped with a USB-C™ connector that supports the charging function via USB power delivery.
- The connected device can be charged via USB-C™ port even when the monitor is in ppower-savingmode.(*)
- The USB power delivery is up to 65W (PD2705U) / 90W (PD3205U). If the connected device requires more than the delivered power for operation or for boot-up (when the battery is drained), use the original power adapter that came with the device.
- The information is based on the standard testing criteria and is provided for reference.
The compatibility is not guaranteed as the user environments vary. If a separately purchased USB-C™ cable is used, make sure the cable is certified by USB-IF and is full-featured, with power delivery and video/audio / data transfer functions.
How to assemble your monitor hardware (for models with stand)
Attach the monitor base
Please be careful to prevent damage to the monitor. Placing the screen surface on an object like a stapler or a mouse will crack the glass or damage the LCD substrate voiding your warranty. Sliding or scraping the monitor around on your desk will scratch or damage the monitor’s surround and controls. Open the box, so you can take out the box contents easily.
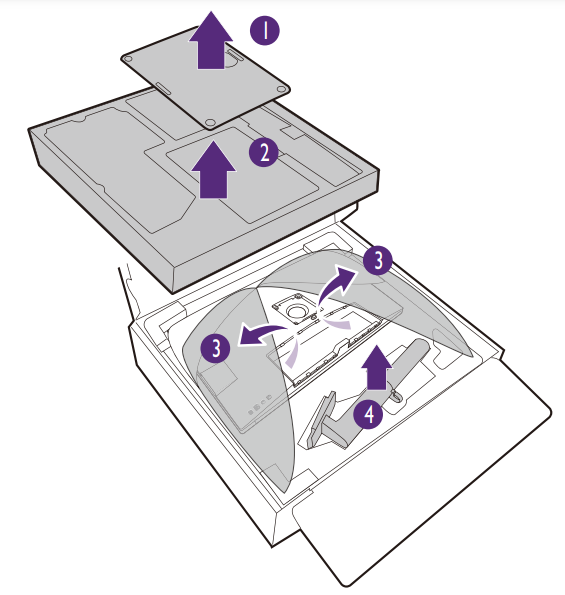
Take out the monitor base and stand. You need to remove the cushion and the foam wrap that protects the back of the monitor to access the stand arm.
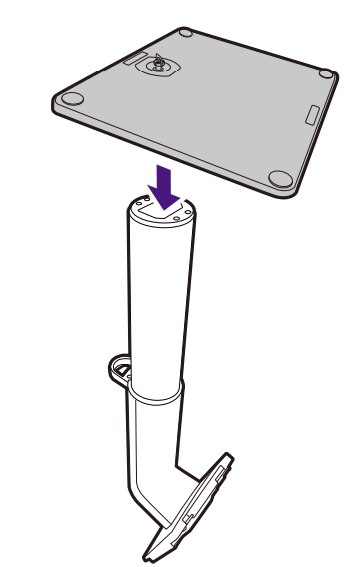
Attach the monitor stand to the monitor base as illustrated.
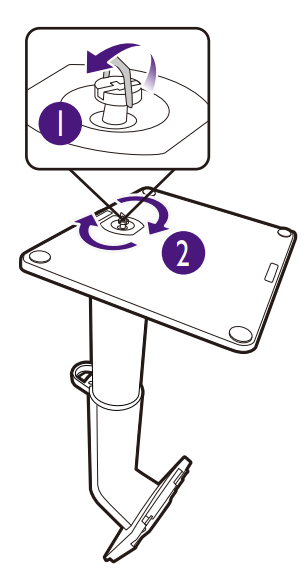
Raise the thumbscrew lid and tighten the thumbscrew as illustrated. Then push the lid back.
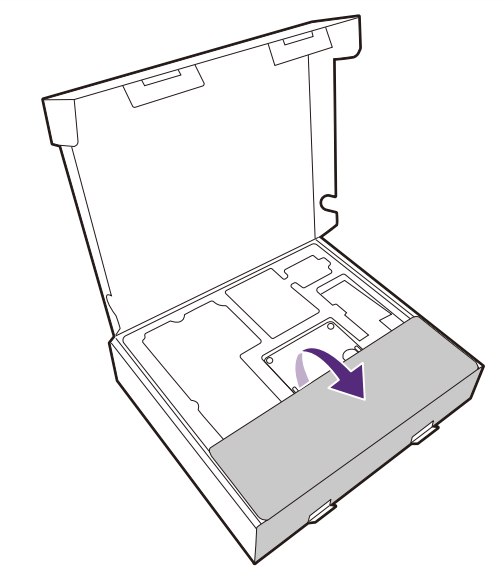
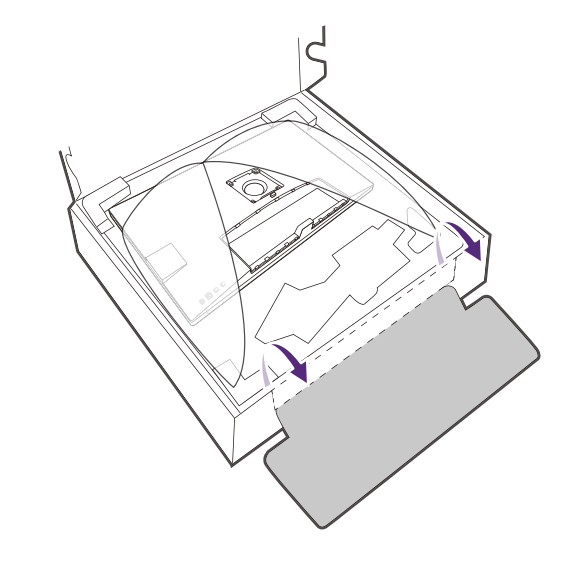
(PD2705U only) Unfold the front side of the box as illustrated to leave some room for stand installation.
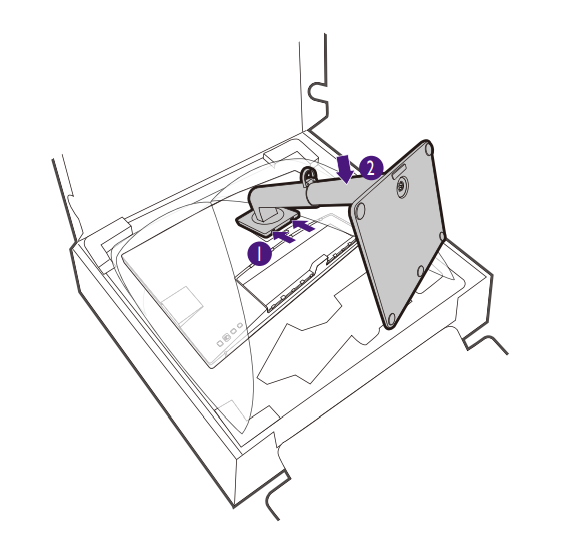
Orient and align the stand arm with the monitor, then push them together until they click and lock into place. Gently attempt to pull them back apart to check that they have properly engaged.
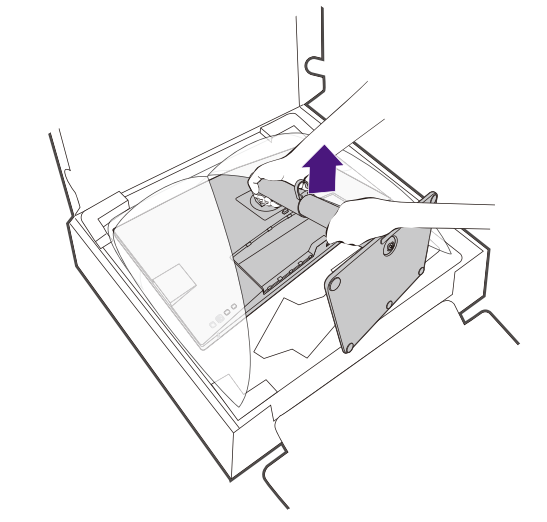
Carefully lift the monitor, turn it over, and place it upright on its stand on a flat even surface.
You might want to adjust the monitor stand height. See Adjusting the monitor height on page 38 for more information.
- You should position the monitor and angle the screen to minimize unwanted reflections from other light sources.
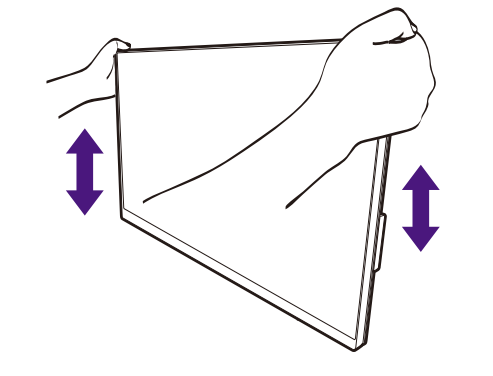
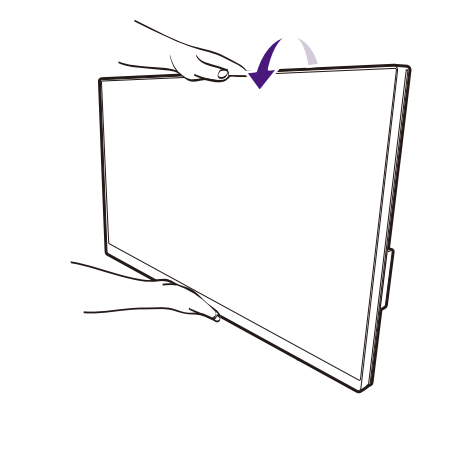
- Your monitor is an edge-to-edge monitor and should be handled with care. Avoid finder pressure on the screen surface. Adjust the screen angle by placing your hands on the top and the bottom of the monitor as illustrated. Excessive force on the display is prohibited
Connect the PC video cable
Establish a video cable connection.
- Connect the plug of the HDMI cable to the HDMI port on the monitor.
- Connect the plug of the DP cable to the monitor video socket.
- Connect the plug of the supplied USB-C™ cable to the USB-C™ port on the monitor.
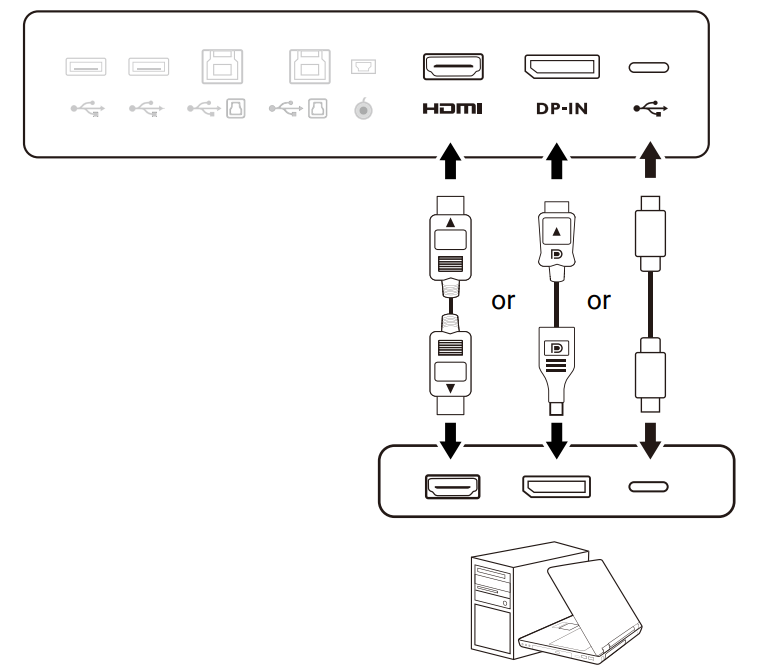
- Connect the other end of the video cable to an appropriate port of a digital output source (e.g., a computer)..
- Tighten all finger screws to prevent the plugs from accidentally falling out during use.
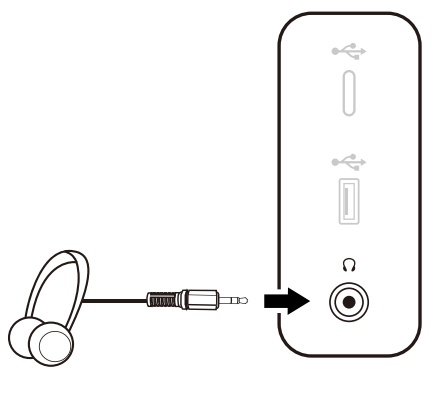
Connect the headphone
You may connect the headphones to the headphone jack.
Connect the USB devices
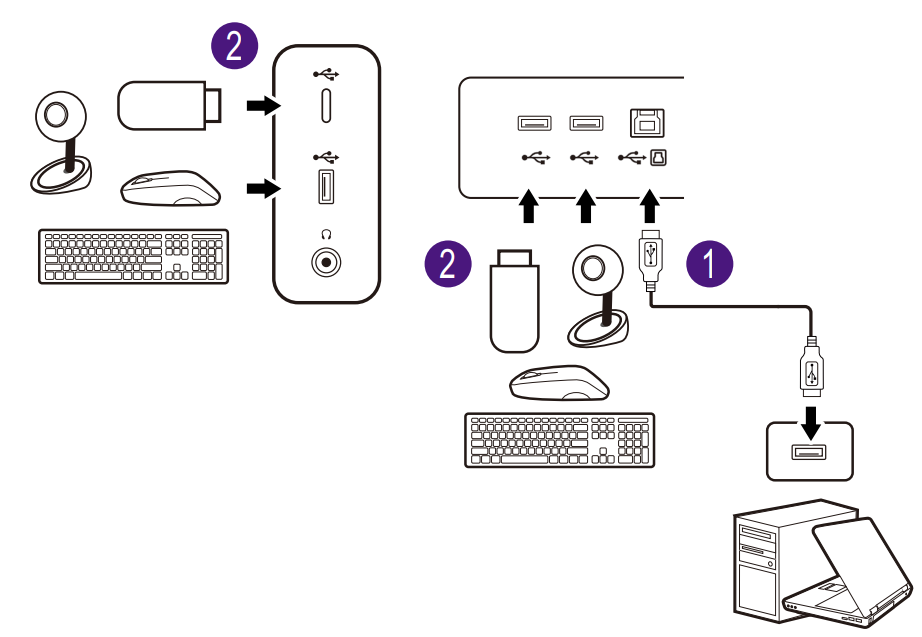
- Connect the USB cable between the PC and the monitor (via the upstream USB port). This upstream USB port transmits data between the PC and the USB devices connected to the monitor. Note that this step is not required if the video source is from the USB-C™ inputs.
- Connect USB devices via other USB ports (downstream) on the monitor. These downstream USB ports transmit data between the connected USB devices and the upstream port.
- If you tend to use a KVM switch, see Working with two or more video sources with one set of keyboard and mouse (KVM Switch) on page 50 for appropriate connections and more information.
Connect the Hotkey Puck G2 to the monitor
Connect the Hotkey Puck G2 to the mini USB port (exclusively or Hotkey Puck G2 connection) on the rear of the monitor. For more information on Hotkey.
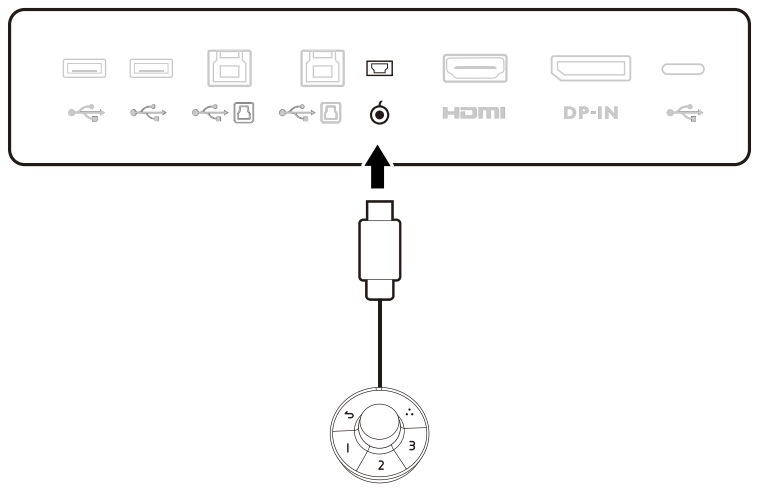
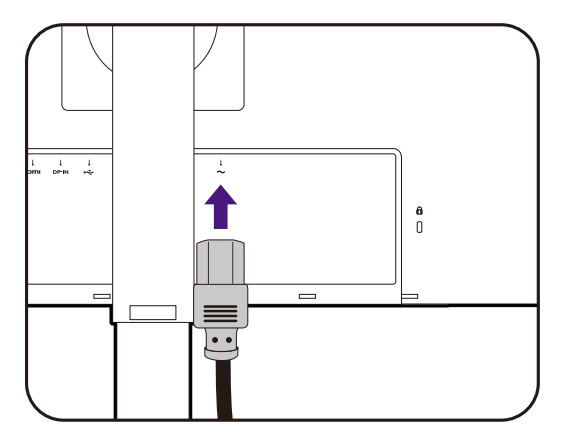
Connect the power cable to the monitor
Plug one end of the power cord into the socket labelled on the rear of the monitor. Do not connect the other end to a power outlet just yet.
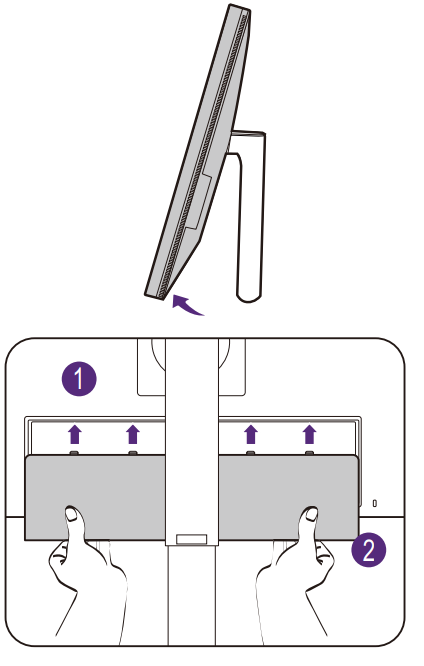
Install the back cover
Gently lift the display and extend it to the maximum extended position. Then tilt the monitor to install/remove the I/O cover easily. Align the back cover with the holes on the back of the monitor, and press both sides and the upper part of the cover against the holes to lock it into place as illustrated. Push the lower part of the back cover toward the monitor to secure it.
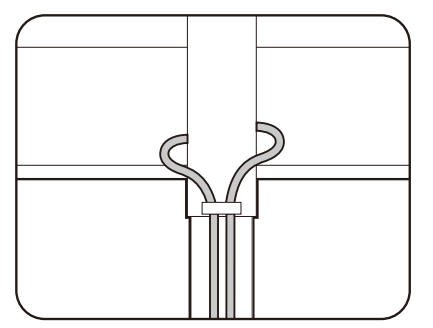
Organize the cables
Route the cables via the cable clip.
Connect to and turn on the power
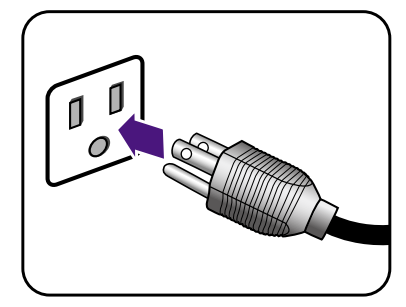
Plug the other end of the power cord into a power outlet and turn it on.
Turn on the monitor by pressing the power button on the monitor. Turn on the computer, too.

Troubleshooting
Imaging
The image is blurred
Download the Resolution file from the website (see Product support on page 3). Refer to “Adjusting the Screen Resolution”. Then select the correct resolution, and refresh rate and make adjustments based on these instructions.
Does the blurring only occur at resolutions lower than the native (maximum) resolution?
Download the Resolution file from the website (see Product support on page 3). Refer to “Adjusting the Screen Resolution”. Select the native resolution.
Pixel errors can be seen
One of several pixels is permanently black, one or more pixels are permanently white, and one or more pixels are permanently red, green, blue, or another color.
The image has a faulty coloration
It has a yellow, blue, or pink appearance. Go to Color, Advanced, and Reset Color, and then choose YES to reset the color settings to the factory defaults. If the image is still not correct and the OSD also has faulty coloration, this means one of the three primary colors is missing in the signal input. Now check the signal cable connectors. If any pin is bent or broken off, please contact your dealer to get the necessary support.
The image is distorted, flashes or flickers
Download the Resolution file from the website (see Product support on page 3). Refer to “Adjusting the Screen Resolution”. Then select the correct resolution, and refresh rate and make adjustments based on these instructions.
The image is displaced in one direction
Download the Resolution file from the website (see Product support on page 3). Refer to “Adjusting the Screen Resolution”. Then select the correct resolution, and refresh rate and make adjustments based on these instructions.
Power LED indicator
The LED indicator is white or orange
- If the LED lights up in solid white, the monitor is powered on.
- If the LED is illuminated in white and there is a message Out of Range on the screen, this means you are using a display mode that this monitor does not support, please change the setting to one of the supported modes. Download the Resolution file from the website (see Product support on page 3). Refer to “Adjusting the Screen Resolution”.Then select the correct resolution, and refresh rate and make adjustments based on these instructions.
- If the LED is illuminated in orange, the power management mode is active. Press any button on the computer keyboard or move the mouse. If that does not help, check the signal cable connectors. If any pin is bent or broken off, please contact your dealer to get the necessary support.
- If the LED is off, check the power supply mains socket, the external power supply, and the mains switch.
OSD controls
The OSD controls are inaccessible
To unlock the OSD controls when it is preset to be locked, press and hold any key for 10 seconds.
OSD messages
A message Out of Range on the screen during the computer boot-up process
If there is a message Out of Range on the screen during the computer boot-up process, this means computer compatibility is caused by the operating system or graphics card. The system will adjust the refresh rate automatically. Just wait until the operating system is launched.
Audio
No sound can be heard from the connected external speakers
- Remove your headphones (if the headphone is connected to the monitor).
- Check whether the headphone jack is properly connected.
- If the external speakers are USB-powered, check whether the USB connection is OK.
- Increase the volume (volume may be muted or too low) on the external speakers
Need more help?
If your problems remain after checking this manual, please contact your place of purchase or visit the local website from Support.BenQ.com for more support and local customer service.
For more Manuals by BENQ, visit MANUALSDOCK
FAQS About BenQ PD3205U 32-inch 4K UHD LCD Monitor
What is the screen size of the BenQ PD3205U monitor?
The BenQ PD3205U features a 32-inch screen size, providing ample viewing space for various tasks.
What is the resolution of the BenQ PD3205U monitor?
This monitor boasts a 4K UHD resolution of 3840 x 2160 pixels, delivering crisp and detailed visuals.
Does the BenQ PD3205U support HDR?
Yes, the BenQ PD3205U supports High Dynamic Range (HDR), enhancing contrast and color accuracy for a more immersive viewing experience.
What kind of panel technology does the BenQ PD3205U use?
The BenQ PD3205U utilizes an LCD panel with IPS (In-Plane Switching) technology, offering wide viewing angles and accurate color reproduction.
Does the BenQ PD3205U feature any ergonomic adjustments?
Yes, the monitor is equipped with adjustable stand features, including tilt, swivel, pivot, and height adjustments, allowing users to customize their viewing experience for comfort.
What ports are available on the BenQ PD3205U?
The monitor typically includes a variety of ports such as HDMI, DisplayPort, USB-C, and USB-A ports, enabling connectivity with various devices.
Is the BenQ PD3205U suitable for gaming?
While primarily designed for professional use, the monitor’s 4K resolution and fast response time make it suitable for gaming, especially for casual gamers who prioritize visual quality.
Does the BenQ PD3205U feature any blue light reduction technology?
Yes, BenQ incorporates Eye Care technology into its monitors, including blue light reduction and flicker-free technology to reduce eye strain during extended viewing periods.
Does the BenQ PD3205U support color calibration?
Yes, the BenQ PD3205U is factory calibrated for color accuracy, but it also supports hardware calibration with compatible devices for precise color reproduction.
Is the BenQ PD3205U VESA mount compatible?
Yes, the monitor is VESA mount compatible, allowing users to mount it on compatible stands or arms for more flexible setup options.

