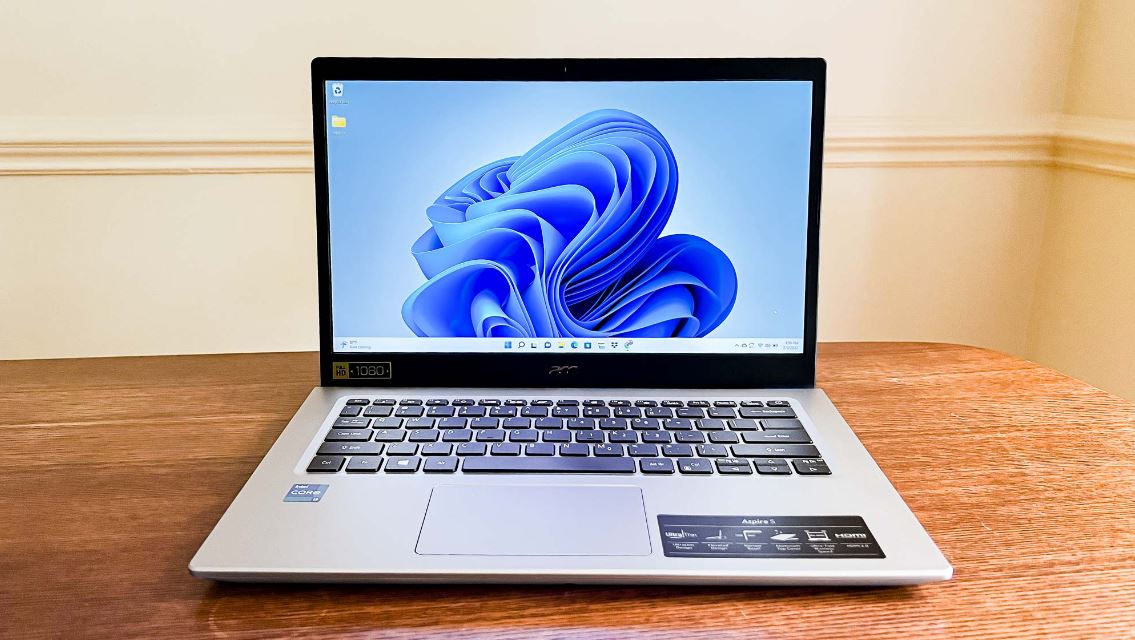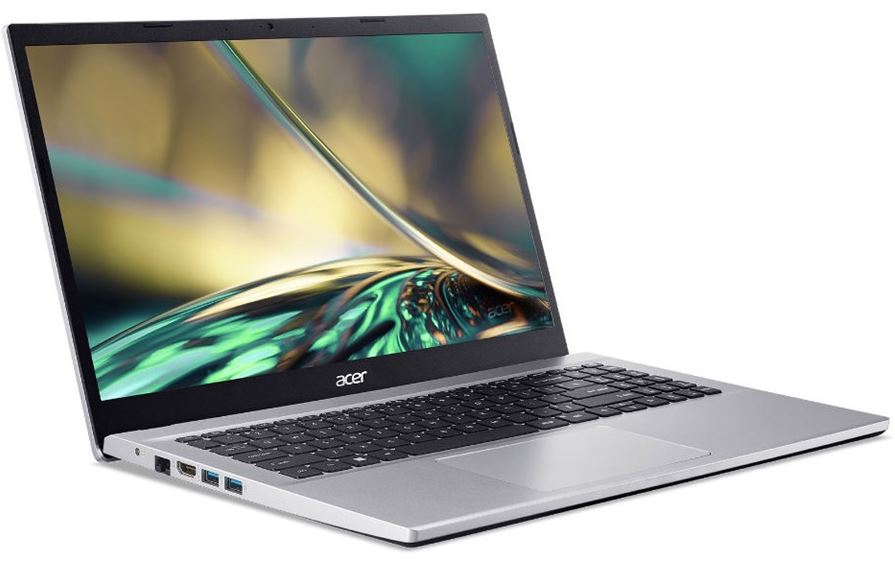
Acer Aspire 5 Windows Laptop
About Acer
Acer is a Taiwanese multinational hardware and electronics corporation that specializes in the production of computer-related products. The company was founded in 1976 and has since become one of the world’s largest computer manufacturers.
Acer produces a wide range of products including desktop and laptop computers, tablets, monitors, projectors, servers, and various accessories. They cater to both the consumer and business markets, offering products that range from budget-friendly options to high-performance devices.
YOUR ACER NOTEBOOK TOUR
Screen view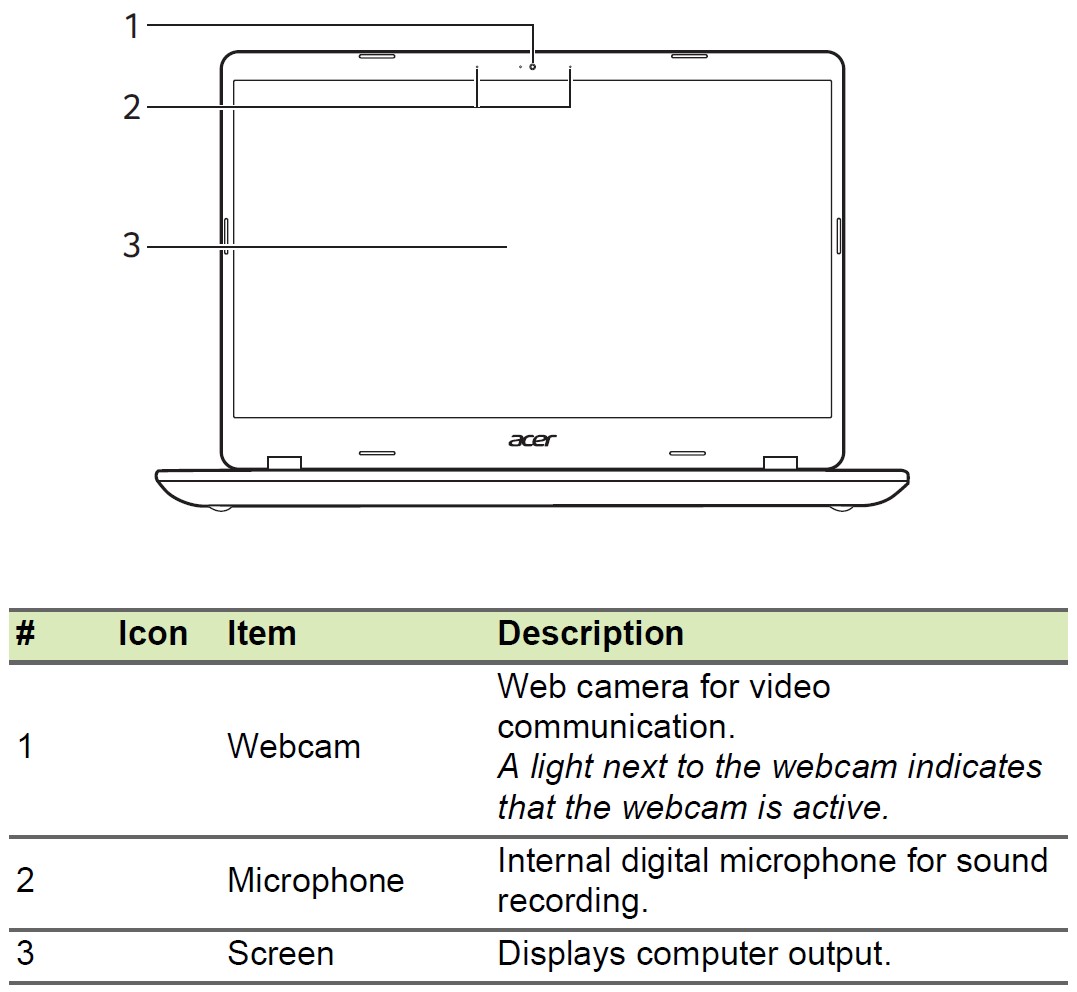
Keyboard view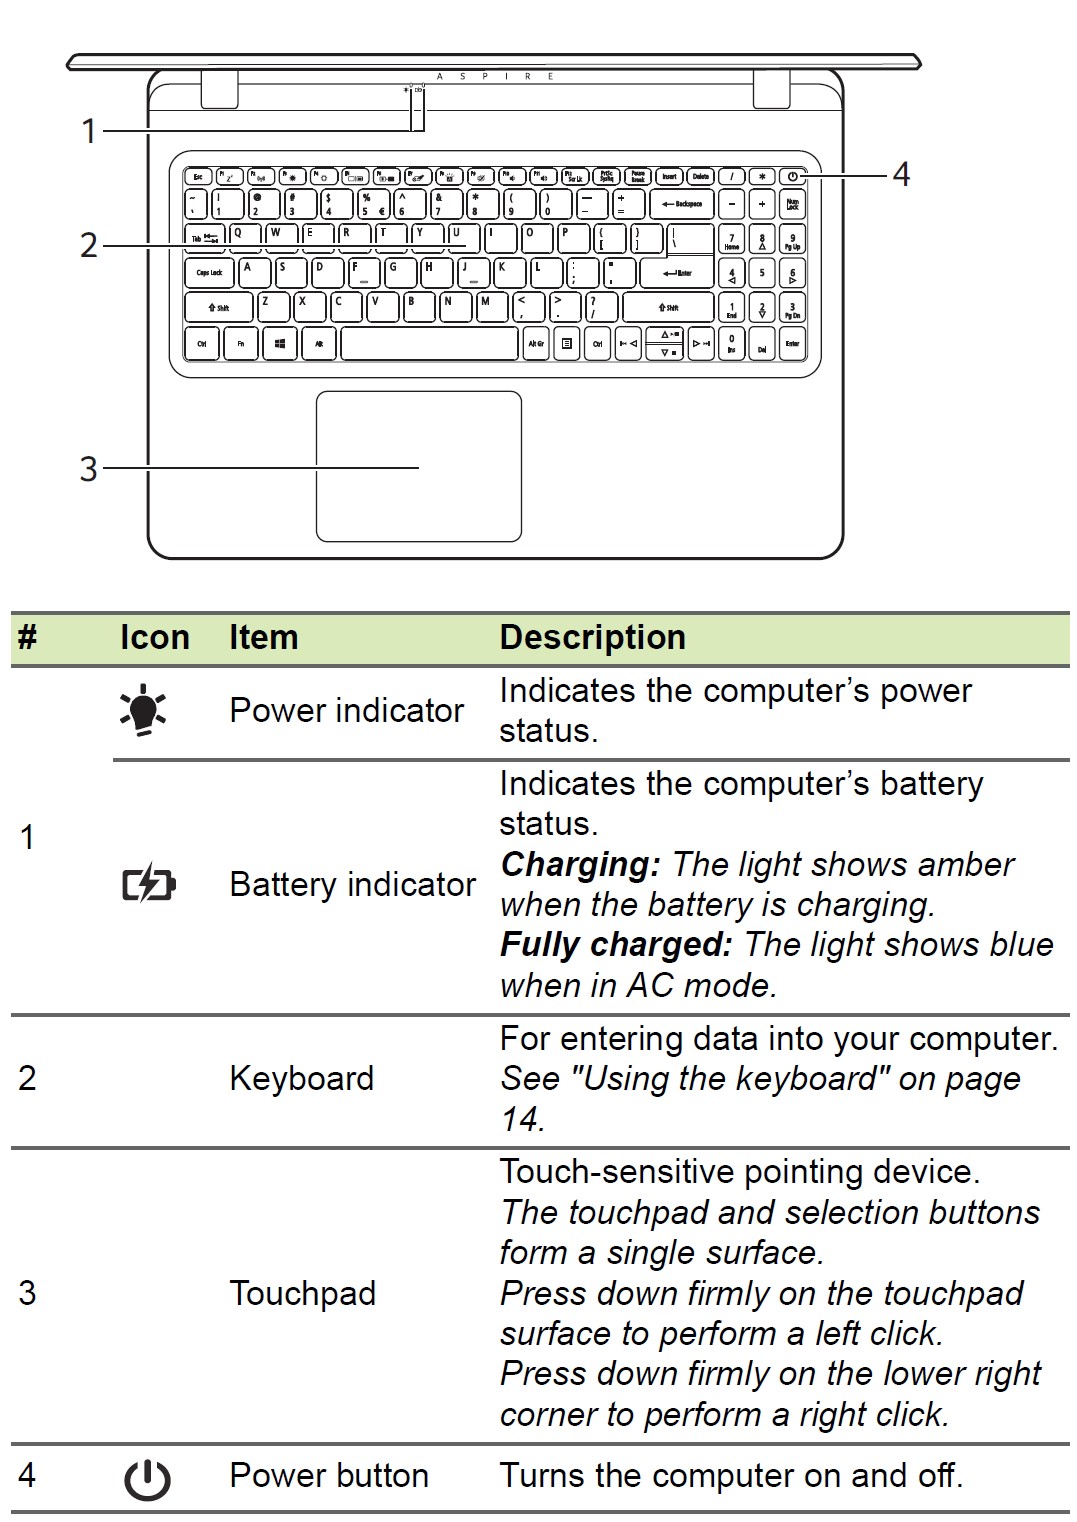
Left view
Visit: Acer Predator Triton 500 SE Gaming Laptop User Guide
Right view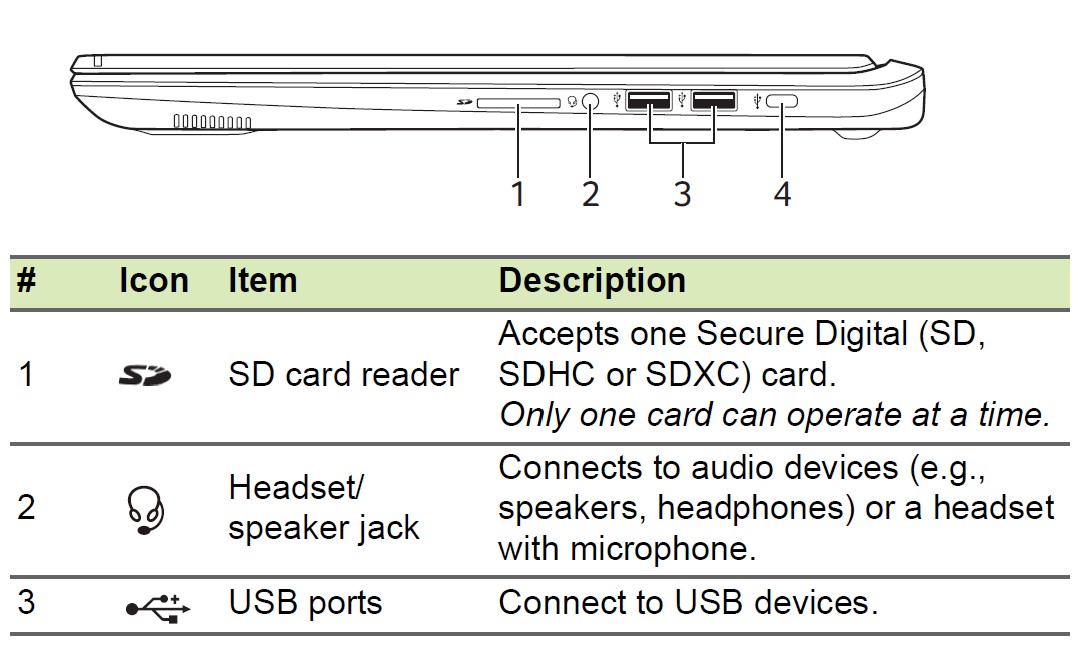

USB 3.0 information
- USB 3.0 compatible ports are blue.
- Compatible with USB 3.0 and earlier devices.
- For optimal performance, use USB 3.0-certified devices.
- Defined by the USB 3.0 specification (SuperSpeed USB).
USB Type-C information
- USB 3.1 Gen 1 with transfer speeds up to 5 Gbps.
Rear View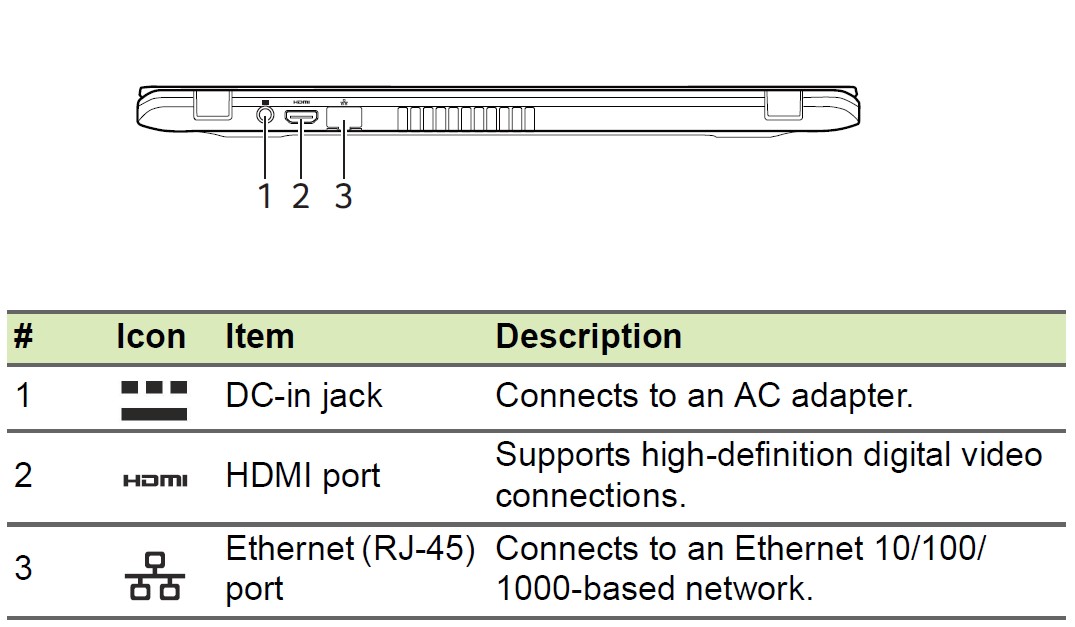
Visit: Acer Predator 8 Gaming Tablet User Manual
Base view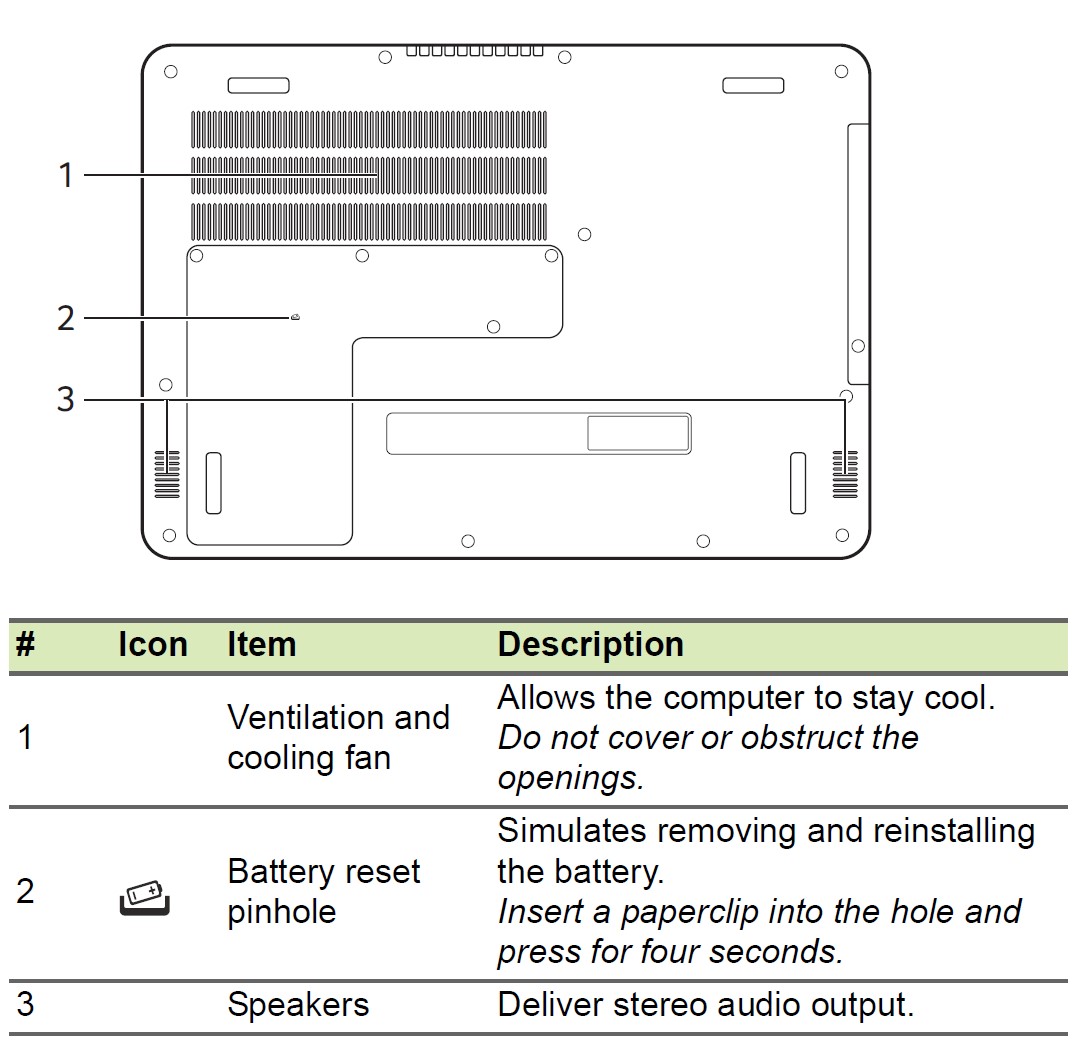
USING THE KEYBOARD
The keyboard has full-sized keys, a numeric keypad, a separate cursor, a lock, Windows, special keys, and hotkeys.
Lock keys
The keyboard has lock keys which you can use to turn keyboard functions on and off.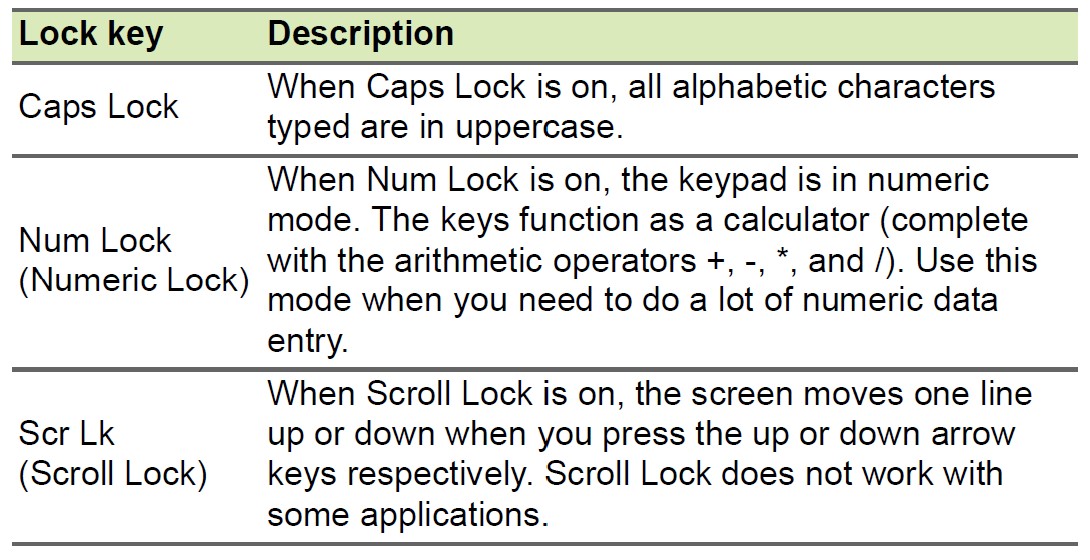
Special keys
Your computer’s keyboard includes keys that activate special functions. The function of each key is clearly marked with an icon.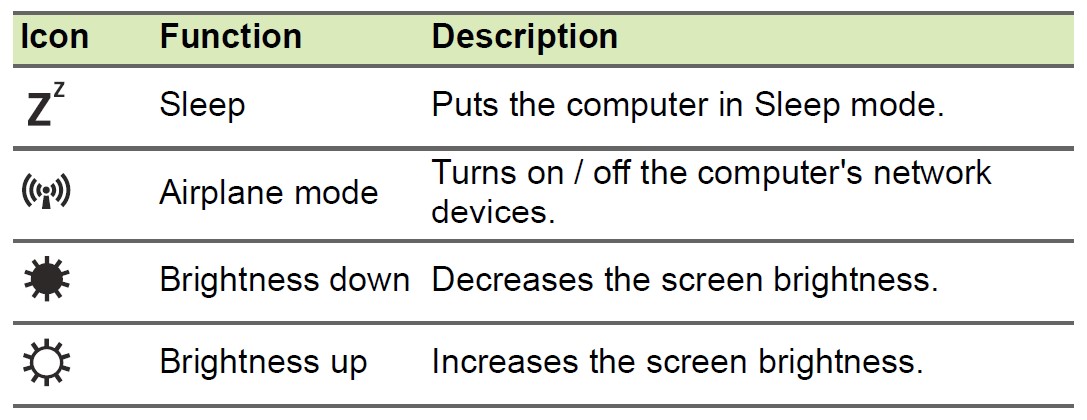
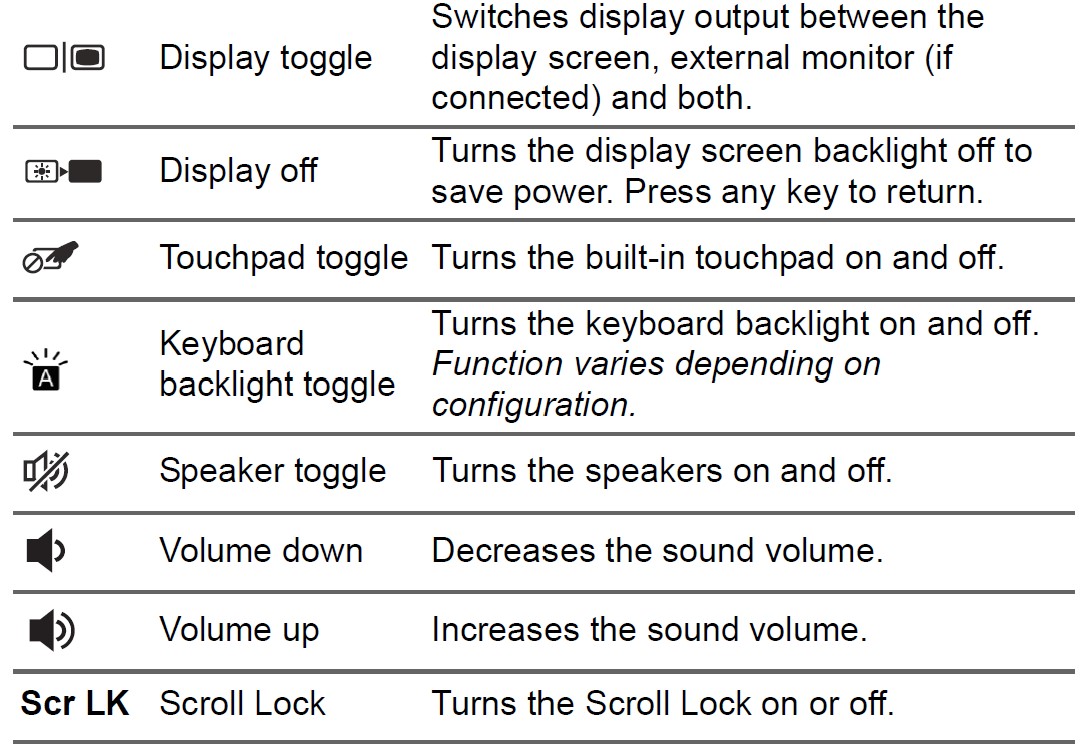
Hotkeys
To activate hotkeys, press and hold the Fn key before pressing the other key in the hotkey combination.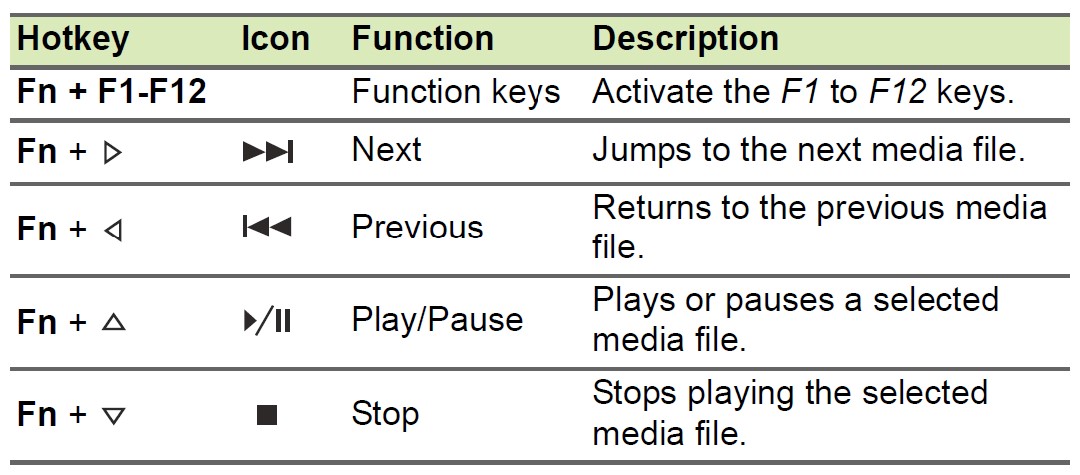
Windows keys
The keyboard has two keys that perform Windows-specific functions.
USING THE PRECISION TOUCHPAD
The touchpad controls the arrow (or ‘cursor’) on the screen. As you slide your finger across the touchpad, the cursor will follow this movement. The Precision Touchpad (PTP) is designed to provide a more uniform, smooth, and accurate touchpad experience. Many applications support precision touchpad gestures that use one or more fingers, however, some gestures may not be supported by the specific application or program you are using.
Visit: Acer Predator Helios 300 Gaming Laptop User Manual
Touchpad gestures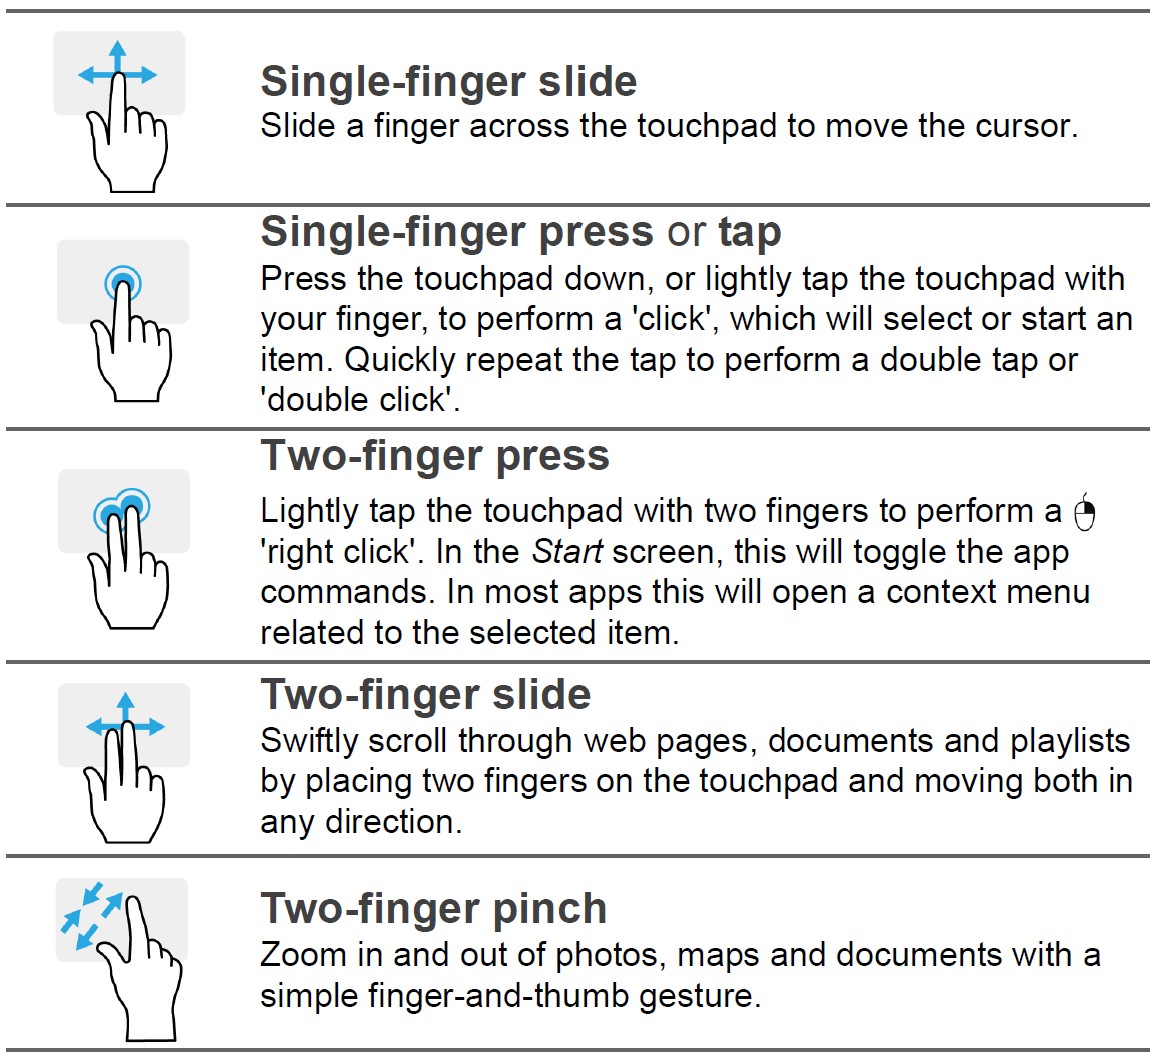
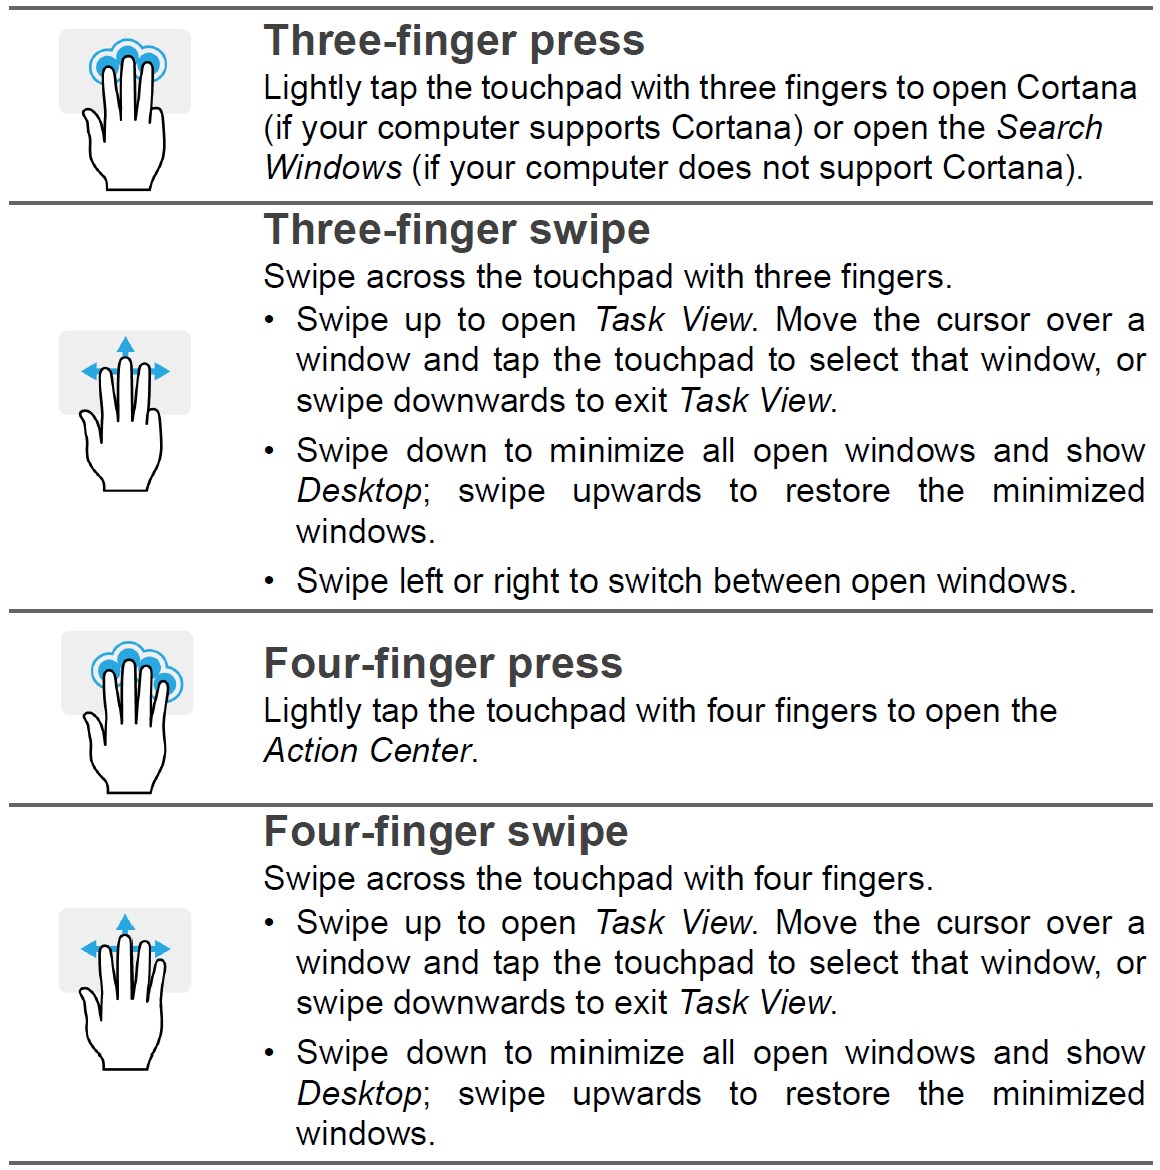
The precision touchpad includes added technology features that help recognize and prevent unintentional gestures such as accidental taps, gestures, and pointer movement.
Note: The touchpad is sensitive to finger movement; the lighter the touch, the better the response. Please keep the touchpad and your fingers dry and clean.
RECOVERY
If you are having trouble with your computer, and the frequently asked questions (see Got a question? on page 54) do not help, you can recover your computer.
This section describes the recovery tools available on your computer. Acer provides Acer Care Center, which allows you to reset your PC, refresh your PC, or create a factory default backup. If you cannot access Acer Care Center, click Settings in the Start menu, select Update & Security, and then click Recovery.
Visit: Lenovo ThinkPad E555 Laptop User Manual
Note: Acer Care Center varies depending on the model or Operating System.
Important: We recommend that you create a Factory Default Backup as soon as possible. In certain situations, a full recovery will require a USB recovery backup.
Creating a factory default backup
Recovery Management allows you to quickly and easily back up your operating system, installed apps, and data.
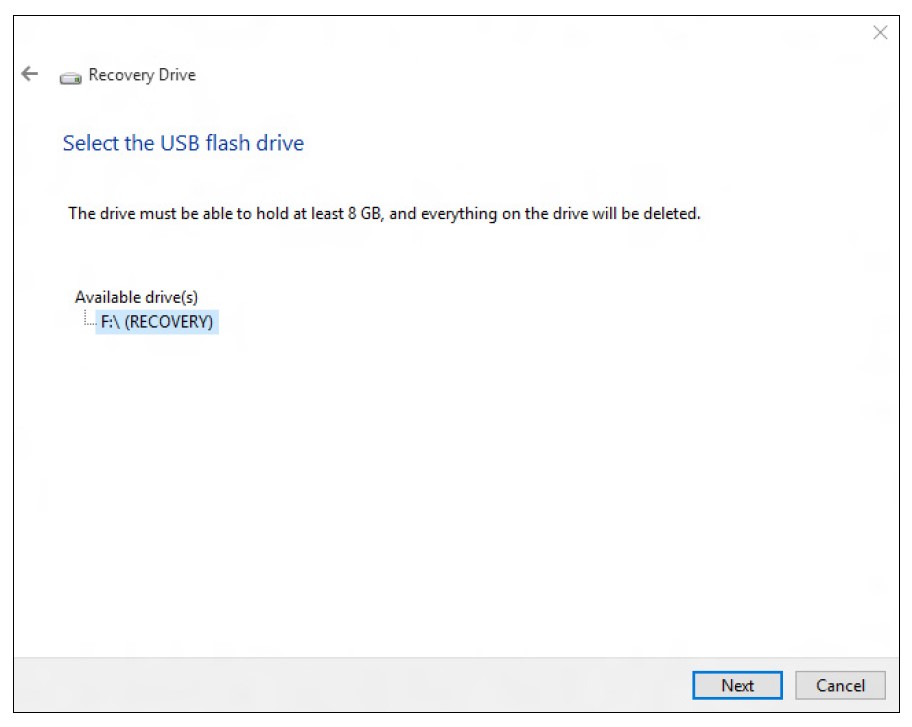
Note: Since the recovery backup requires at least 8 GB of storage after formatting, it is recommended to use a USB drive with a capacity of 16 GB or larger.
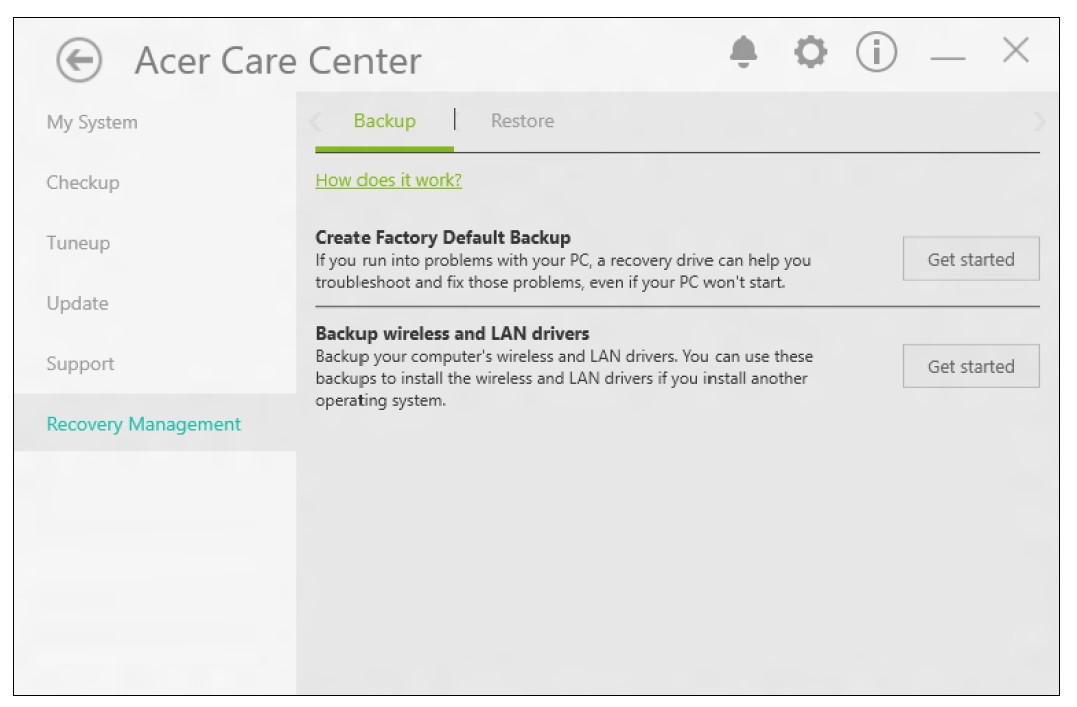
- From Start, select Care Center then Recovery Management.
- Select the Backup tab and click Get Started for Create Factory Default Backup to open the Recovery Drive window.
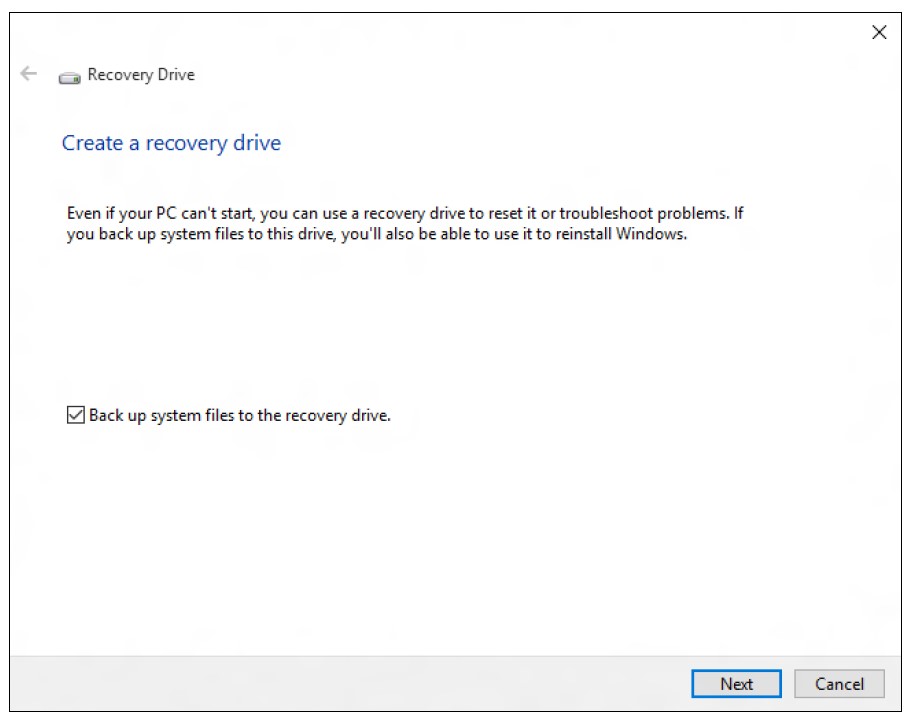
- Make sure Backup system files to the recovery drive are selected and click Next.
- Plug in the USB drive and wait for the PC to detect the USB drive then click Next.
- Everything on the drive will be deleted. Click Create to continue.
- You will be shown the backup progress on the screen.
- Follow the process until it completes.
- Unplug the USB drive and label it clearly.
Important: Write a unique, descriptive label on the backup, such as ‘Windows Recovery Backup’. Make sure you keep the backup in a safe place that you will remember.
Backing up your wireless and LAN drivers
Back up your wireless and LAN drivers. You can use these backups to install the wireless and LAN drivers if you install another operating system.
- From Start, select Care Center then Recovery Management.
- Select the Backup tab and click Get Started for Backup Wireless and LAN drivers. Choose a folder to save your drivers and select OK.
Restoring your computer
Recovery Management allows you to quickly and easily restore your computer back to its default status. You can choose to keep your files or remove them before reinstalling Windows.
Visit: Dell Inspiron 15 5000 Series Laptop Service Manual
Reset this PC and keep my files
- From Start, select Care Center then Recovery Management.
- Select the Restore tab and click Get Started to Choose an option.
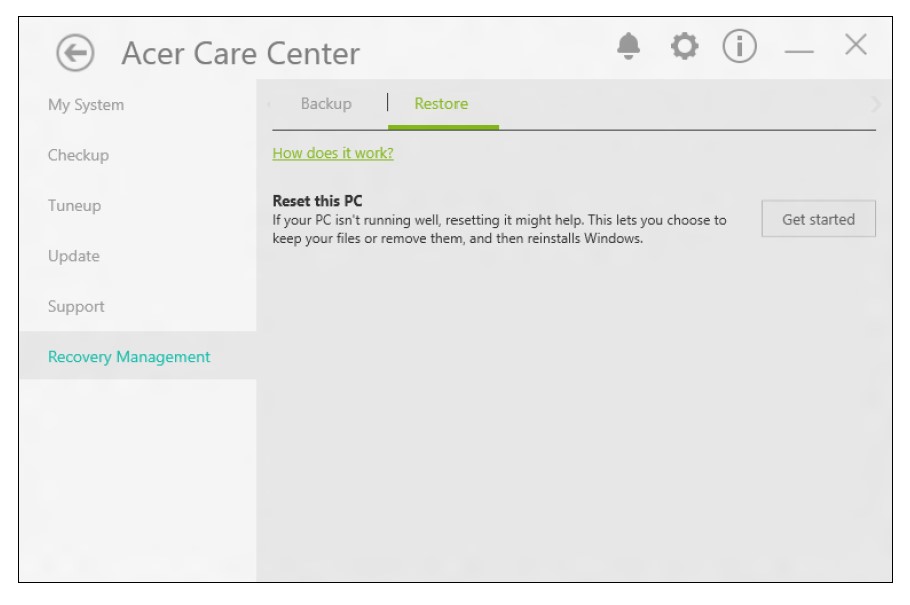
- Select Keep my files to refresh your PC and reinstall your operating system without removing your personal files. Click Next to continue.
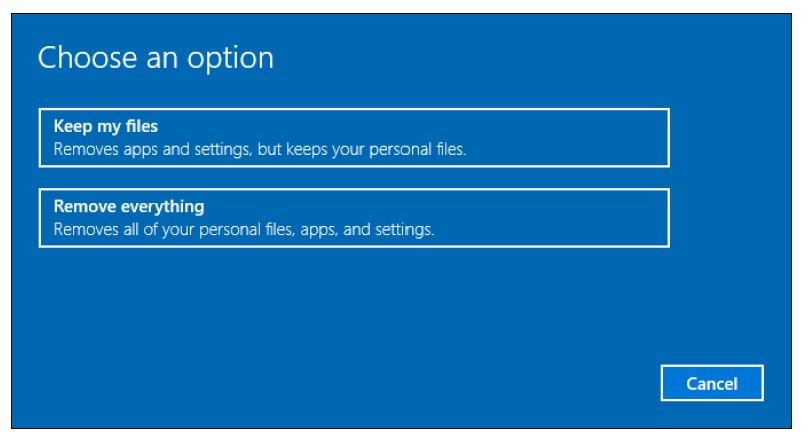 Important: If you have apps installed on your PC, they will be removed.
 - Resetting the PC will reinstall Windows, change settings back to their factory defaults, and remove all preinstalled apps and programs without removing your personal files. Click Reset to continue.
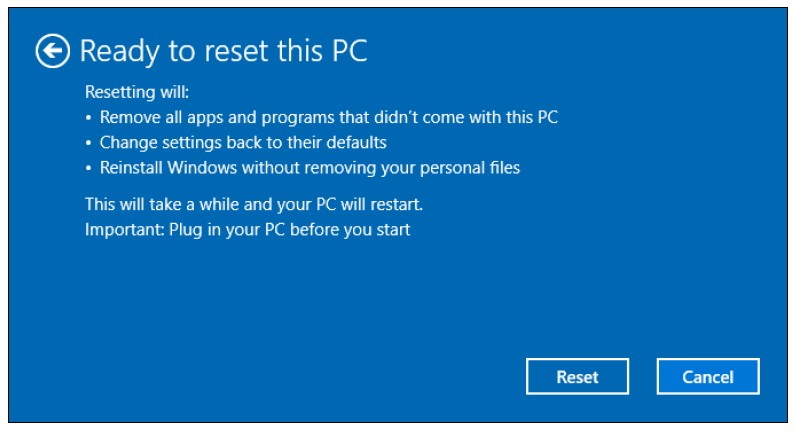
- You will be shown the reset progress on the screen. The screen will turn off during the reset process.
- The screen will turn back on when it is installed in Windows. Your PC will restart several times during the reset process.
- Follow the process until it completes.
- When your PC has completed the reset process, Windows will have been reset back to its factory default settings without removing your personal files.
Visit: MSI GP72 Leopard Pro-002 Gaming Laptop User Guide
Reset this PC and remove everything
- From Start, select Care Center then Recovery Management.
- Select the Restore tab and click Get Started to Choose an option.
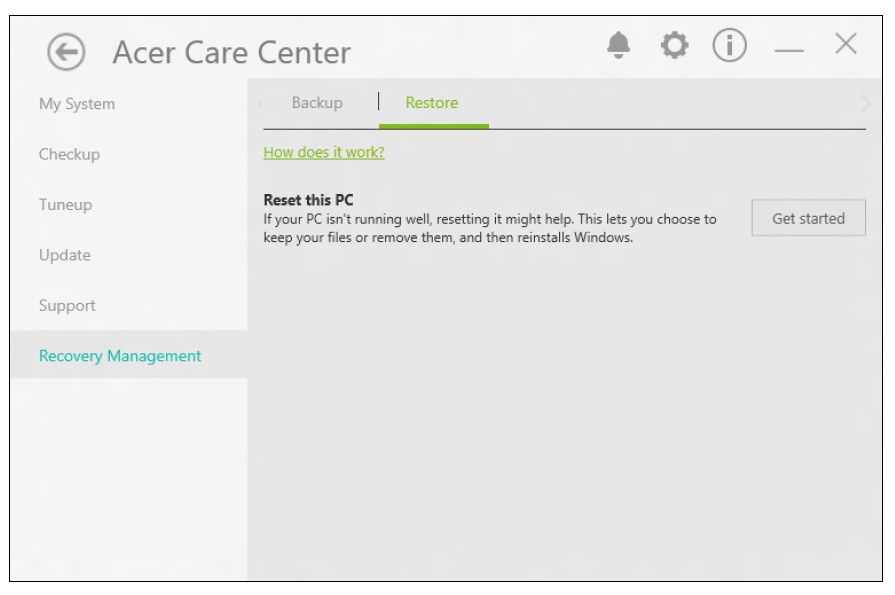
- Select Remove Everything to reset your PC back to its factory default. This process will reinstall your operating system and remove all of your personal files, apps, and settings.
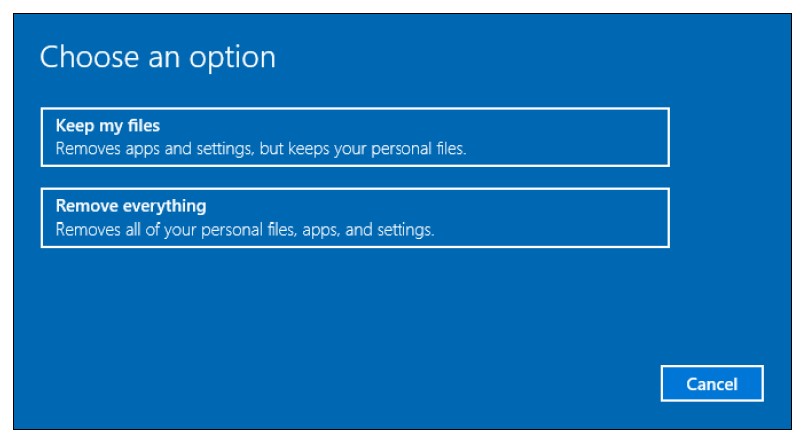
- Select Just remove my files if you are keeping your computer. This will be quicker, but less secure. Files may still be recovered with a file recovery program.
Select Remove files and clean the drive if you are not keeping your computer. This process will take longer but will be more secure.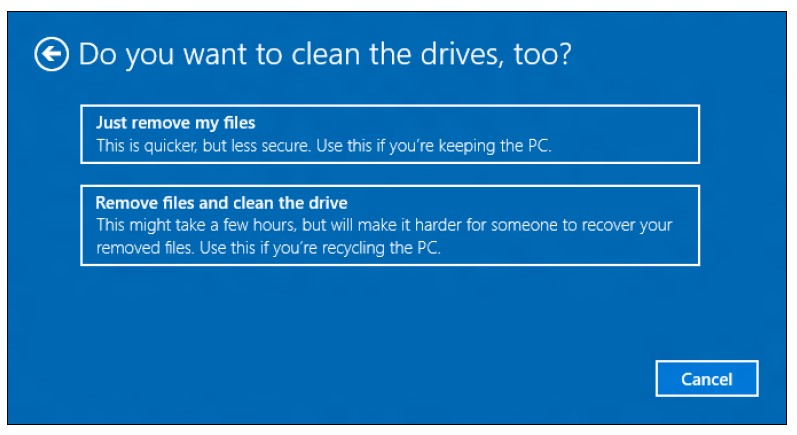 Warning: Selecting “Remove files and clean the drive” will remove all of your personal files and accounts, along with pre-existing drivers that may affect your Windows installation.
 - Click Reset to continue.
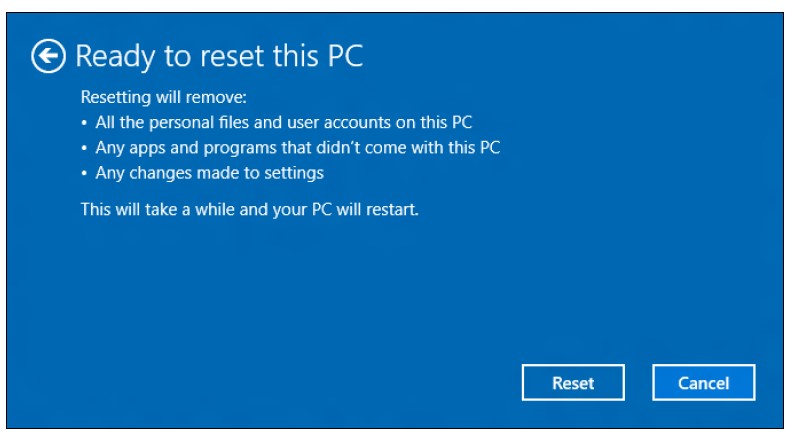
- You will be shown the reset progress on the screen. The screen will turn off during the reset process.
- The screen will turn back on when it is installed in Windows. Your PC will restart several times during the reset process.
- Follow the process until it completes.
- When your PC has completed the reset process, Windows will use factory default settings.
SECURING YOUR COMPUTER
Your computer is a valuable investment that you need to take care of. Learn how to protect and take care of your computer.
Security features include hardware and software locks — a security notch and passwords.
Visit: MSI PX60 Prestige GTX 950M Laptop User Manual
Using a computer security lock
The computer comes with a computer security slot for a security lock.
Wrap a computer security lock cable around an immovable object such as a table or handle of a locked drawer. Insert the lock into the notch and turn the key to secure the lock. Some keyless models are also available.
Using passwords
Passwords protect your computer from unauthorized access. Setting these passwords creates several different levels of protection for your computer and data:
- Supervisor Password prevents unauthorized entry into the BIOS utility. Once set, you must enter this password to gain access to the BIOS utility.
- User Password secures your computer against unauthorized use. Combine the use of this password with password checkpoints on boot-up and resume from Hibernation (if available) for maximum security.
- Password on Boot secures your computer against unauthorized use. Combine the use of this password with password checkpoints on boot-up and resume from Hibernation (if available) for maximum security.
Important: Do not forget your Supervisor’s Password! If you forget your password, please get in touch with your dealer or an authorized service center.
Entering passwords
When a password is set, a password prompt appears in the center of the display screen.
- When the Supervisor Password is set, a prompt appears when you enter the BIOS utility.
- Type the Supervisor Password and press Enter to access the BIOS utility. If you enter the password incorrectly, a warning message appears. Try again and press Enter.
- When the User Password is set and the password on the boot parameter is enabled, a prompt appears at boot-up.
- Type the User Password and press Enter to use the computer. If you enter the password incorrectly, a warning message appears. Try again and press Enter.
Important: You have three chances to enter a password. If you fail to enter the password correctly after three tries, the system halts. Press and hold the power button for four seconds to shut down the computer. Then turn on the computer again, and try again.
Visit: MSI PX60 Prestige GTX 950M Laptop User Manual
BIOS UTILITY
The BIOS utility is a hardware configuration program built into your computer’s BIOS.
Your computer is already properly configured and optimized, and you do not normally need to run this utility. However, if you encounter configuration problems, you may need to run it.
To activate the BIOS utility, press F2 while the computer logo is being displayed.
Boot sequence
To set the boot sequence in the BIOS utility, activate the BIOS utility, then select Boot from the categories listed at the top of the screen.
Setting passwords
To set a password on boot, activate the BIOS utility, then select Security from the categories listed at the top of the screen.
Find Set Supervisor Password and enter a password to enable this feature. Once you have entered a password for this feature, you may then enable/disable
Password on Boot.
Remember to select F10 to properly save and exit the BIOS utility when you are done making changes.
Visit: Microsoft Surface Pro 4 Laptop User Guide
POWER MANAGEMENT
This computer has a built-in power management unit that monitors system activity. System activity refers to any activity involving one or more of the following devices: keyboard, mouse, hard disk, peripherals connected to the computer, and video memory. If no activity is detected for a period of time, the computer stops some or all of these devices in order to conserve energy.
Saving power
Disable Fast startup
Your computer uses Fast Startup to start quickly but also uses a small amount of power to check for signals to start. These checks will slowly drain your computer’s battery.
If you prefer to reduce your computer’s power requirements and environmental impact, turn off Fast Startup:
Note: If Fast Startup is off, your computer will take longer to start from Sleep. Your computer will also not start if it receives an instruction to start over a network (Wake on LAN).
- Press the Windows key or select the Windows Start button then select Settings > System > Power & Sleep.
- Select Additional power settings.
- Select Choose what the power buttons do.
- Select Change settings that are currently unavailable.
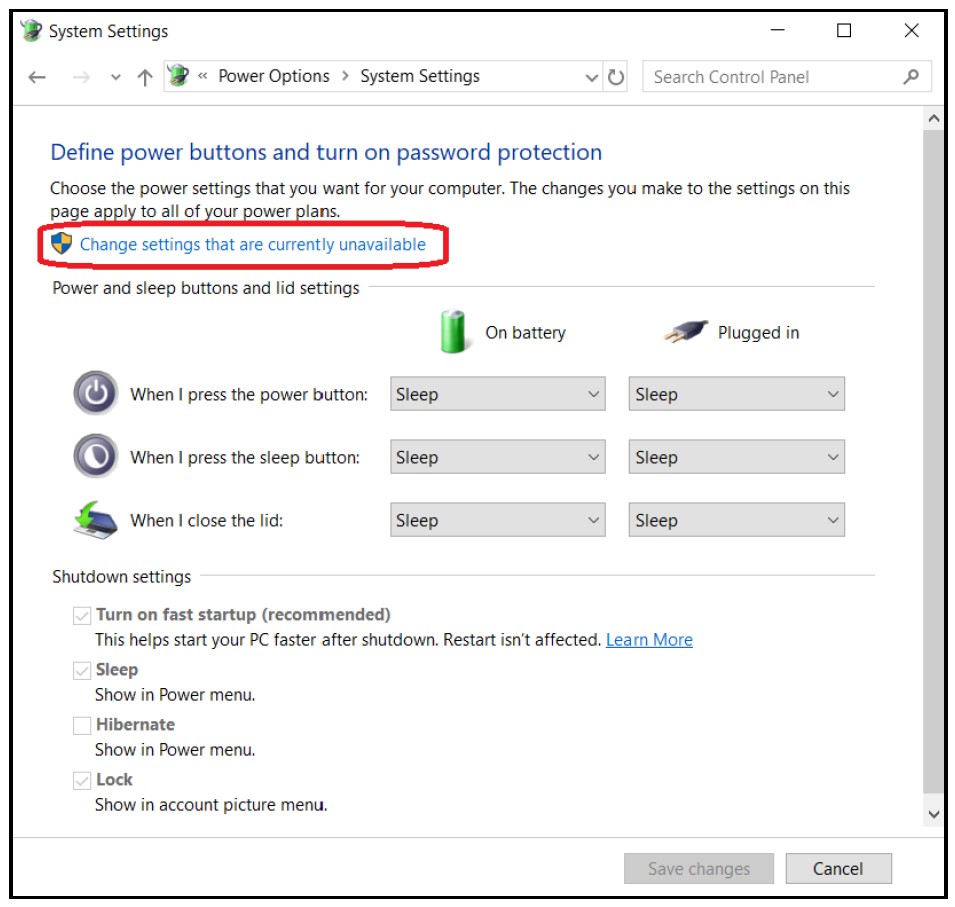
- Scroll down and disable Turn on fast startup.
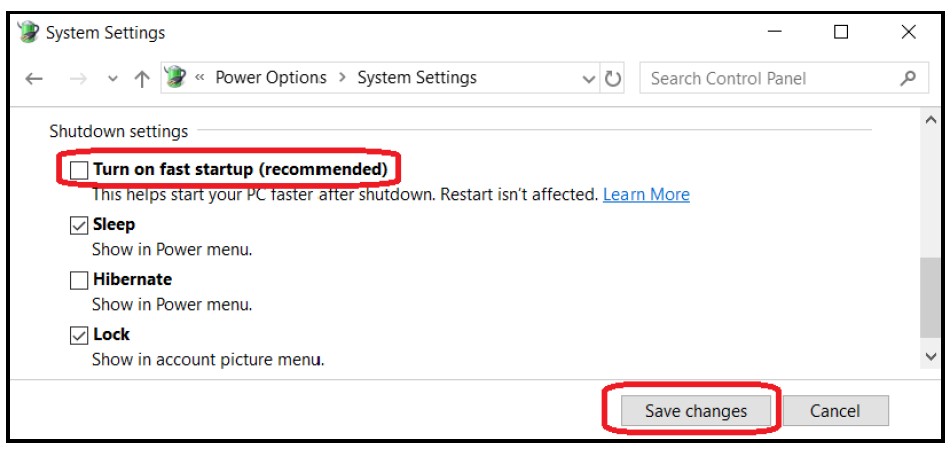
- Select Save changes
BATTERY PACK
The computer uses an embedded Lithium battery that gives you long use between charges.
Visit: Victus by HP 15 NVIDIA GeForce RTX 3050 Gaming Laptop Datasheet
Battery characteristics
The battery is recharged whenever you connect the computer to the AC adapter. Your computer supports charge-in-use, enabling you to recharge the battery while you continue to operate the computer. However, recharging with the computer turned off significantly reduces charge time.
The battery will come in handy when you travel or during a power failure.
Ports and connectors…
UNIVERSAL SERIAL BUS (USB)
The USB port is a high-speed port that allows you to connect USB peripherals, such as a mouse, an external keyboard, additional storage (external hard disks), or any other compatible device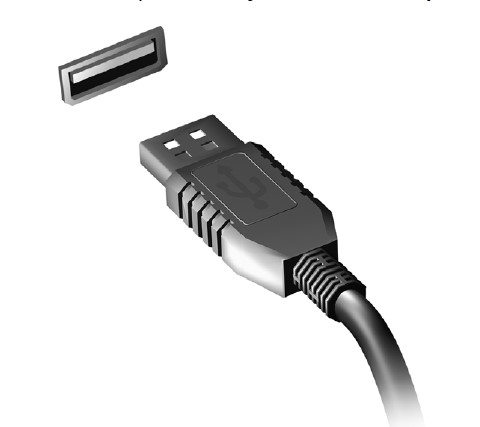
Note: Two USB standards are currently available on Acer computers: USB 2.0 (High-speed USB) and USB 3.0 (SuperSpeed USB). USB 2.0 ports on Acer computers have a black tongue in the port, while USB 3.0 ports have a blue tongue. For best performance, USB 3.0 devices should always be plugged into USB 3.0 ports. Consult your device’s documentation to see which standard it supports.
You can also charge devices such as tablets, smartphones, or other devices through a USB port. Some USB 3.0 ports support charging devices when the computer is in Hibernate or turned off. Additionally, you can use a USB hub to connect multiple devices to a single USB port.
Visit: MSI GS70 Stealth Pro-006 Gaming Laptop Notebook User Manual
Important: When removing a USB storage device, you should right-click on the USB icon in the Windows taskbar and select “Eject <device>” to tell the operating system to stop using the device before removing it. Failure to do this may result in data loss or damage to your peripheral.
USB TYPE-C PORT
A USB Type-C port is a connector that allows you to easily connect USB Type-C peripherals, such as additional storage (e.g. an external drive), or any other compatible device.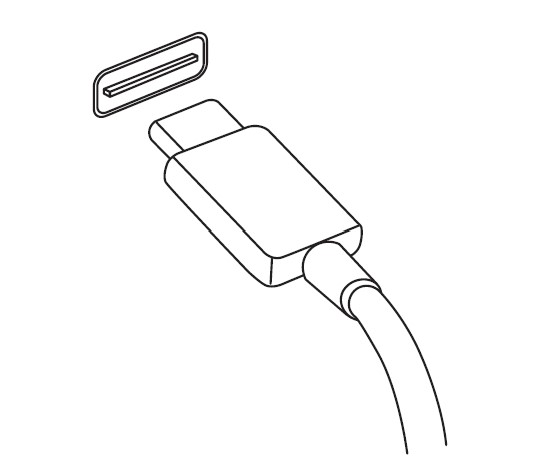
The Type-C port is reversible; connectors may be inserted with either side up.
Note: On Acer computers USB Type-C ports support up to USB 3.1 (SuperSpeed USB, 5 Gbps).
Other USB devices with a USB Type-C connector are supported, but transfer speed may be reduced and certain functions will be disabled (such as Thunderbolt video support).
Important: When removing a USB storage device, you should right-click on the USB icon in the Windows taskbar and select “Eject <device>” to tell the operating system to stop using the device before removing it. Failure to do this may result in data loss or damage to your peripheral.
Visit: Fujitsu Lifebook E744 Notebook Laptop Operating Manual
SD CARD READER
SD (Secure Digital) cards are used in a wide selection of digital cameras, tablets, media players, and cellular phones.
Inserting an SD card
- Align the card so that the connector points towards the port, with the connectors facing down.
- Carefully slide the card into the port. If you find you need to use any force to insert the card, try reorientating the card slightly.
- Push the card until it clicks into place. A few millimeters of the card will extend from beyond the slot.
If the card contains some files, the Windows AutoPlay window may appear (this depends on the contents of the card) and ask you if you wish to use a program to access the contents of the card.
Important: When removing an SD card, you should right-click on the USB icon in the Windows taskbar and select “Eject <card name>” to tell the operating system to stop using the device before removing it. Failure to do this may result in data loss or damage to your peripheral.
SD, SDHC, and SDXC cards
Different types of SD cards cover different capacities while using the same overall design. SD cards contain up to 4 GB; SDHC cards contain up to 32 GB; and SDXC cards can contain up to 2048 GB (2 TB). Your computer provides an SDHC or SDXC-compatible card reader.
Note: SDXC memory cards can only be used in an SDXC-compatible reader; SD and SDHC cards can be used in either type.
VIDEO AND AUDIO CONNECTORS
Add an external monitor to your computer via a video port. The type of port available depends on your computer’s configuration.
Connecting a monitor
- Check that the computer is powered off and the monitor power switch is turned off.
- Attach the video cable to the monitor port on the computer.
- Connect the monitor power cable and plug it into a properly grounded wall outlet.
- Follow any setup instructions in the monitor’s user guide.
- Turn on the power to the monitor, then the computer.
- The correct resolution and refresh rate should be detected automatically. If necessary, change the display settings used by the computer.
Note: To access the display controls, right-click anywhere on the desktop and select Display settings.
Headphones and microphone
One or more 3.5 mm jacks on your computer allow you to connect audio devices.
Use the headphone port to plug in stereo headphones or powered speakers; connecting an audio device to the headphone port disables the built-in speakers.
Use the microphone port to connect an external microphone; connecting a microphone disables the built-in microphone.
Visit: Fujitsu Lifebook E734 Notebook Laptop Operating Manual
Note: Some computers have a single “combo” port that allows you to use single-pin headsets with a built-in microphone. These headsets are most commonly used with smartphones.
HDMI
HDMI (High-Definition Multimedia Interface) is a high-quality, digital audio/video interface. HDMI allows you to connect any compatible digital audio/video source, such as your computer, a set-top box, DVD player, and audio/video receiver to any compatible digital audio and/or video monitor, such as a digital television (DTV) with a single cable.
The single cable keeps everything neat and tidy while ensuring easy connection and the best audio and visual quality.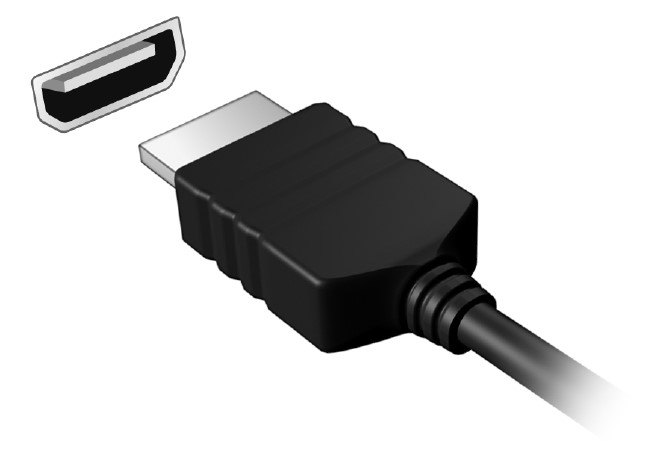
Troubleshooting
This chapter shows you how to deal with common system problems. Read it before calling a technician if a problem occurs. Solutions to more serious problems require opening up the computer. Do not attempt to open the computer yourself; contact your dealer or authorized service center for assistance.
Troubleshooting tips
This computer incorporates an advanced design that delivers onscreen error message reports to help you solve problems.
If the system reports an error message or an error symptom occurs, see “Error messages” below. If the problem cannot be resolved, contact your dealer.
Visit: Dell Alienware M17X R3 Mobile Laptop User Manual
Error messages
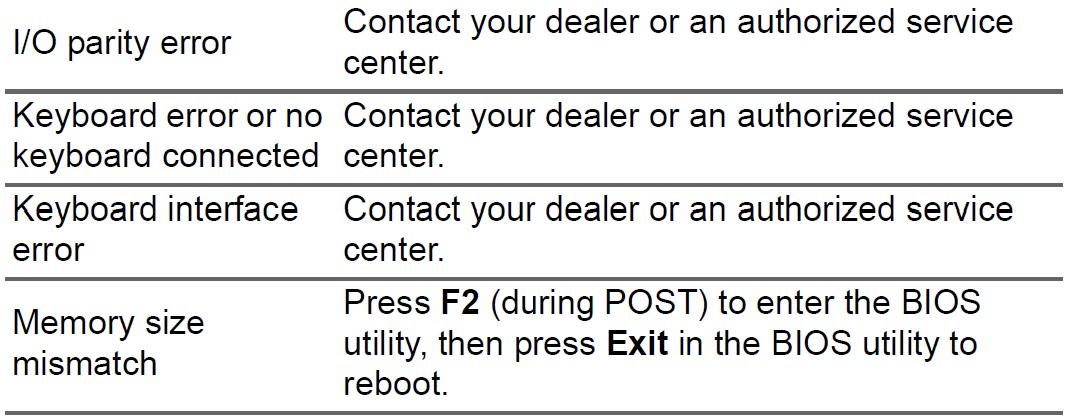
If you receive an error message, note the message and take corrective action. The following table lists the error messages in alphabetical order together with the recommended course of action.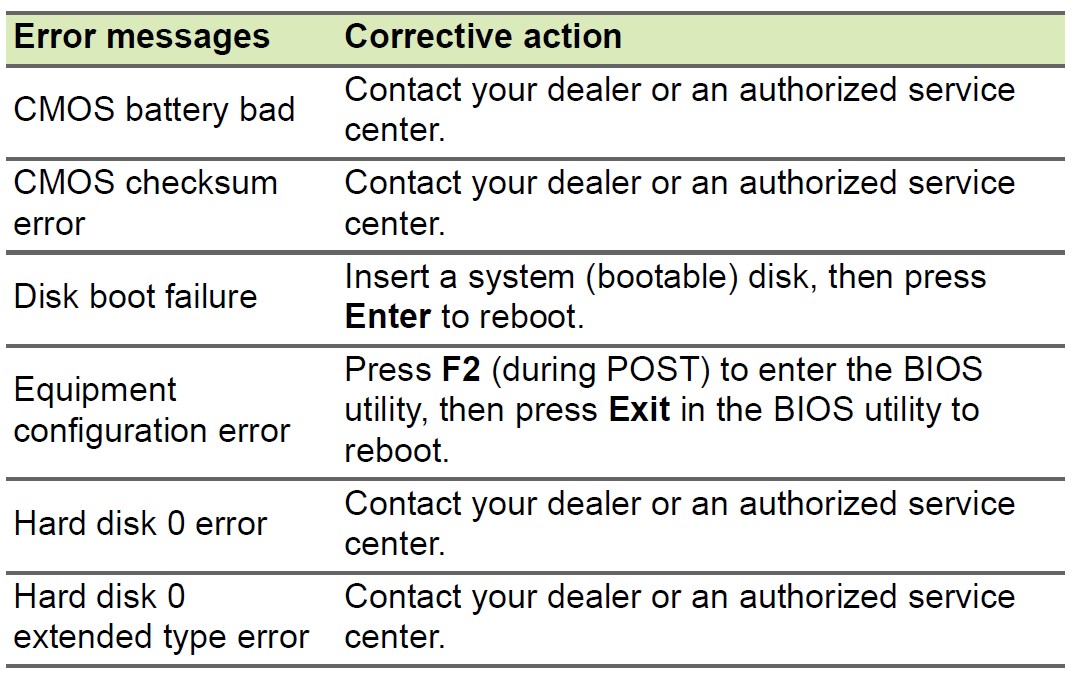
FAQs About Acer Aspire 5 Windows Laptop User Manual
Uses Windows in the Acer Aspire 5?
2022 Amazon Alexa, WiFi 6, 11th Gen Intel Core i3-1115G4 Processor (Beats Ryzen 3 3250U), Acer Aspire 5 Slim Laptop, 15.6″ FHD IPS Display, 20GB RAM | 1TB SSD Double-tap to read the full content (short content is available).
What is the Aspire 5’s battery life?
You can watch videos for about six hours if you set the brightness to maximum.
Does Acer offer Windows support?
Acer Spin 1 features an 11.6-inch HD touchscreen, an Intel Quad-Core N4000 processor, 4GB of RAM, 64GB of storage, Bluetooth, and Windows 10.
The weight of the Acer Aspire 5?
Its dimensions of 14.3 x 9.9 x 0.7 inches and weight of 3.7 pounds (1.8 kg) make it neither extremely portable nor excessively bulky.
Can Acer be used with Windows?
The following Acer laptops, desktop computers, and tablets have been examined and found to be suitable for Windows 11 upgrades. Acer has not tested the device and the drivers have not been updated if your product model is not shown in the table below.
What is Aspire 5’s processing speed?
Core i5 7th Gen 7200U from Intel
Acer Aspire 5 is it suitable for students?
For anyone looking for dependable performance at a very affordable price, the Acer Aspire 5 2023 Edition is now a great budget Ultrabook. College students, office employees, or any other user searching for a powerful daily laptop without breaking the bank may find this to be a decent option.
Acer Aspire 5 weight.
Review of the Acer Aspire 5: A fun, inexpensive laptop that weighs 3.75 pounds and is 71 inches thick. Even while it’s not very light, it can still fit into most laptop bags and is so lightweight that you hardly even notice you’re carrying it.
Is the laptop Acer Aspire 5 touchscreen?
Thanks to its potent Raptor Lake processor, Thunderbolt 4, and outstanding runtimes, the Aspire 5 earns points. The laptop has a 14-inch touchscreen display with 1,920 x 1,200 pixels and a 16:10 aspect ratio from Acer.
Has the Aspire 5 got a touch screen?
The sleek and convertible Aspire 5 Spin 14 is designed for mobility and productivity. This tablet easily flips, stands, folds, and spins to fit the way you work thanks to its highly responsive touchscreen and Active Stylus.
For more manuals by Acer, Visit Manualsdock

