VEVOR GL50 Pool Cartridge Filter
PRECAUTIONS
THESE OPERATING INSTRUCTIONS CONTAIN IMPORTANT INFORMATION ON THE SAFE, PROPER, AND ECONOMICAL OPERATION OF THE SWIMMING POOL PUMPS. STRICT OBSERVATION OF THE OPERATING INSTRUCTIONS WILL HELP TO AVOID DANGERS, REDUCE REPAIR COSTS, AND SHUTDOWN TIMES AND INCREASE THE RELIABILITY AND WORKING LIFE OF THE PRODUCT.
INSTALLATION INSTRUCTIONS
- The filter should be mounted on a level concrete slab. Position the filter so that the instructions, warnings, and pressure gauge are visible to the operator. Also, position the filter so that the piping connections, control valve, and drain port are convenient and accessible for servicing and winterizing.
- Install electrical controls (e.g., on/off switches, timers control systems, etc.) at least 2m (5 feet) from the filter. This will allow you enough room to stand clear of the filter during system start-up.
- Provide sufficient clearance around the filter to permit visual verification that the clamp is properly installed.
- Provide sufficient space above the filter to remove the filter lid for cleaning and servicing. This distance will vary with the model of filter you are using.
- Position the filter to safely direct water drainage. Rotate the valve to safely direct purged air or water. Water discharged from an improperly positioned filter or valve can create an electrical hazard as well as damage property.
- Make all plumbing connections in accordance with local plumbing and building codes. Filter plumbing connections are provided with an O-ring seal. Use only a silicone base lubricant on the O-rings.
- The maximum working pressure of this filter is 3bar. Never subject this filter to pressure more than this amount, even when conducting hydrostatic pressure tests. Pressures above3.5barcancause the lid to be blown off, which can result in severe injury, death, or property damage.
WARNINGS BEFORE INSTALLATION
This filter operates under high pressure. When any part of the circulating system (e.g., lock ring, pump, filter, valves, etc.) is serviced, air can enter the system and become pressurized. Pressurized air can cause the lid to blow off which can result in severe injury, death, or property damage. To avoid this potential
hazard, follow these instructions.
- Before positioning valves and before beginning the assembly, disassembly, or adjustment of the lock ring or any other service of the circulating system:
- Turn off the pump and shut off any automatic controls to ensure the system is not inadvertently started during the servicing.
- open-air relief valve. c. wait until all pressure is relieved the pressure gauge must read zero (0).
- Whenever installing the filter lock ring, follow the filter lock ring installation instructions exactly.
- Once service on the circulating system is complete, follow system restart instructions exactly.
- Maintain the circulation system properly. Replace worn or damaged parts immediately (e.g., lock ring, pressure gauge, relief valve, o rings, etc.)
- Be sure that the filter is properly mounted and positioned according to the instructions provided.
WARNINGS BEFORE OPERATION
- This filter operates under pressure. When the lock ring is installed properly and operated without air in the water system, this filter will operate in a safe manner.
- The pressure gauge is the primary indicator of how the filter is operating. Maintain your pressure gauge in good working pressure.
- Clean your filter when pressure reads between 80-100kpa higher than the original starting pressure. Your filter pressure reading will increase as it removes dirt from your pool. However, this increase in pressure will vary due to different bathing loads, temperatures, weather conditions, etc…
FILTER MAINTENANCE
- Turn the pump off and shut off any automatic controls to ensure that the system is not inadvertently started during servicing.
- Open the air relief valve and the waste drain valve.
- Remove the locking ring and then remove the tank lid by placing your hands in the lifting handles and pulling straight up.
- Remove the cartridge elements from the center support tube.
- Using a garden hose with a nozzle, direct water spray at the cartridge element to dislodge and wash away accumulated foreign dirt. Water may be sprayed on the outside as well as the inside of the cartridge element for thorough cleaning.
- Turn the cartridge element over several times during the washing operation to clean the media thoroughly.
- Clean and remove debris from inside the filter tank and from the O-ring and its seat on the tank base.
- Replace the clean cartridge elements on the internal support tube and install the assembly into the filter tank body, making sure it is fully seated.
- Replace the tank lid onto the tank body making sure it is fully and firmly seated on the tank base.
- Place the lock ring over the tank lid, and tight firmly the screw.
- Open the air relief valve and restart the circulation pump.
- Close the air relief valve after a steady stream of water drops appears.
NOTE
Algae, calcium, clay, sustain oil, and body oils can forma coating on the cartridge elements which may not be easily removed with normal hosing. We recommend soaking the cartridge elements in a de-greaser and/ or descaled liquids to dissolve the dirty particles.
TROUBLESHOOTING
Air entering in your filter is dangerous and can cause the lid to blow off. Correct any conditions in your filtration system that allow air to enter into the system. Some common ways to identify air entering the system:
- Low water level in pool or spa – skimmer is starving for water with pump running. Refill water to pool or spa.
- Air bubbles coming out of water return lines into pool or spa with pump running.
- If pressure drops on gauge, check skimmer basket and pump basket first for debris. If the baskets are clean, shut off main power and control if the pump is working properly or check if there is an obstruction in the line between the pool and the pump.
- The pressure gauge is an important part of the filter system. It is your primary indicator of how the system is operating. Maintain your pressure gauge in good working condition. Check the operation of your pressure gauge in the following manner:
- The pressure gauge should go to zero (0) when the system is turned off and pressure is relieved.
- The pressure gauge should indicate pressure when the system is operating
- The pressure gauge should be readable and not damaged in anyway.
- Replace the pressure gauge if it is not meeting the requirements as above.
SPECIFICATIONS


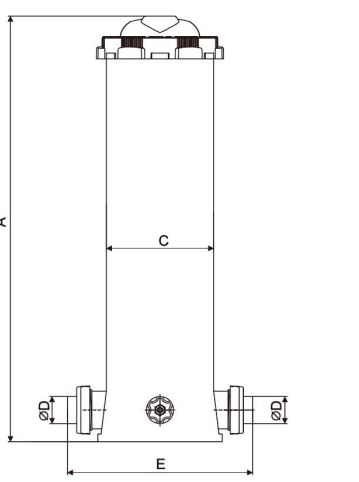
- The flow rate is determined by the pump size and the piping system.

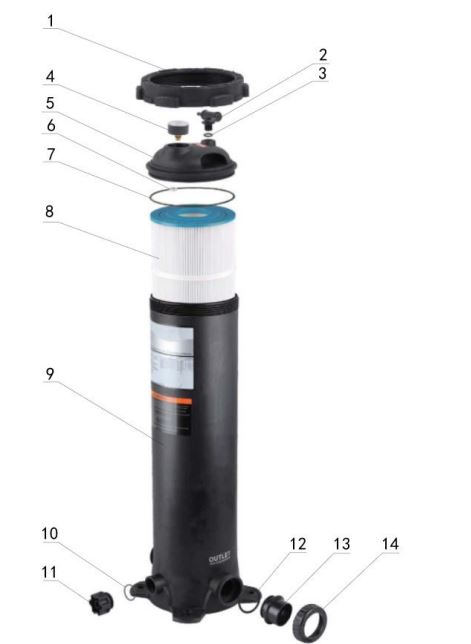
Expanded Diagram

- Tank Lid Nut
- Air Relief Valve
- O Ring
- Pressure Gauge
- Tank Lid Assembly
- Nut
- Tank O Ring
- Filter Cartridge
- Tank Body
- O Ring
- Drain Cap
- O Ring
- Pipe
- Nut
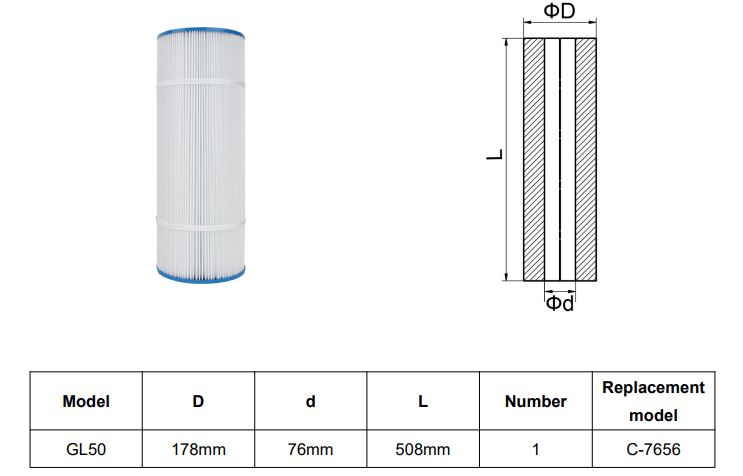
Filter Cartridge

Easy-to-clean & Reusable Cartridge Elements
Cartridges have extra dirt-holding capacity and are engineered of durable, high-quality materials for longer service life with minimal care. Simply remove the cartridge element and flush the cartridge with hose water or clean the cartridge with a Filter Cleaner.
NOTICE:
After the service life of the filter Cartridges expires or is damaged, the user can purchase other filter elements of the same size for installation.
FOR MORE MANUALS BY VEVOR, VISIT MANUALSDOCK

