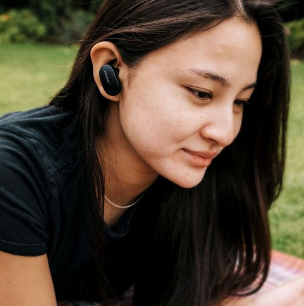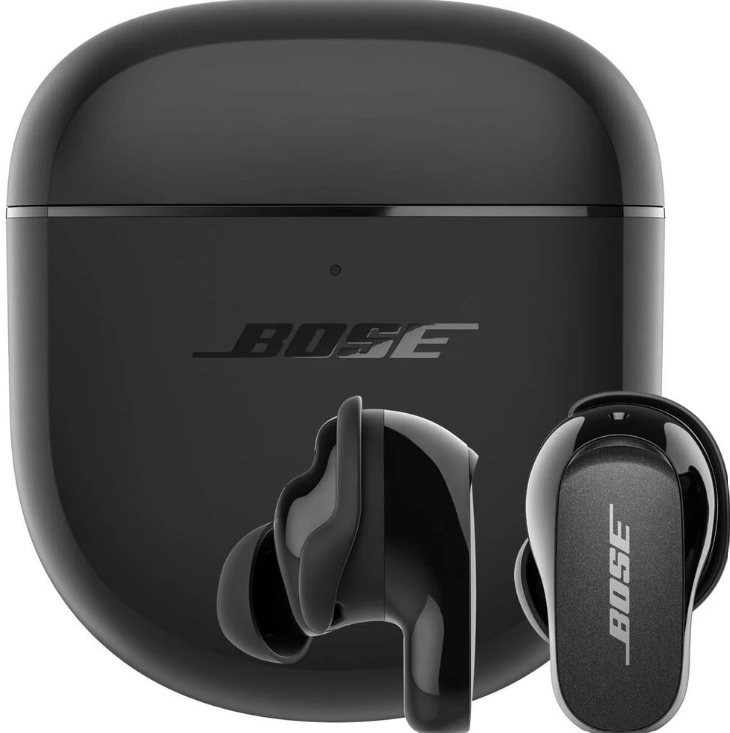
Bose QuietComfort Earbuds II
WHAT’S IN THE BOX
CONTENTS
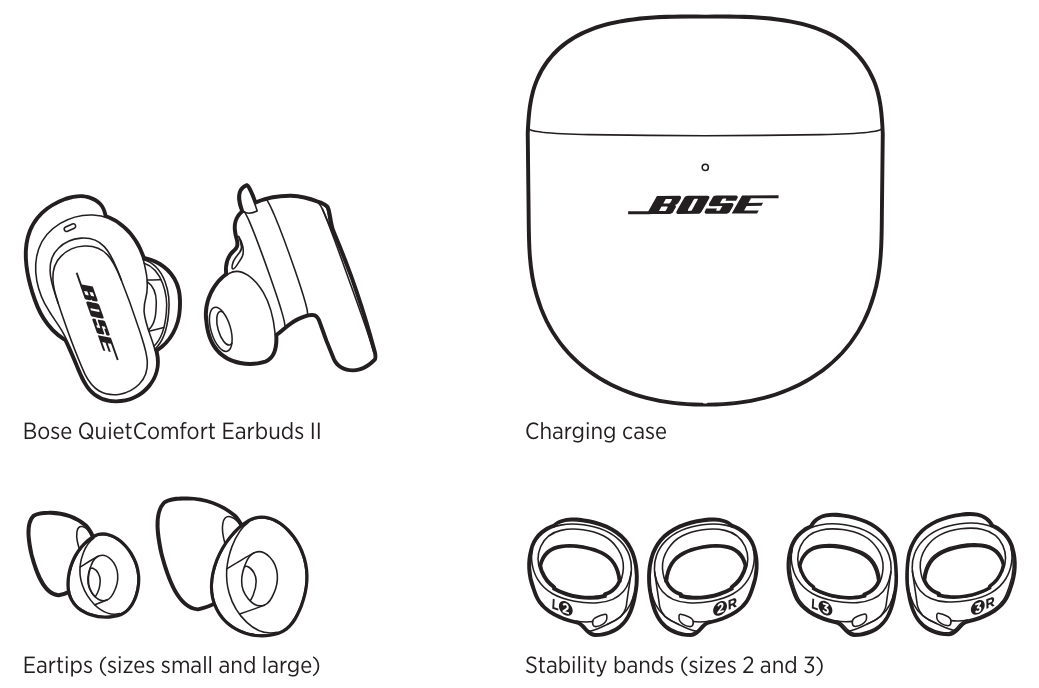
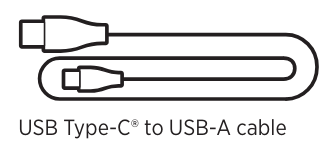
Confirm that the following parts are included:
HOW TO WEAR
INSERT THE EARBUDS
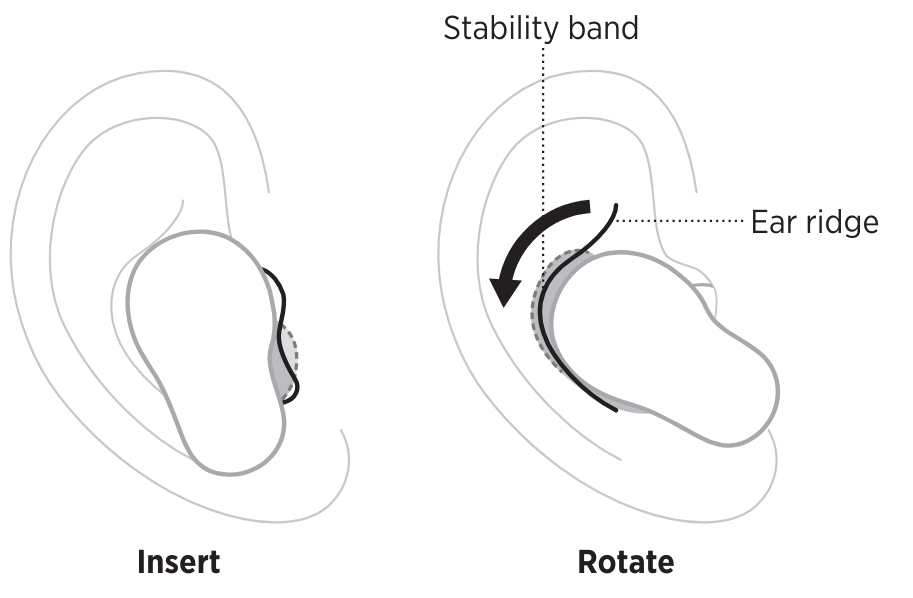
- Insert the earbud so the ear tip gently rests at the opening of your ear canal.
 Slightly rotate the earbud back until the ear tip creates a comfortable seal at your ear canal and the stability band rests against your ear ridge.
 Check the fit (see page 17).
- Repeat steps 1 – 3 to insert the other earbud.
CHECK YOUR FIT
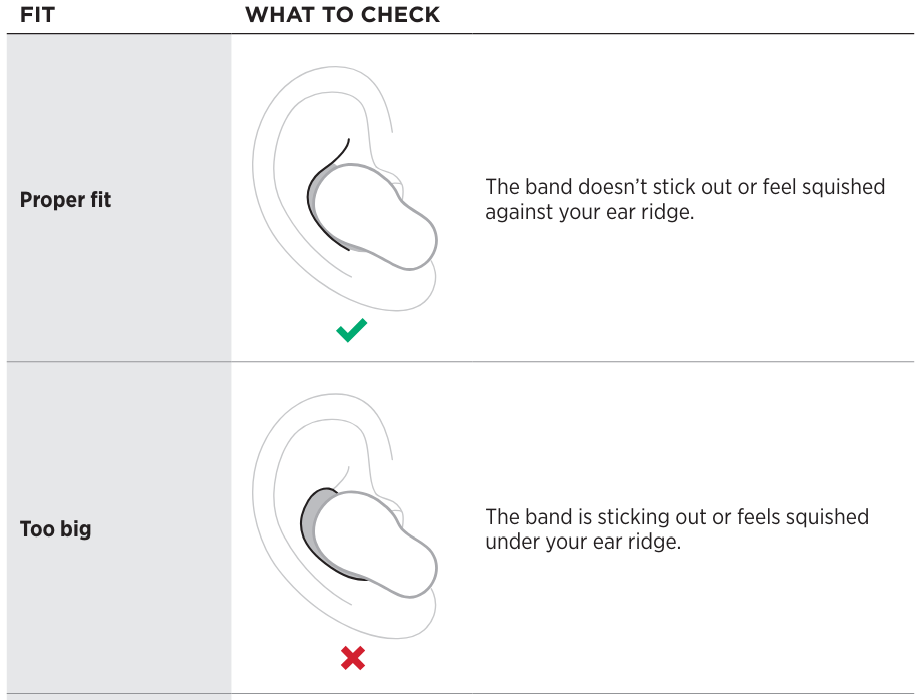
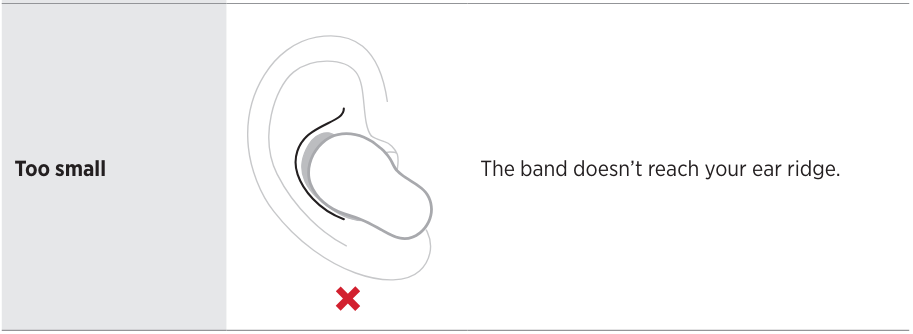
For the best fit, audio performance, and noise cancellation, use a mirror to make sure you’re using the correct size ear tips and stability bands. You may need to try a different size ear tip or stability band for each ear.
TIP
You can also check your fit using the Eartip Fit Test in the Bose Music app. You can access this option from the Settings menu.
Eartips
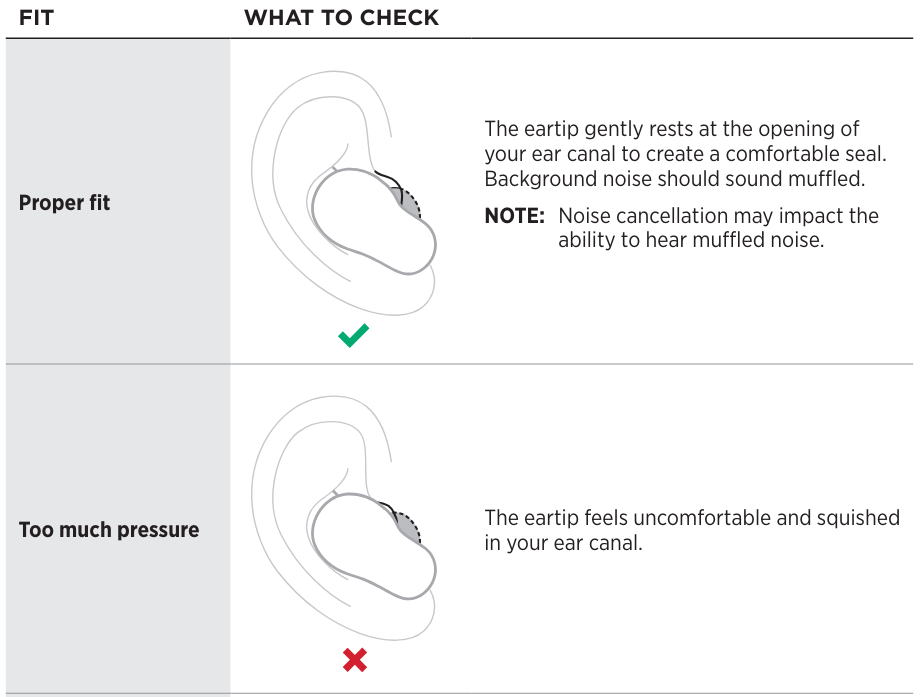
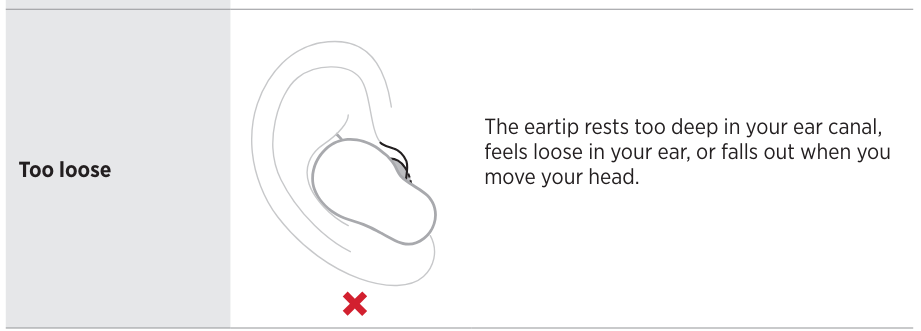
Stability bands
TRY ANOTHER SIZE
Wear the earbuds for an extended period. If the earbuds don’t feel comfortable or secure, or noise cancellation or sound quality isn’t as expected, try another size ear tip or stability band. You may need to try all three ear tips or band sizes or use a different size ear tip or band for each ear.
Eartips
The ear tips come in small, medium, and large
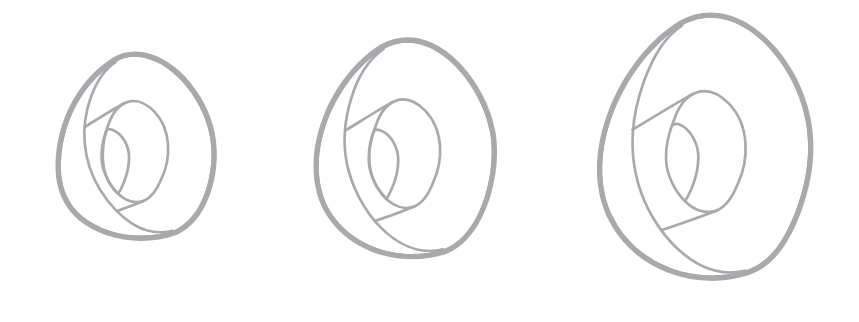
Medium ear tips come attached to the earbuds. If they feel too small, try large ear tips. If they feel too big, try small ear tips.
Stability bands
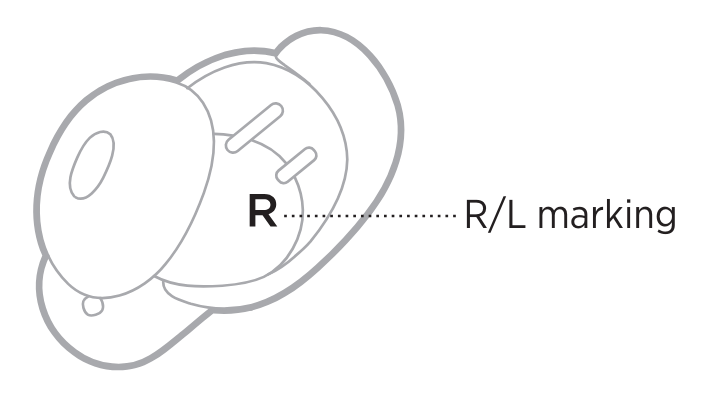
The stability bands are marked with size 1 (small), 2 (medium), or 3 (large) and an R (right) or L (left).

Size 1 bands come attached to the earbuds. If they feel too small, try size 2 bands
CHANGE THE EAR TIPS
- Holding the earbud, gently squeeze the ear tip and peel it away from the earbud.
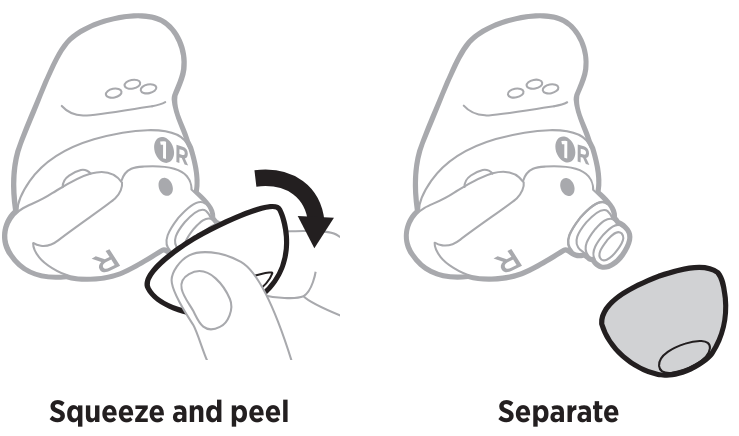 Choose a new ear tip size (see page 19).
- Align the ear tip with the earbud nozzle and press the ear tip onto the nozzle until you feel it snap securely into place and hear it click.
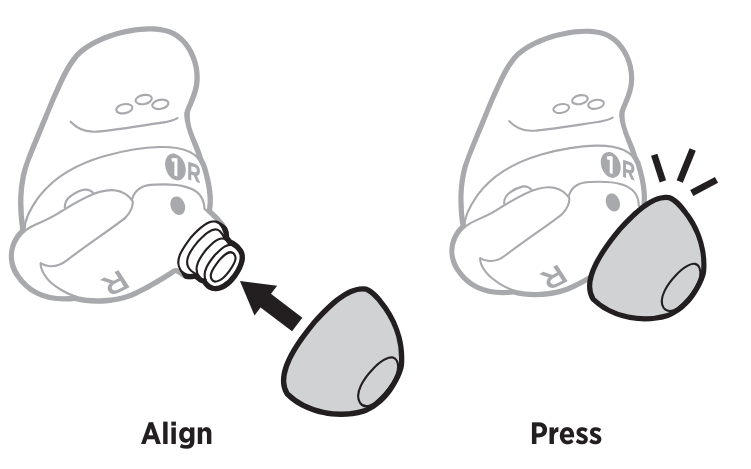 Repeat steps 1 – 3 for the other earbud, as needed.
- Insert the earbuds (see page 16).
- Check the fit (see page 17).
NOTES
- If you change the ear tip, you may need to change the stability band so the band rests comfortably against your ear ridge (see page 21).
- To see how-to videos about changing the ear tips, visit: support.Bose.com/QCEii
- If you need additional ear tip sizes, contact Bose customer service or visit: support.Bose.com/QCEii
CHANGE THE STABILITY BANDS
- Holding the earbud, gently grab the stability band scoop and peel the band toward you, over the ear tip, and away from the earbud.
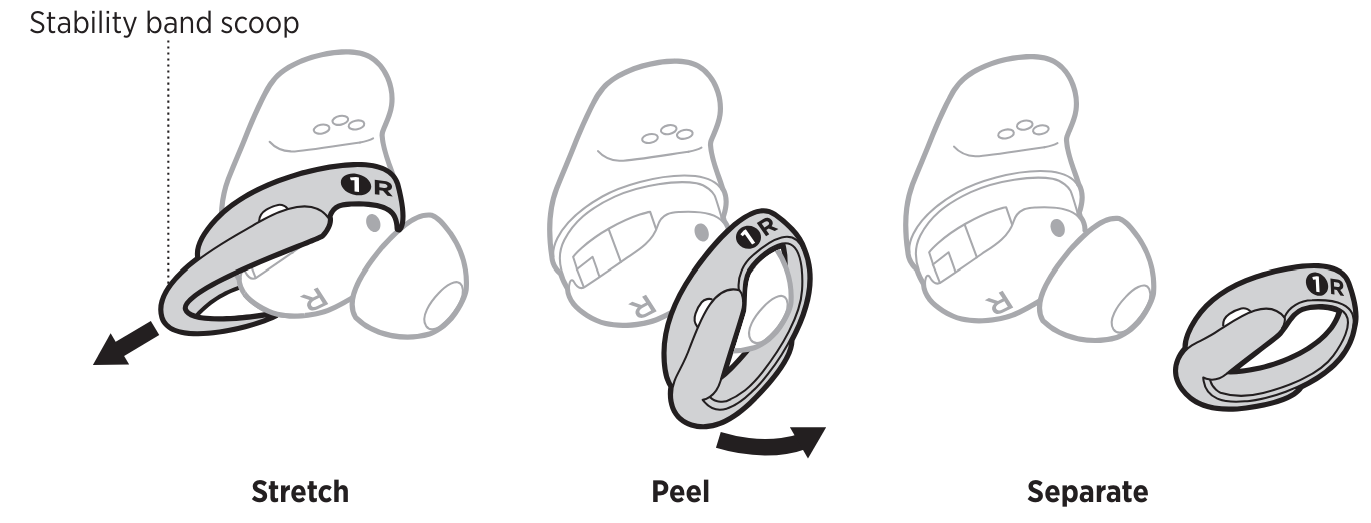 Choose a new band size (see page 19).
- With the band markings facing you and the band scoop facing away from you, align the dot on the band with the gray dot on the bottom of the earbud.
- Gently stretch the band over the ear tip, making sure the dots align and the microphone hole on the band is over the microphone on the earbud so the microphone isn’t blocked.
- Press down until the band fits securely into place.
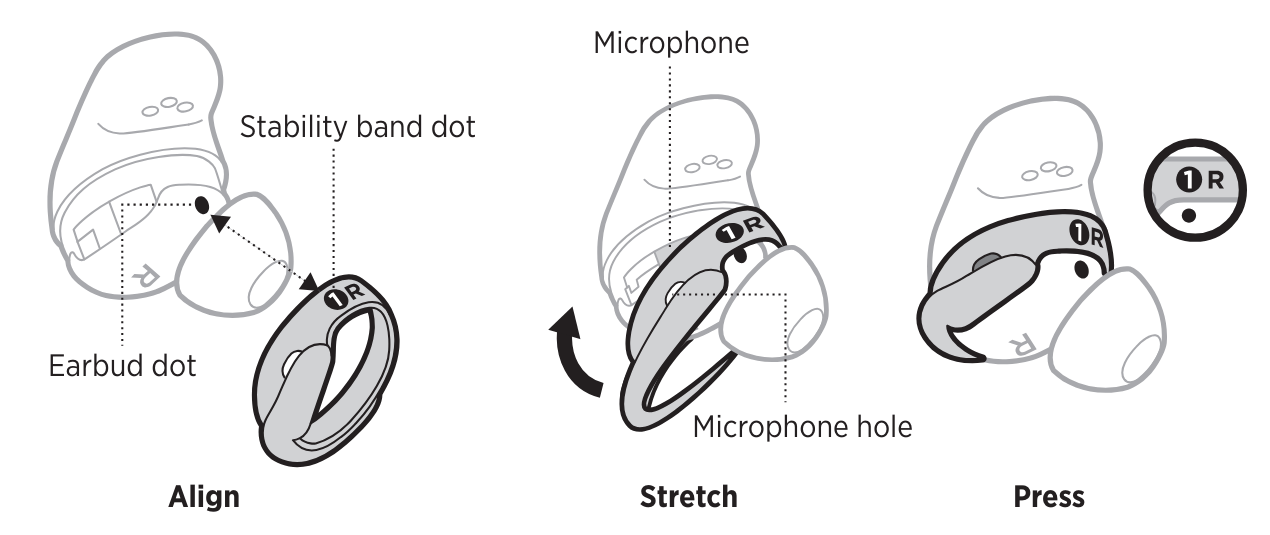 Repeat steps 1 – 5 for the other earbuds, as needed
- insert the earbuds (see page 16).
- Check the fit (see page 17).
POWER
POWER ON
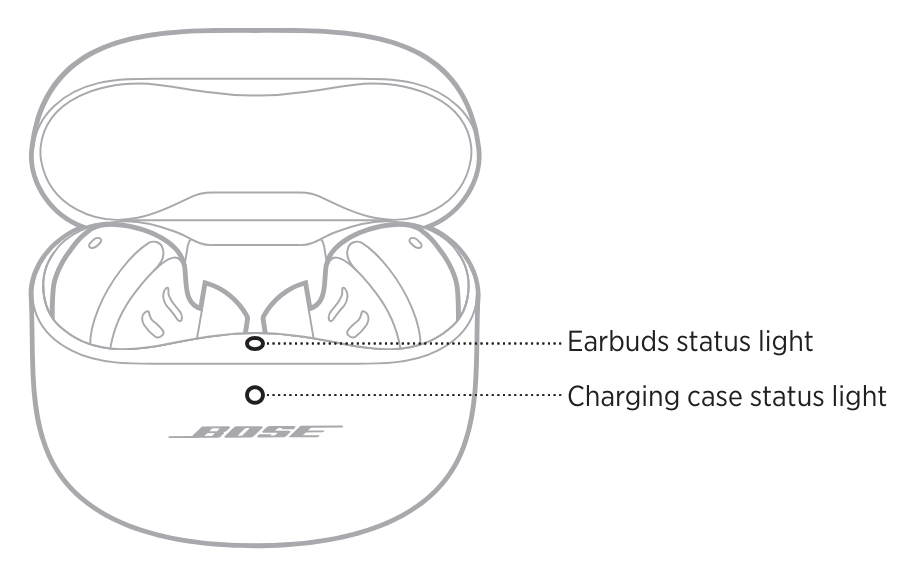
Open the charging case. The earbuds power on. The earbud’s status light blinks white and then glows according to the charging status (see page 36). The charging case status light glows according to the battery level (see page 37).
POWER OFF
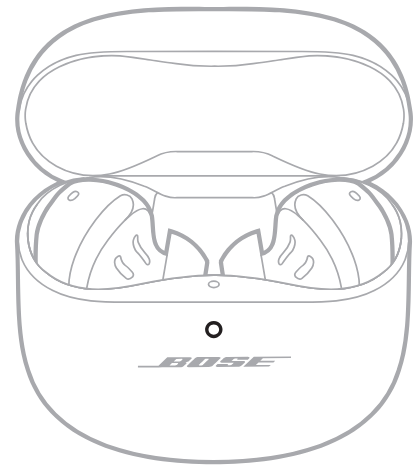
- Place both earbuds in the charging case.
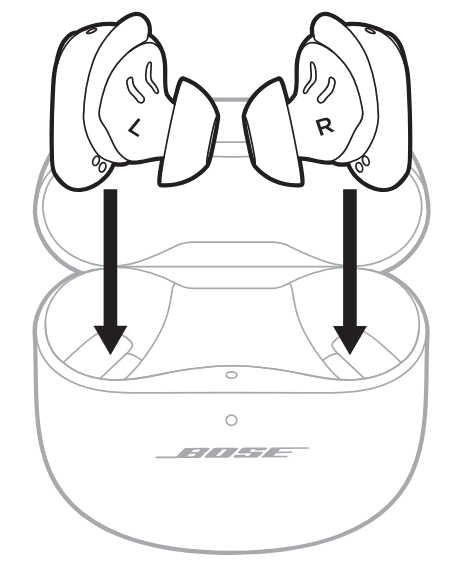 Close the case. The earbuds power off. The charging case status light glows according to the battery level (see page 37)
STANDBY
Standby conserves the earbud battery when an earbud is out of the case and not in use. The earbud switches to Standby when you remove the earbud from your ear for 10 minutes. To wake the earbud, insert the earbud in your ear.
TOUCH CONTROL
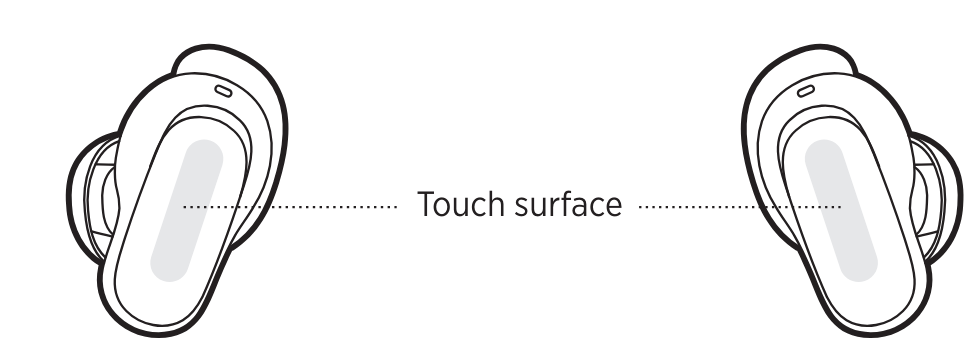
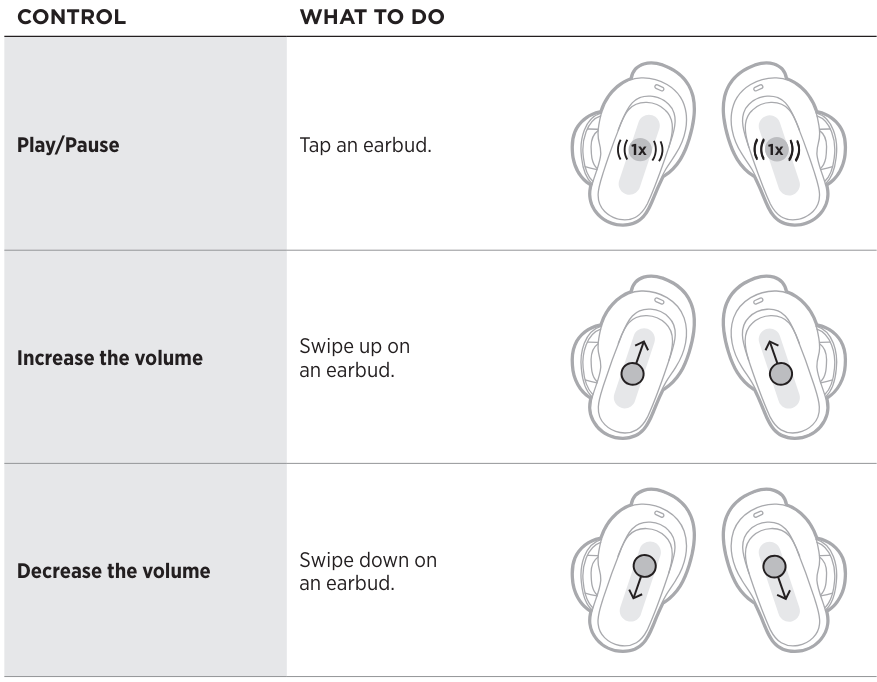
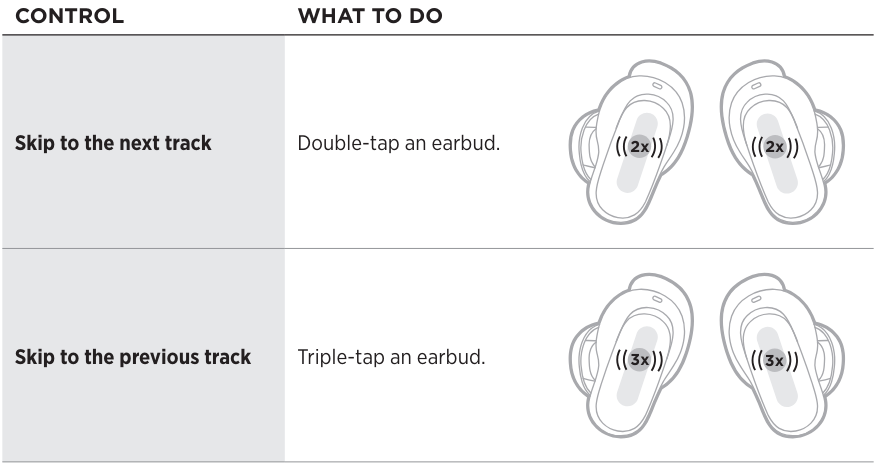
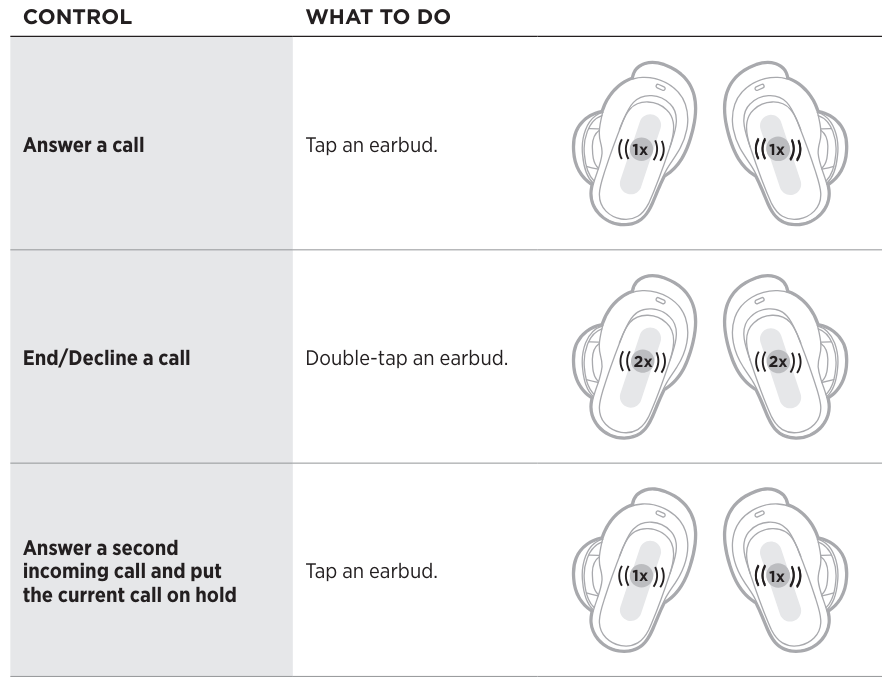
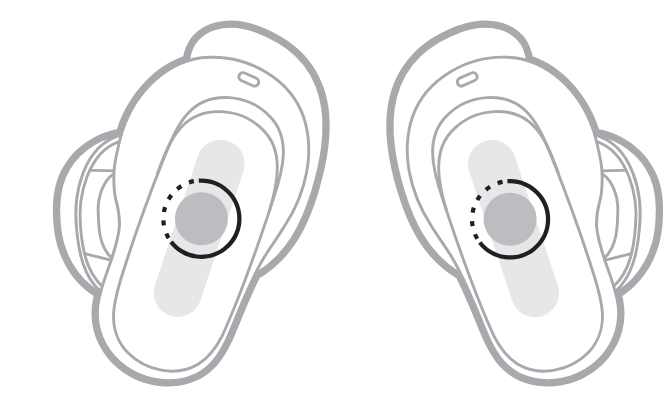
Use touch control by tapping or swiping the touch surface of either earbud. With touch control, you can play/pause audio, change the volume, perform basic call functions, adjust noise cancellation, and use a Shortcut (see page 28).
TOUCH SURFACE AREA
The touch surface is located on the outer surface of both earbuds. It controls media playback, volume, phone calls, noise cancellation, and your Shortcut.
MEDIA PLAYBACK AND VOLUME
PHONE CALLS

Call notifications
A voice prompt announces incoming callers and calls status. To stop call notifications, disable voice prompts using the Bose Music app. You can access this option from the Settings menu.
NOISE CANCELLATION
For information about changing the noise canceling mode, see page 31.
MOBILE DEVICE VOICE CONTROL
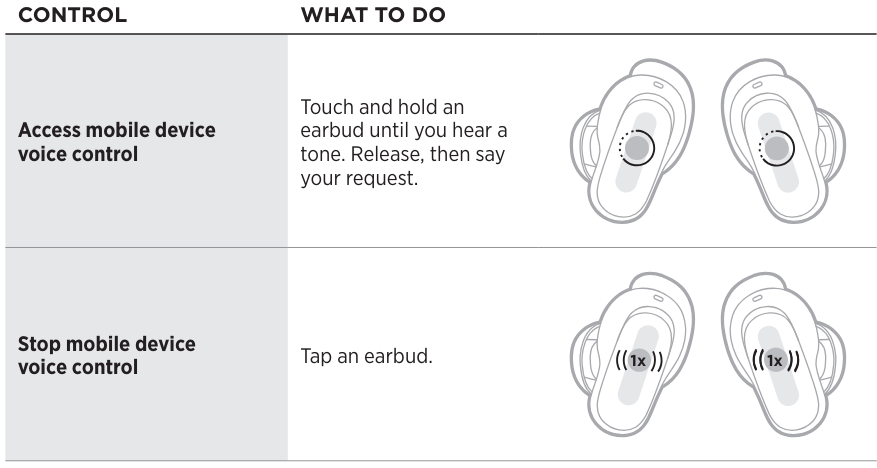
You can set a Shortcut to access your mobile device voice control using the earbuds. The microphone on the earbuds acts as an extension of the microphone on your mobile device.
CUSTOMIZE TOUCH CONTROL
SHORTCUT
A Shortcut enables you to quickly and easily access one of the following functions:
- Cycle through noise-cancelling modes
- Use your mobile device’s voice control
Use your Shortcut
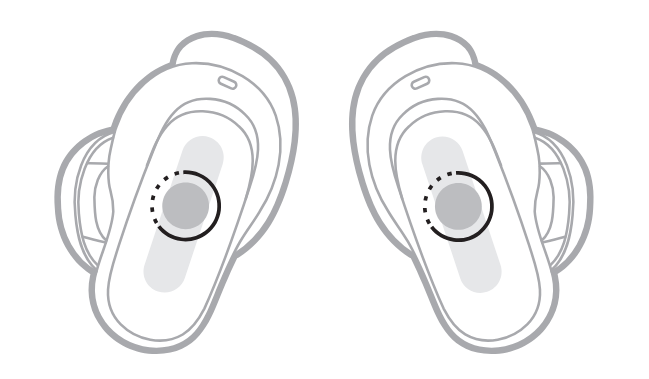
To use your Shortcut, touch and hold an earbud.
Change or disable your Shortcut
To change or disable a Shortcut or to assign a different Shortcut to each earbud, use the Bose Music app. You can access this option from the Settings menu.
IN-EAR DETECTION
In-ear detection uses sensors to identify when you’re wearing both earbuds or just a single earbud. You can automatically play/pause audio, answer phone calls (if enabled), and adjust noise cancellation by inserting or removing an earbud.
AUTO PLAY/PAUSE
When you remove an earbud, audio pauses on both earbuds. To resume audio, reinsert the earbud.
AUTO ANSWER CALL
You can answer phone calls by inserting an earbud.
AUTO TRANSPARENCY
When you remove an earbud, the noise-canceling mode adjusts to Aware Mode on the earbud in your other ear (see page 30). When you reinsert the earbud, the earbud in your ear adjusts to the previous noise-canceling level.
NOISE CANCELLATION
Noise-canceling reduces unwanted noise, providing a clearer and more lifelike audio performance. You can choose between two pre-configured noise canceling modes, Quiet and Aware, or create up to two of your custom modes. Quiet Mode allows you to block out distractions using the highest level of noise cancellation. Aware Mode provides full transparency and allows you to hear your surroundings while enjoying your audio. Aware Mode also includes ActiveSense™ technology to reduce sudden or loud noises. Choose your noise-canceling mode based on your listening preferences and environment.
NOISE CANCELLING MODES
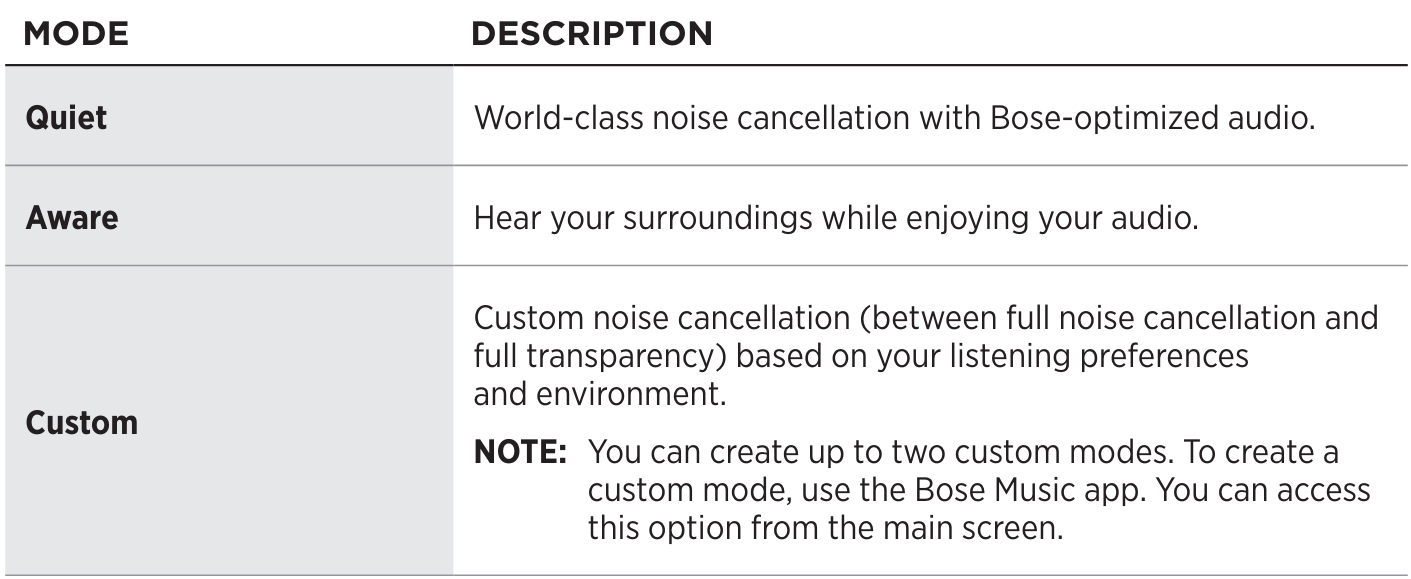
Aware Mode with ActiveSense™
The dynamic noise cancellation of Aware Mode with ActiveSense™ technology allows you to hear your surroundings while reducing unwanted noise. Aware Mode with ActiveSense™ allows the earbuds to automatically turn on noise cancellation when sudden or loud noises occur near you, so you can maintain awareness without intermittent noise interrupting your audio. Once the noise stops, noise cancellation automatically turns off again.
CHANGE NOISE CANCELLING MODE
To cycle through the noise canceling modes, touch and hold an earbud. A voice prompt announces the selected noise-canceling mode.
BATTERY
CHARGE THE EARBUDS
- Align the charging contacts on the left earbud with the charging pins on the left side of the charging case.
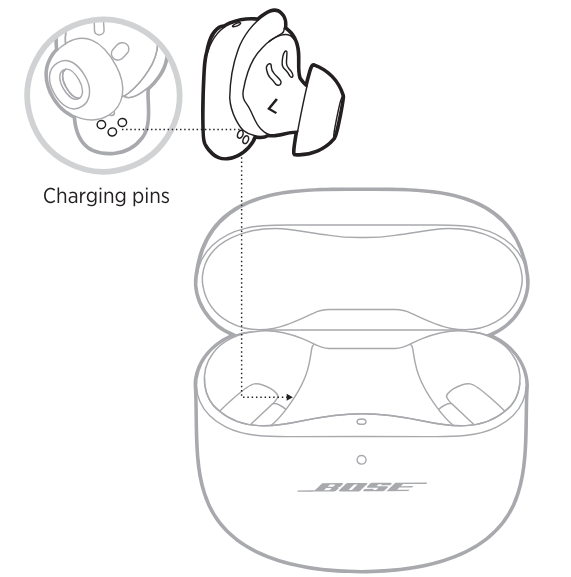 Place the earbud in the case until it magnetically snaps into place. The earbud’s status light blinks white and then glows according to the charging status (see page 36).
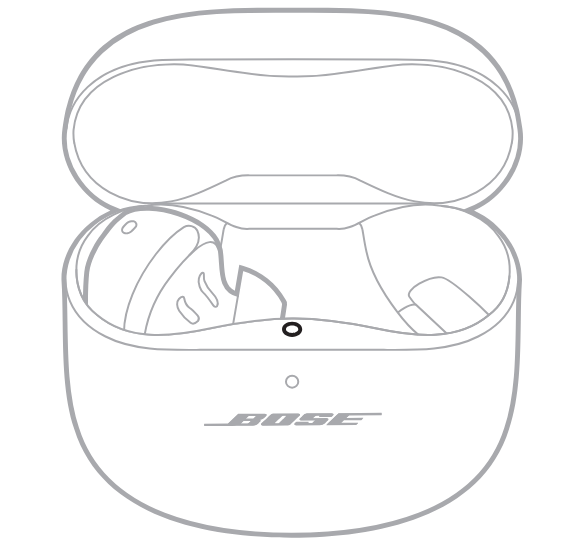 Repeat steps 1 – 2 for the right earbud.
CHARGE THE CHARGING CASE
- Connect the small end of the USB cable to the USB-C® port on the bottom of the charging case.
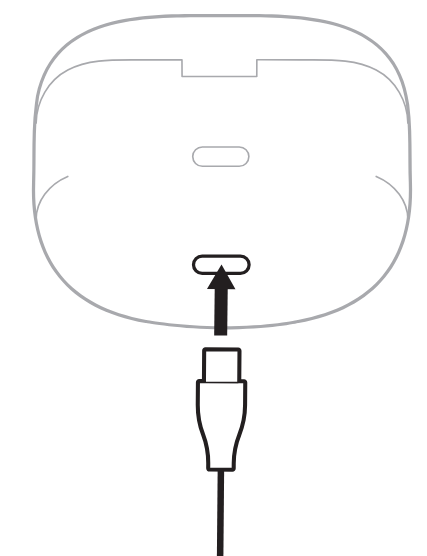 Connect the other end to a USB-A wall charger (not provided) or computer. The charging case status light glows solid amber (see page 37)
CHECK THE EARBUD BATTERY LEVEL
While using the earbuds
- When you remove the earbuds from the charging case and insert them into your ears, a voice prompt announces the earbud battery level.
- Use the Bose Music app. The earbud battery level is displayed on the main screen.
While charging the earbuds
When you place the earbuds into the charging case, the earbud’s status light blinks white and then glows according to the charging status (see page 36).
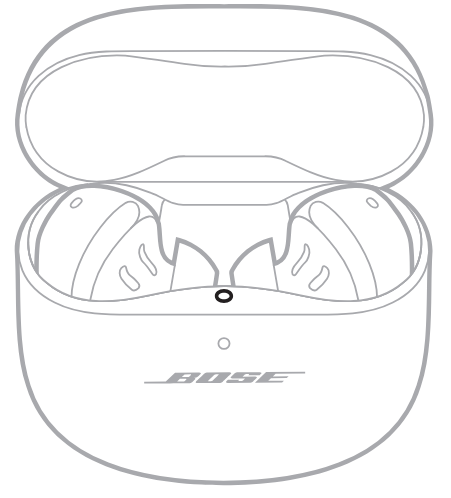
CHECK THE CHARGING CASE BATTERY LEVEL
Open the charging case. The charging case status light glows according to the battery level (see page 37).
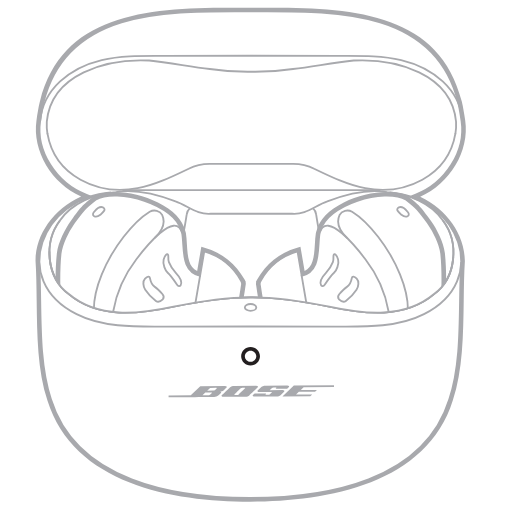
CHARGING TIME

NOTES
- When the earbud battery level is low, a 20-minute charge with the case closed powers the earbuds for up to 2 hours.
- A full charge powers the earbuds for up to 6 hours. Battery life varies depending on usage.
- When the case is fully charged, you can fully charge the earbuds up to 3 times.
- When the earbuds are inside the case, the case charging time varies.
EARBUD AND CHARGING CASE STATUS
EARBUDS STATUS LIGHT
The earbud’s status light is located on the inside surface of the charging case.
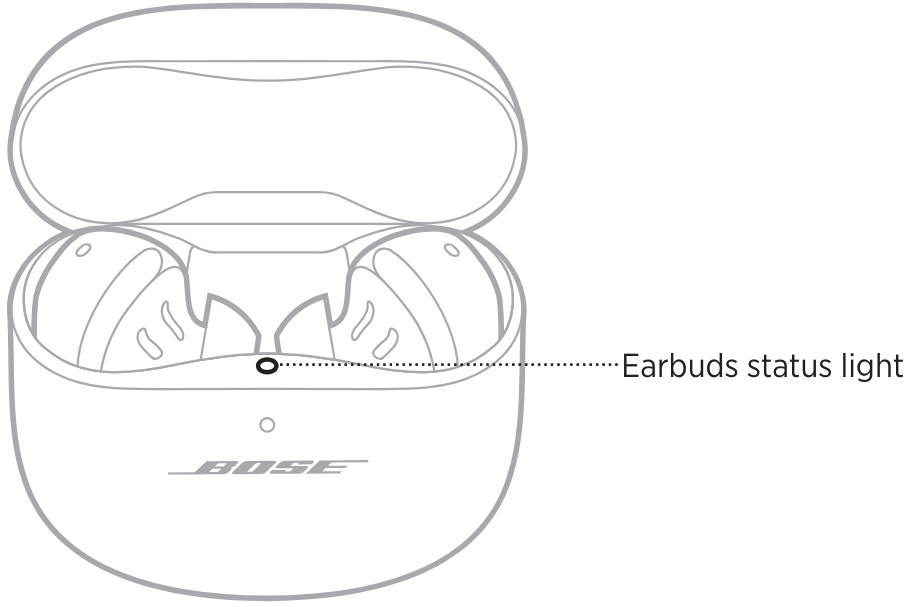
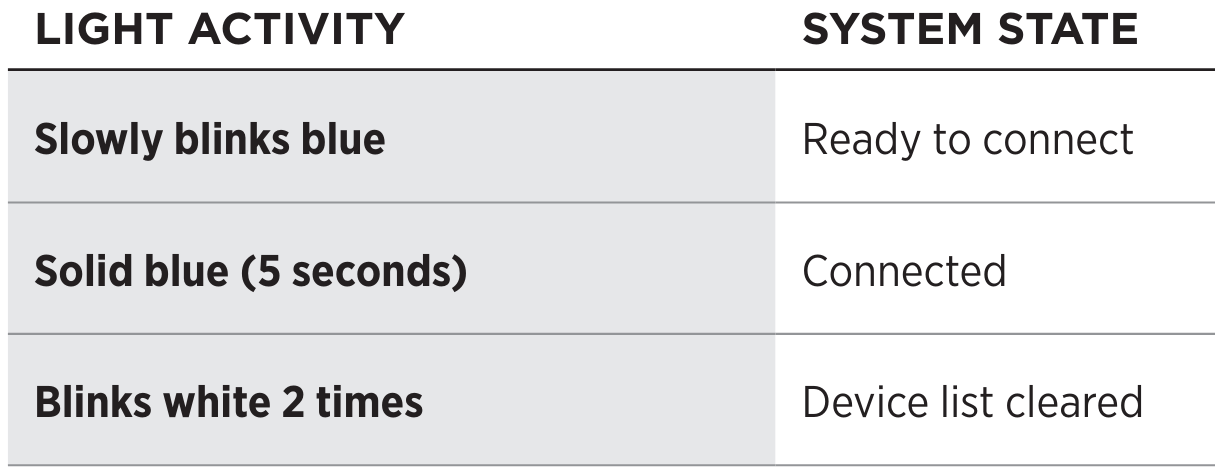
Bluetooth status
Shows the Bluetooth connection status to mobile devices.
CARE AND MAINTENANCE
STORE THE EARBUDS
When you’re not using the earbuds, store them in the charging case. Close the charging case to help preserve battery life and keep the charging case free of debris.
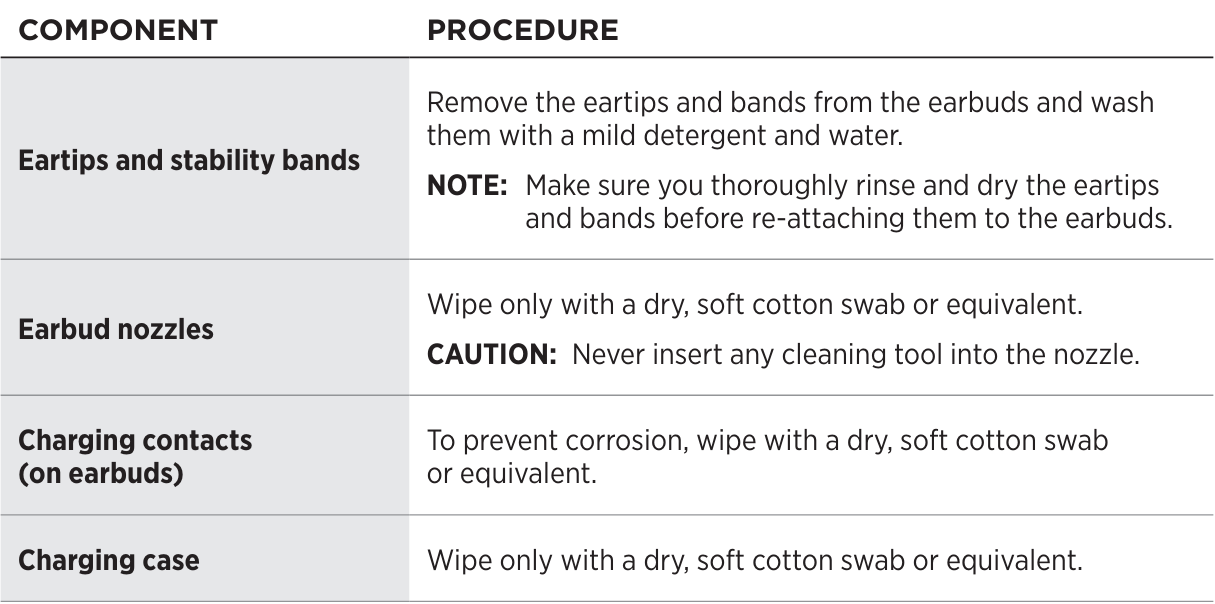
CLEAN THE EARBUDS AND CHARGING CASE
TROUBLESHOOTING
TRY THESE SOLUTIONS FIRST
If you experience problems with the earbuds, try these solutions first:
- Charge the earbuds and the charging case (see page 32).
- Power on the earbuds (see page 23).
- Check the earbuds status light (see page 36) and charging case status light (see page 37).
- Make sure your mobile device supports Bluetooth connections (see page 38).
- Download the Bose Music app and run available software updates (see page 14).
- Move your mobile device closer to the earbuds (30 ft or 9 m) and away from any interference or obstructions.
- Increase the volume on the earbuds, your mobile device, and the music app.
- Connect another mobile device (see page 14).
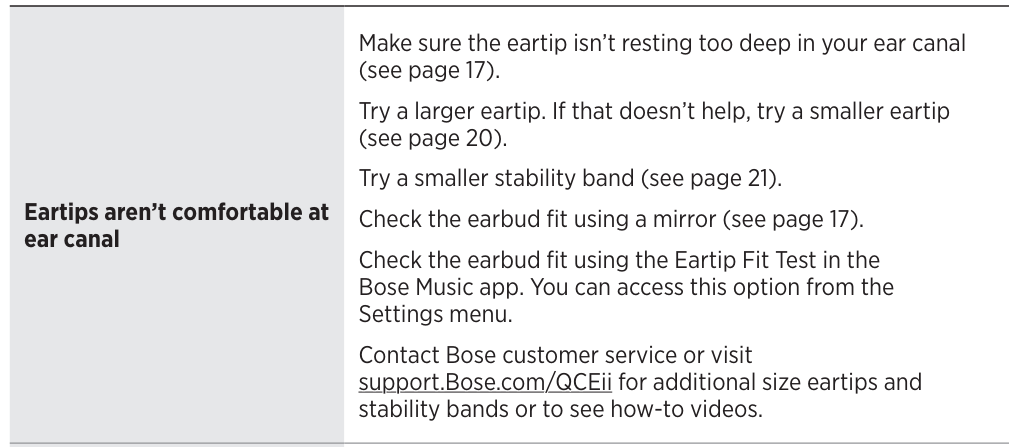
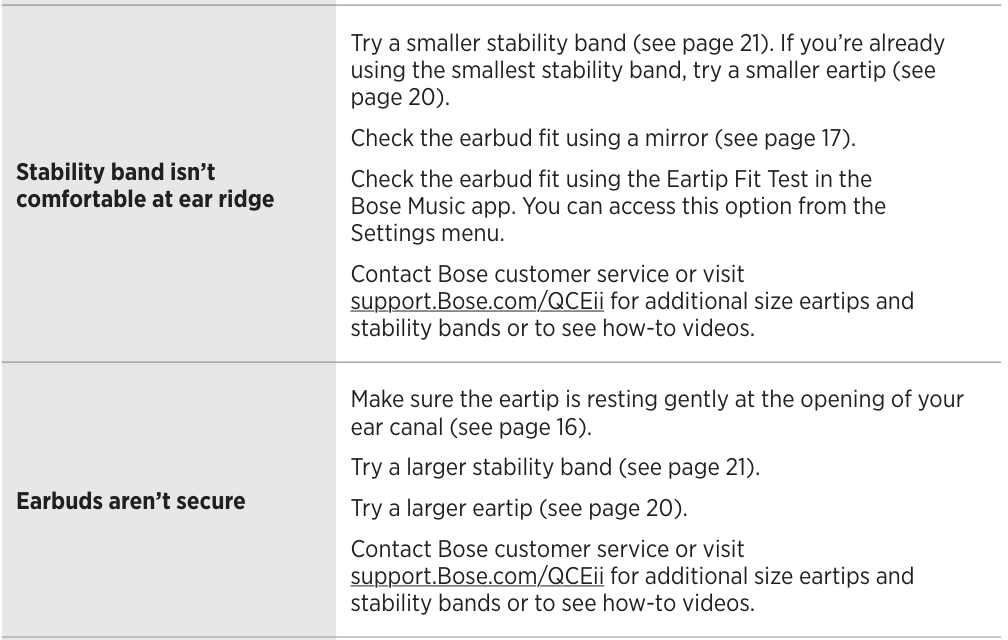
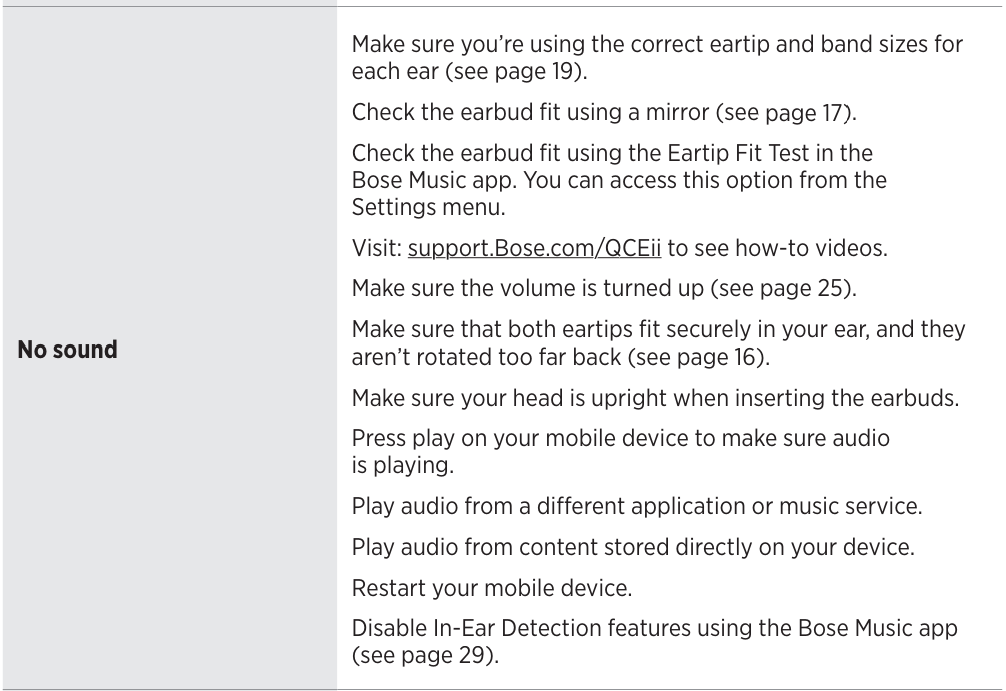
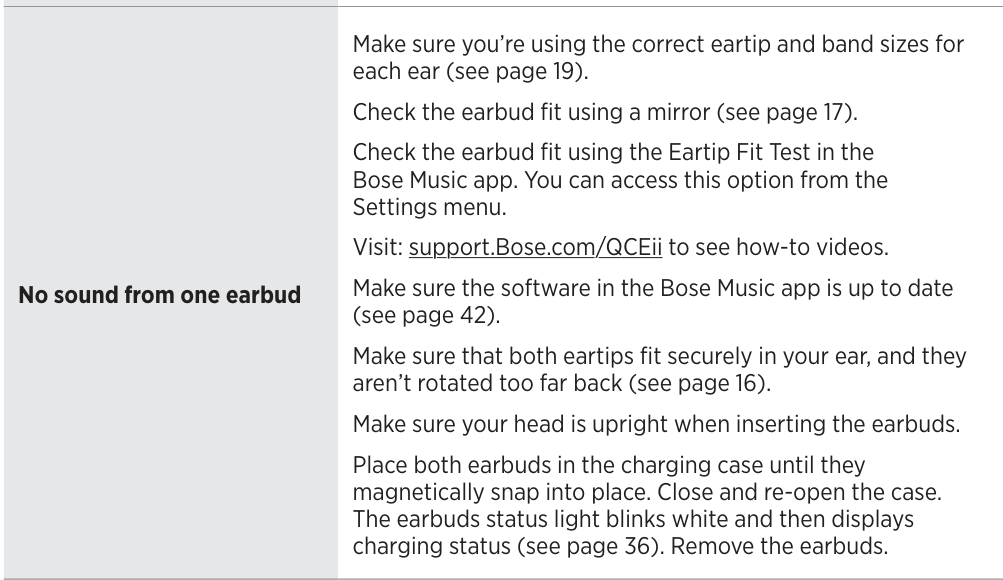
OTHER SOLUTIONS
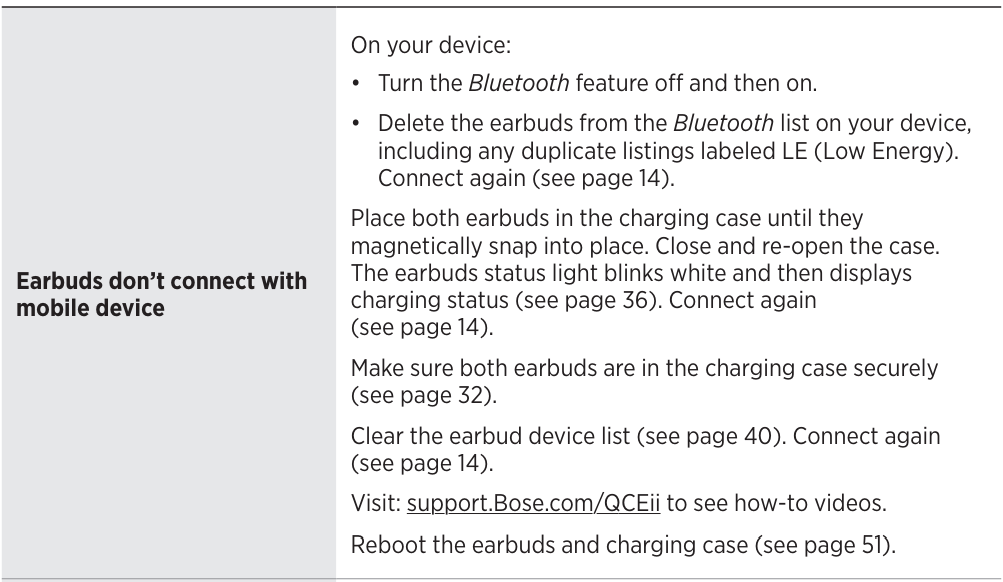
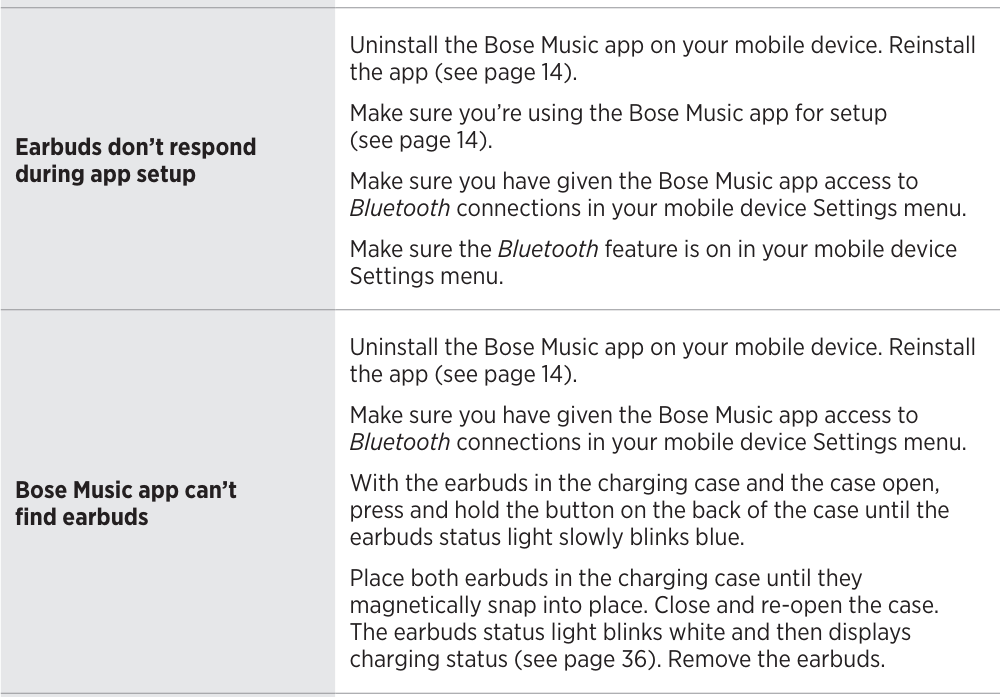
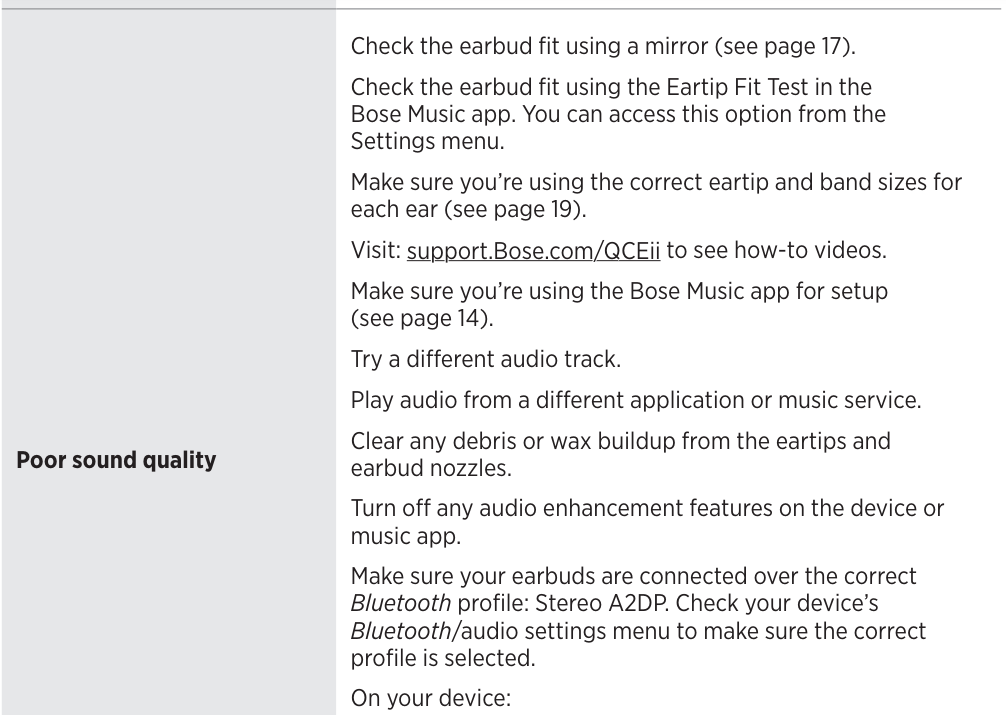
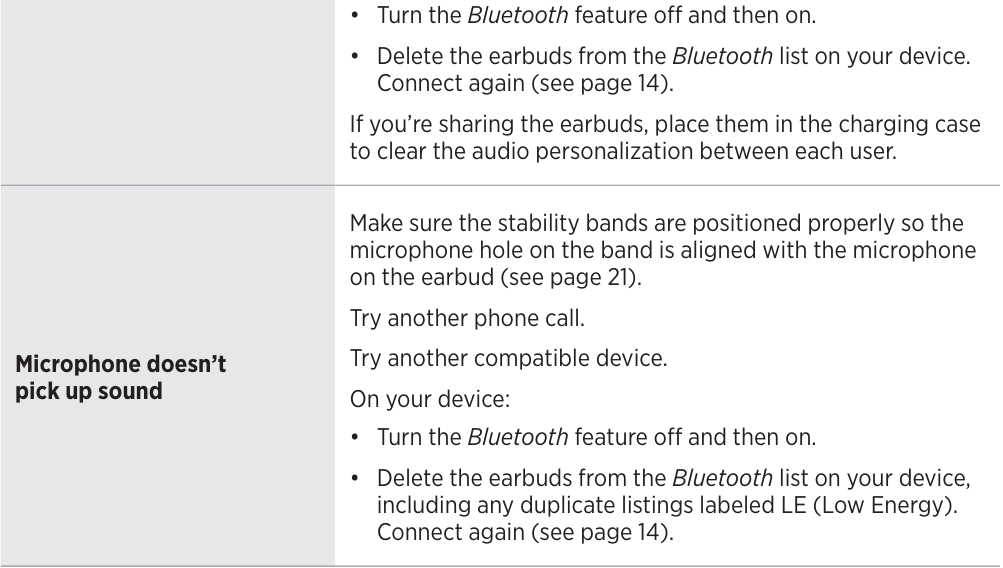
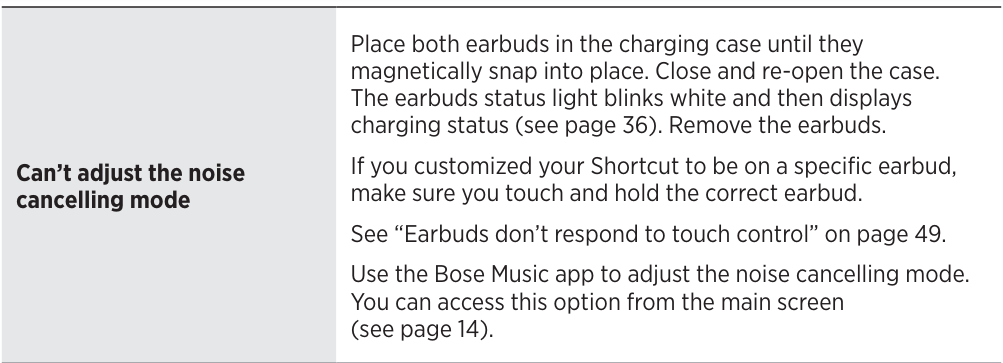
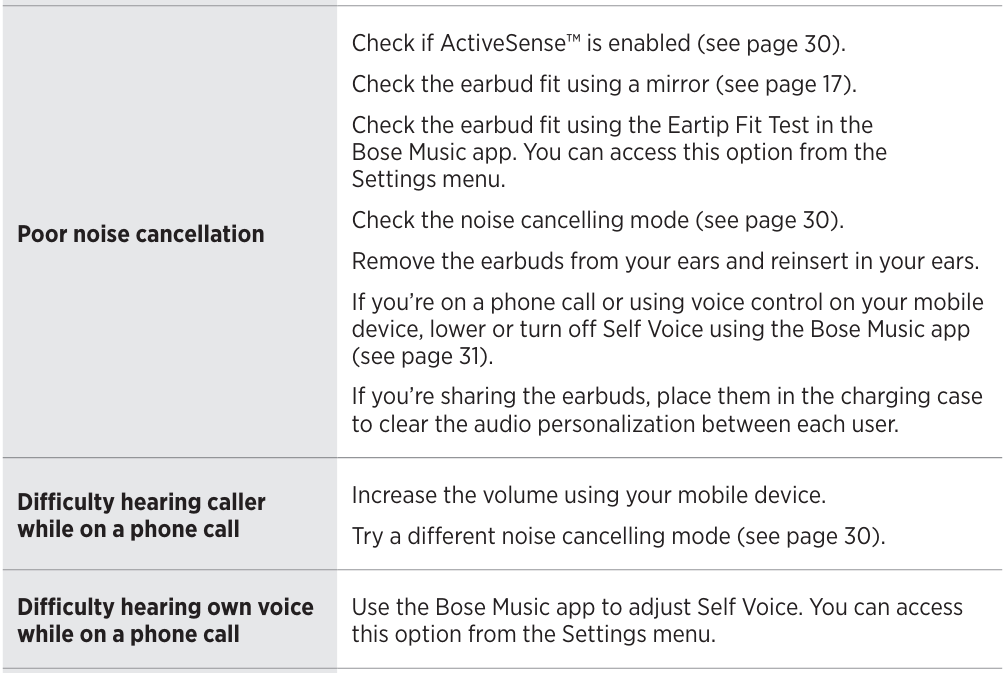
If you cannot resolve your issue, see the table below to identify symptoms and solutions to common problems. If you’re unable to resolve your issue, contact Bose customer service. Visit: worldwide.Bose.com/contact






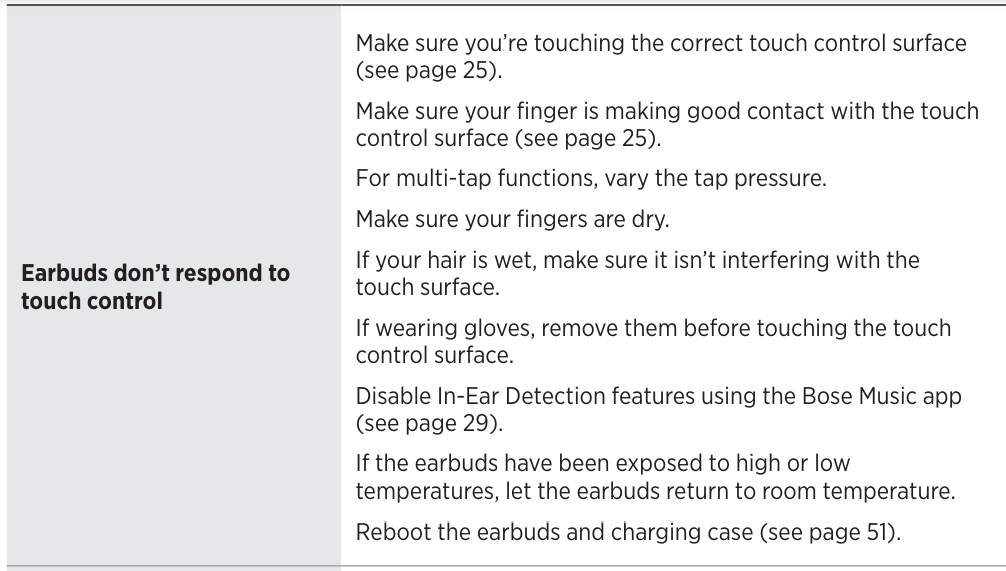
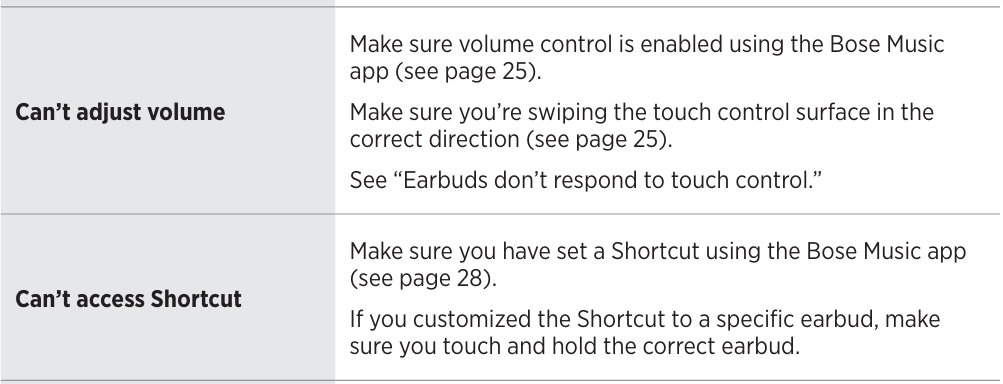
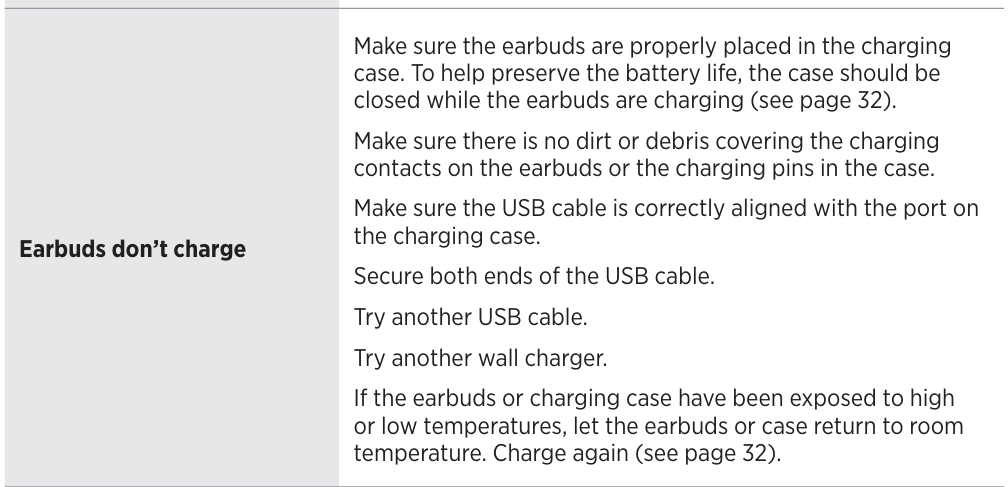
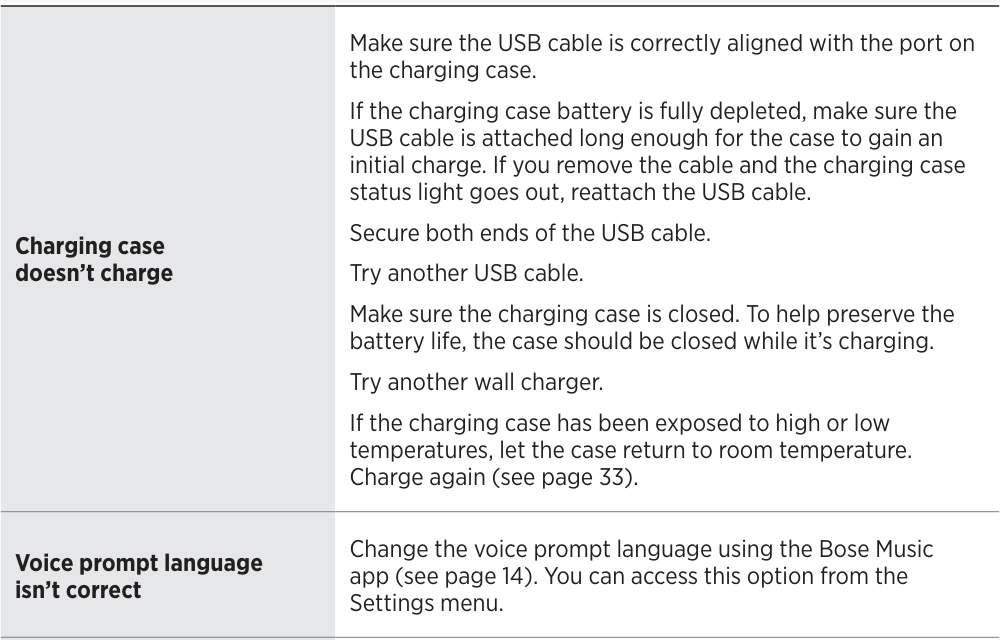

REBOOT THE EARBUDS AND CHARGING CASE
If the earbuds or charging case are unresponsive, you can reboot them. With the earbuds in the charging case and the case open, press and hold the button on the back of the case for 25 seconds until the earbuds status light blinks white 2 times, slowly blinks blue, and then turns off.
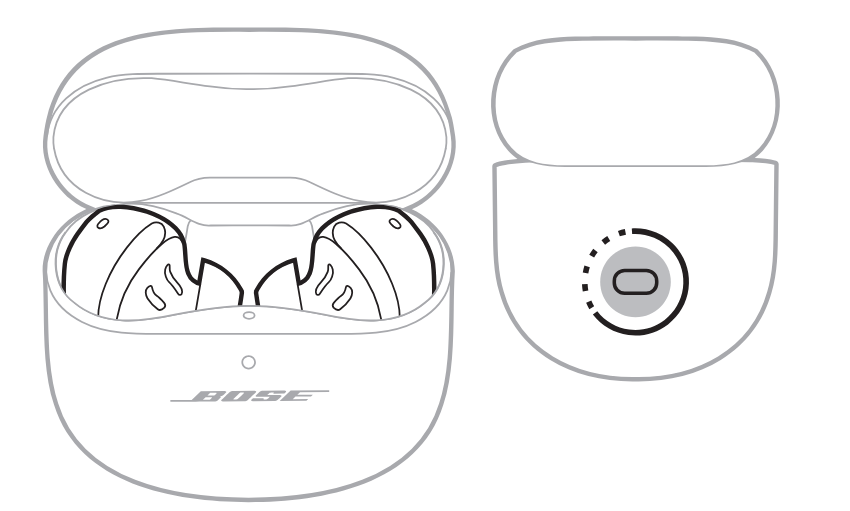
When the reboot is complete, the earbuds status light glows according to the charging status (see page 36), and the charging case status light glows according to the battery level (see page 37).
REPLACEMENT PARTS AND ACCESSORIES
Replacement parts and accessories can be ordered through Bose customer service. Visit: support.Bose.com/QCEii
LIMITED WARRANTY
The earbuds are covered by a limited warranty. Visit our website at worldwide.Bose.com/Warranty for details of the limited warranty. To register your product, visit worldwide.Bose.com/ProductRegistration for instructions. Failure to register will not affect your limited warranty rights.
For more Manuals by BOSE, visit MANUALSDOCK

