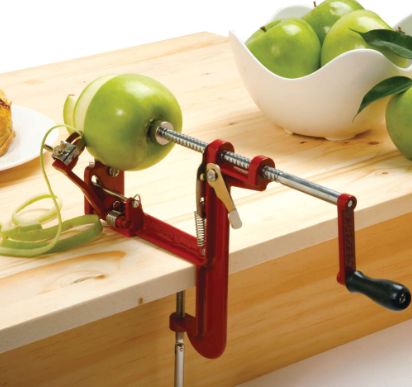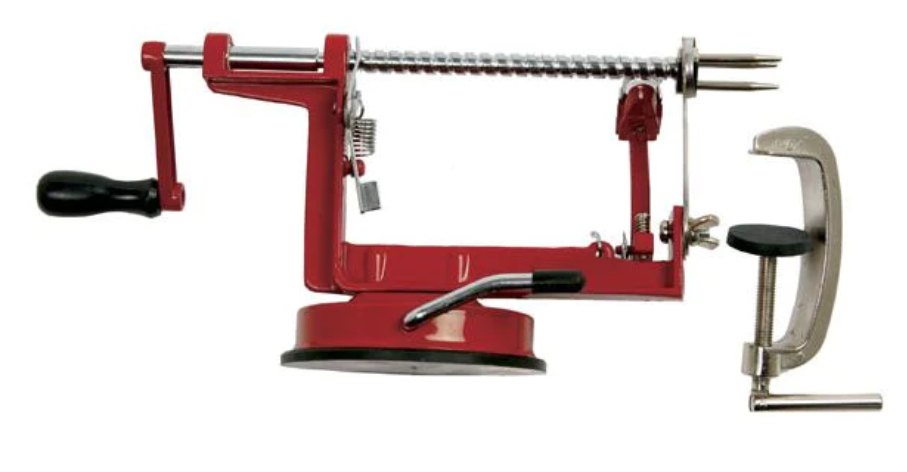
Norpro 866R Master-Apple Parer Slicer and Corer
OPERATING INSTRUCTIONS
TO PARE/CORE/SLICE
- Remove Apple Master from the box clean it with warm soapy water and dry it thoroughly before use.
- Attach the handle to the arm using a Phillips screwdriver.
- Mount the Apple Master to a smooth flat surface. Flip the lever to create a tight suction. (For model 865, you can use the optional clamp to clamp to table).
- Push in the shaft release lever to bring the 3-prong fork into the start position. (See diagram 1)
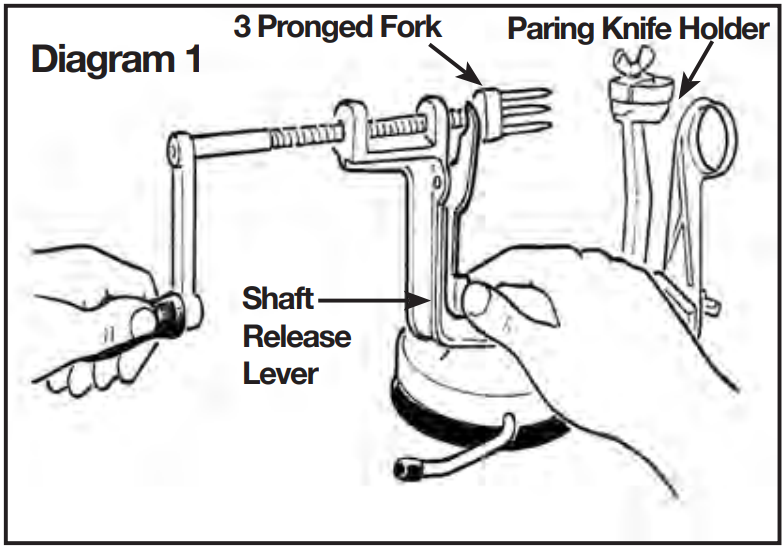 Gently push the apple onto the 3-prong fork, stem first. Be sure the apple core is lined up with the hole in the corer/slicer blade. (See diagram 2)
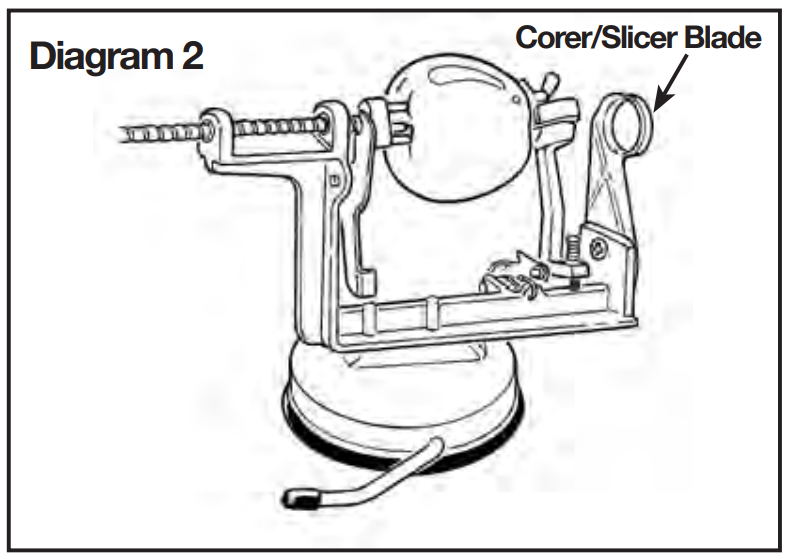 Turn the handle clockwise. Continue turning until the apple is completely through the corer/ slicer (see diagram 3). Minor blade adjustments may be needed if the peel is too thin or thick (See pages 6-7 for details).
 Remove sliced apple and core from 3 3-prong fork. Discard core.
- Repeat steps 4-7 to peel/core/slice more apples.
TO PARE ONLY
Remove the corer/slicer blade to allow the paring knife to work alone, then follow the instructions above.
TO CORE/SLICE ONLY
Pull the paring knife holder back until it locks open to allow the corer/slicer to work alone (see diagram 1), then follow the instructions above.
TO PARE/CORE/SLICE
- Remove Apple Mate I from the box clean it with warm soapy water and dry it thoroughly before use.
- Attach the handle to the arm using a Phillips screwdriver.
- Mount the Apple Mate I to the edge of a counter or tabletop up to 1.75”/4.5cm.
- Push in the shaft release lever to bring the 3-prong fork into the start position. (See diagram 1).
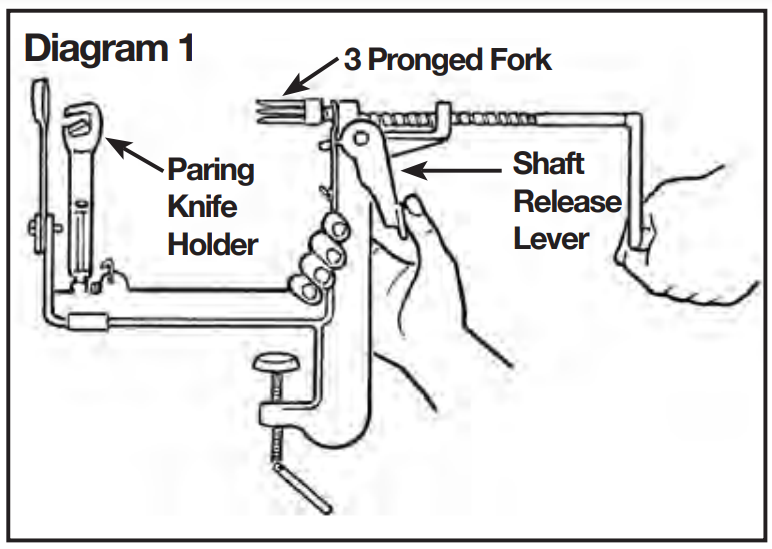 Gently push the apple onto the pronged fork, stem first. Be sure the apple core is lined up with the hole in the corer/slicer blade. (See diagram 2).
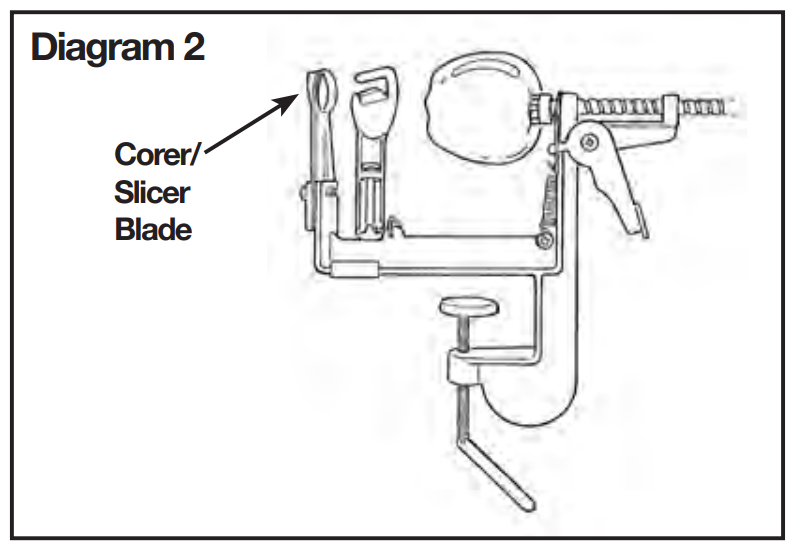 Turn the handle clockwise. Continue turning until the apple is completely through the corer/ slicer. (See diagram 3). Minor blade adjustments may be needed if the peel is too thin or thick (see pages 6-7 for details).
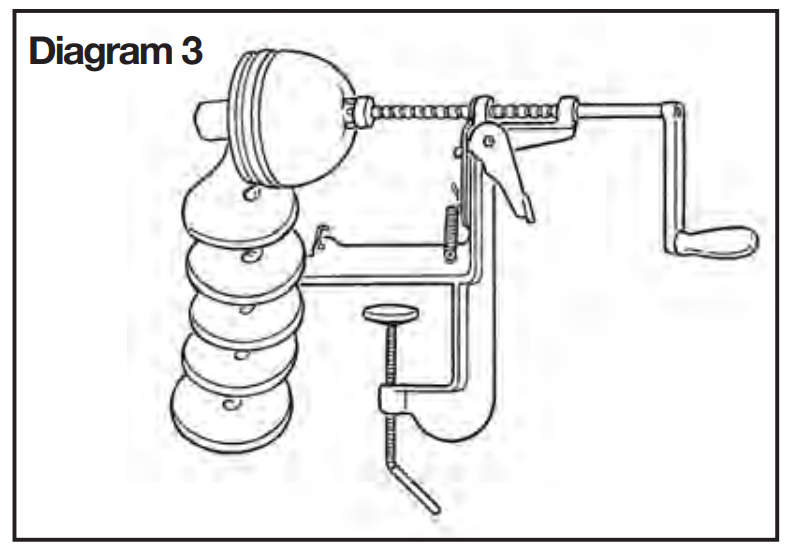 Remove sliced apple and core from 3 3-prong fork. Discard core.
- Repeat steps 4-7 to peel/core/slice more apples.
TO PARE ONLY
Remove the corer/slicer blade to allow the paring knife to work alone, then follow the instructions above.
TO CORE/SLICE ONLY
Pull the paring knife holder by removing the screw and nut attached to it, then follow the instructions above. For troubleshooting, see pages 6-7
TO PARE/CORE/SLICE
- Remove Apple Mate II or III from the box clean it with warm soapy water and dry it thoroughly before use.
- Attach the handle to the arm using a Phillips screwdriver.
- Mount the Apple Mate II or III to the edge of a counter or tabletop up to 2″/5cm thick.
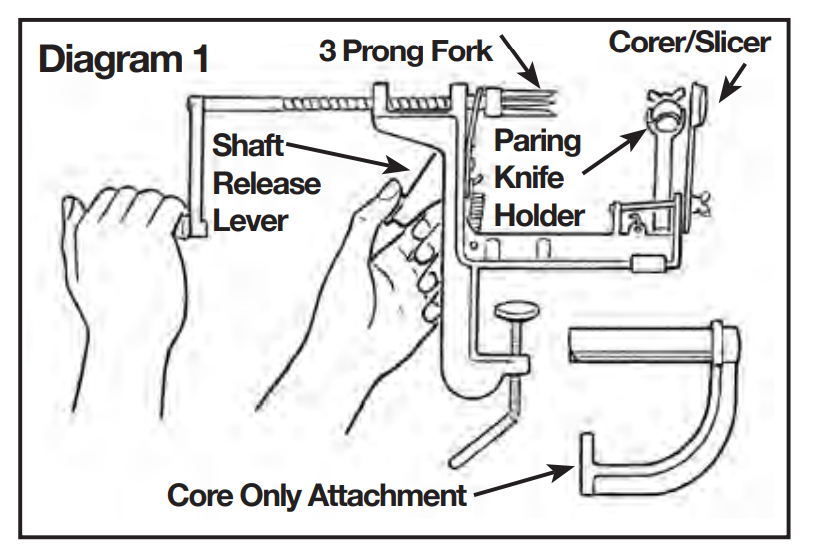
- Push in the shaft release lever to bring the 3-prong fork into the start position. (See diagram 1).
 Gently push the apple onto the 3-prong fork, stem first. Be sure the apple core is lined up with the hole in the corer/slicer blade. (See diagram 2).
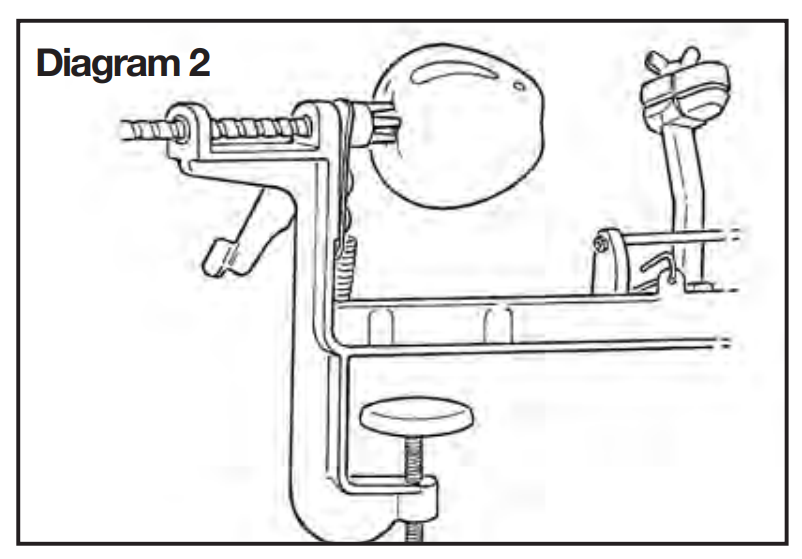 Turn the handle clockwise. Continue turning until the apple is completely through the corer/ slicer. (See diagram 3). Minor blade adjustments may be needed if the peel is too thin or thick See pages 6-7 for details.
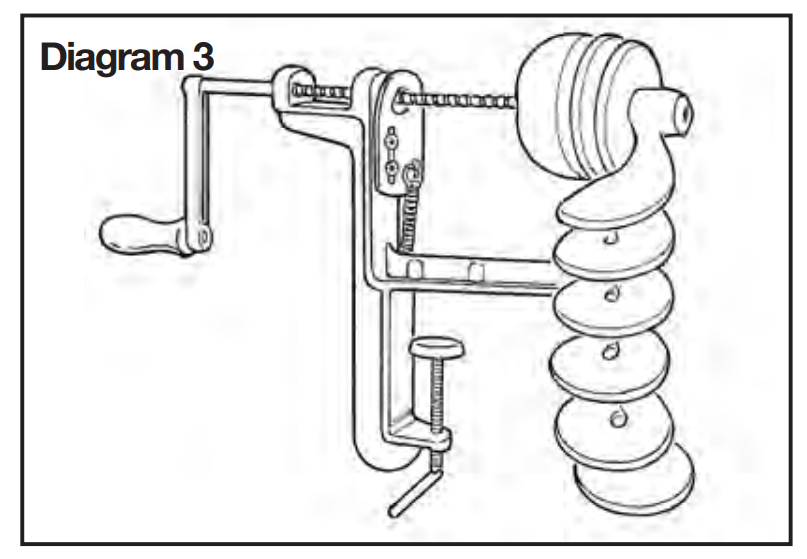 Remove sliced apple and core from 3 3-prong fork. Discard core.
- Repeat steps 4-7 to peel/core/ slice more apples.
TO PARE ONLY
Remove the corer/slicer blade to allow the paring knife to work alone, then follow the instructions above.
TO CORE/SLICE ONLY
Pull back the paring knife holder past the retaining bar. The retaining bar will secure the arm back so that it does not make contact with the apple. Then follow the instructions above.
TO CORE ONLY (for Apple Mate III only – Model 861)
- Pull back the paring knife holder past the retaining bar. The retaining bar will secure the arm back so that it does not make contact with the apple.
- Remove the corer/slicer blade by first removing the wing nut and metal plate.
- Attach the core-only attachment in place of the corer/slicer see diagram 1).
- Follow instructions above.
TO PARE AND CORE ONLY
(For Apple Mate III only – Model 861). Follow the instructions for TO CORE ONLY, but use a paring knife as well. For troubleshooting, see pages 6-7.
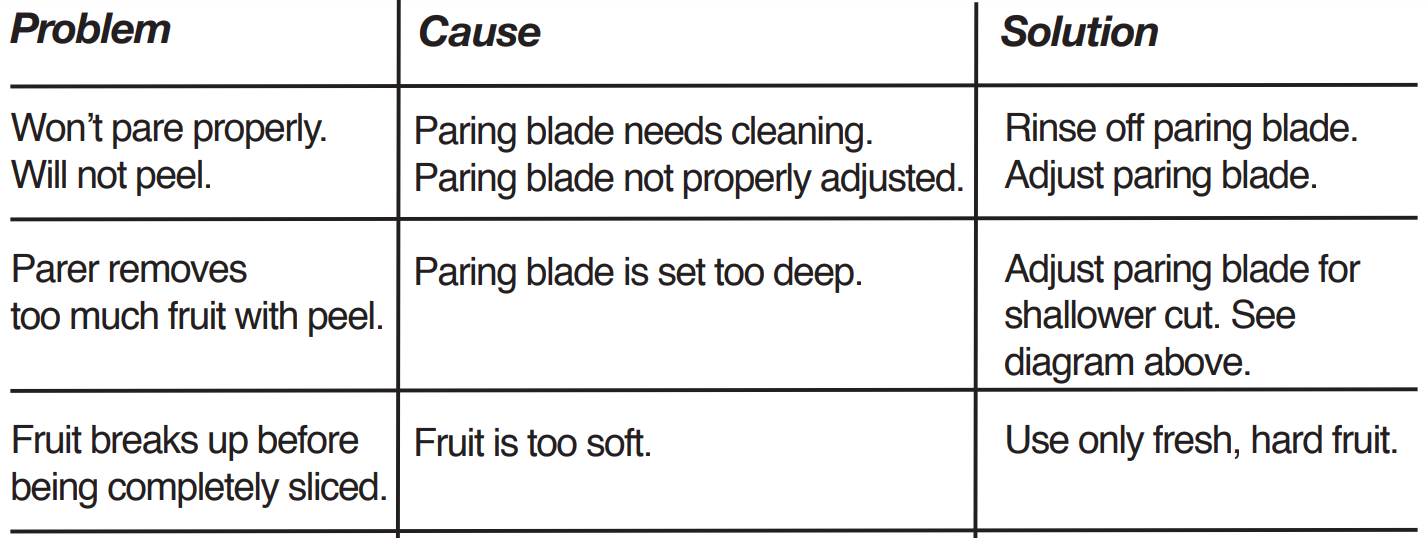
TROUBLESHOOTING
To prevent damage, your Apple Machines must be adjusted properly before each use. Refer to the following instructions each time you set up your machine and you will enjoy years of trouble-free service.
All Models
Be sure Slicer/Corer Blade is facing the right way
When using the slicer/corer blade, be sure the flanged end of the blade faces away from the 3-pronged forks and the support plate is in the proper position. (See diagram below)

All Models
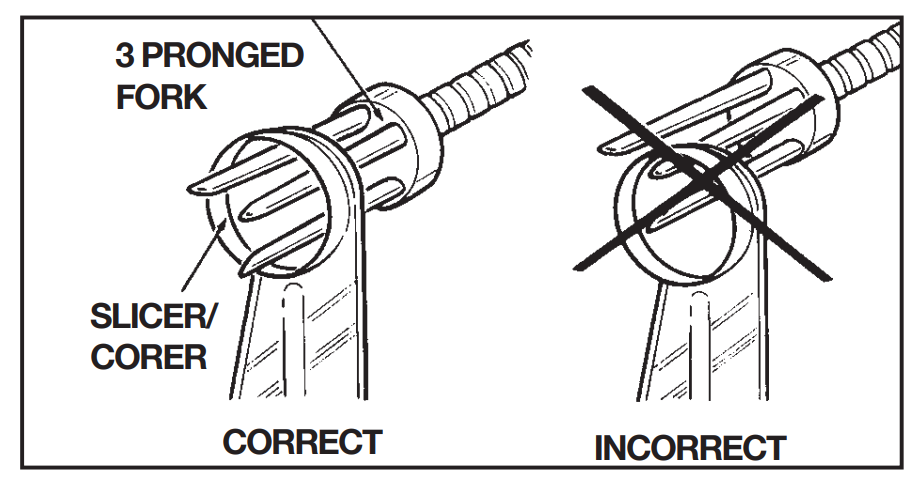
Align Corer or Slicer/Corer Blade
Release the shaft release the lever and push the shaft in. Align the slicer/corer with the 3-pronged fork so that there is an even space around the 3-pronged fork. (See diagram at right).
Model #860
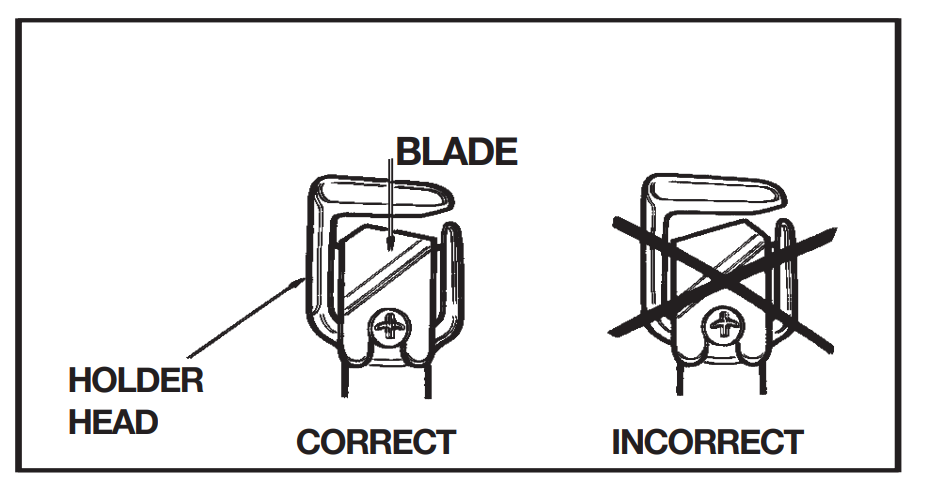
Face Paring Knife Blade the right way
If the paring knife blade has been removed for cleaning, be sure it is facing the right way before using it. (See diagram at right)
Models #861, 864, 865, 866
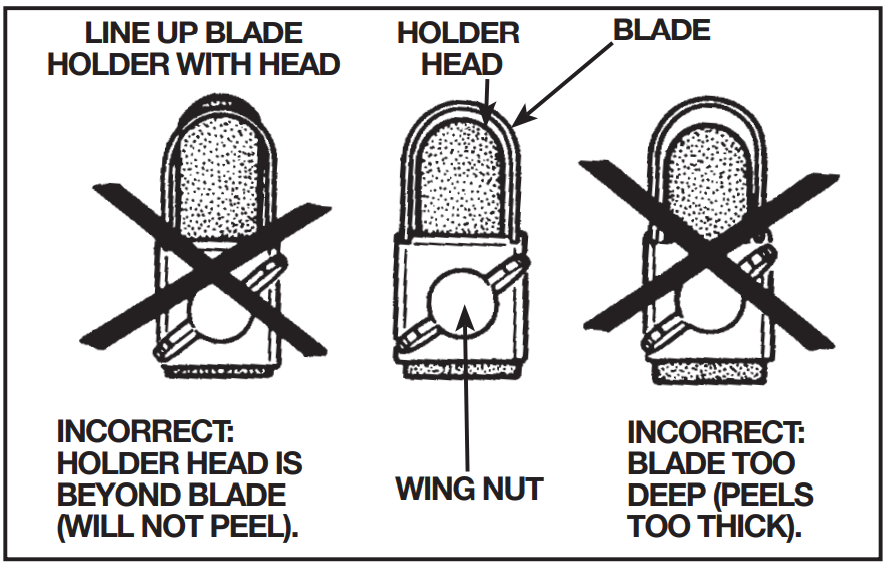
Adjust Paring Knife Blade
The correct setting should have the peeling blade approximately even with the rounded end of the holder. To adjust for proper peeling thickness for different varieties of apples, loosen the wing nut and move the blade forward or back slightly, i.e. 1/32″ until you obtain the desired peeling depth. Make sure there is an even space between the older head and the lade as shown. Hold firmly in the desired position and tighten the wing nut securely. Note: By moving the blade forward (away from the holder) more apples will be peeled and by moving the blade back, fewer apples will be peeled. (See diagram above).
ALL MODELS

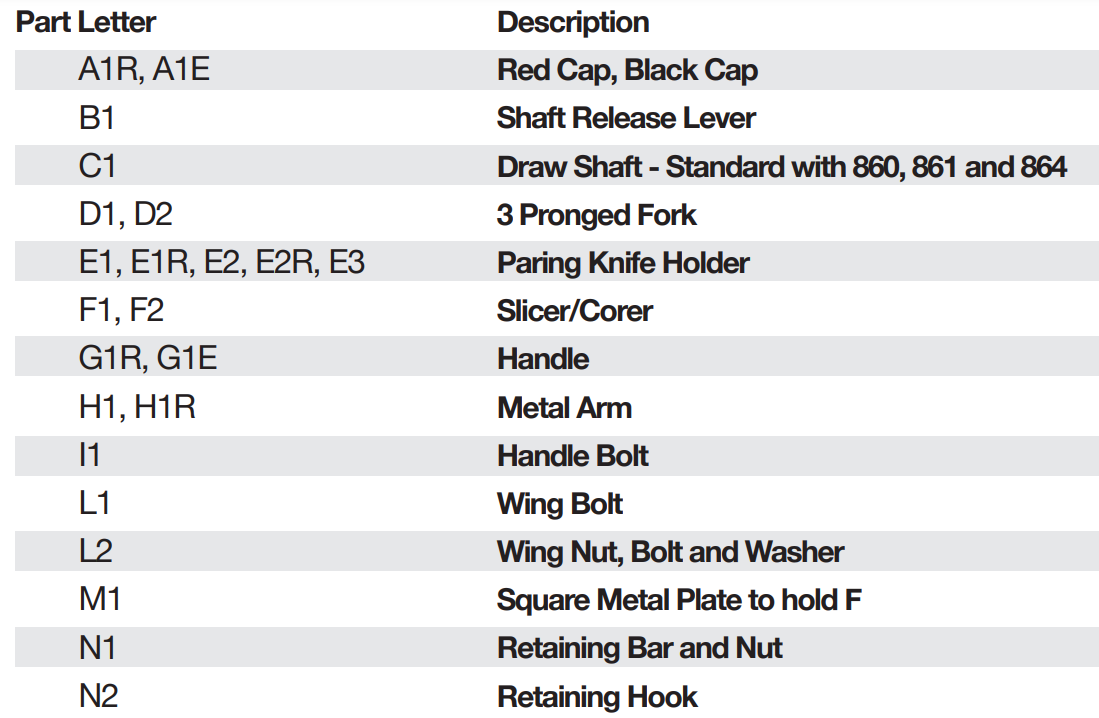
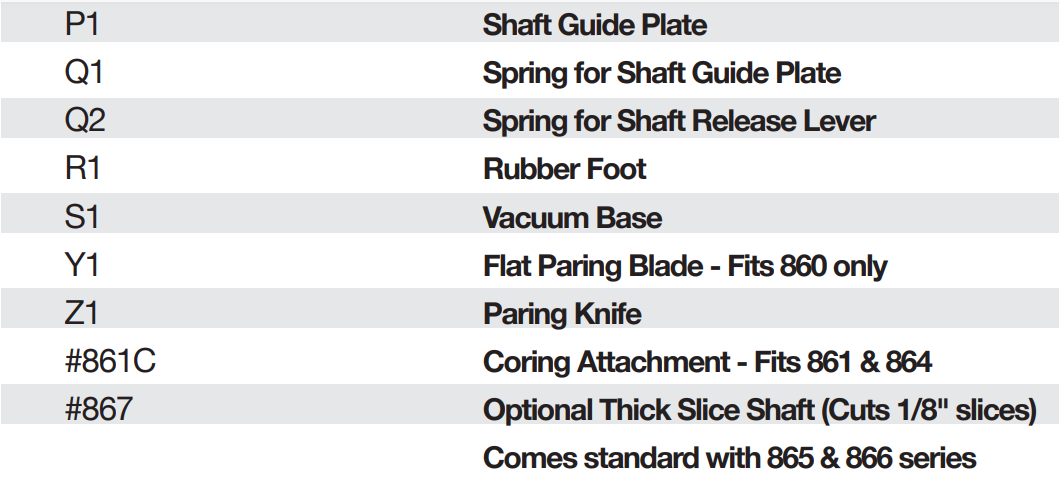
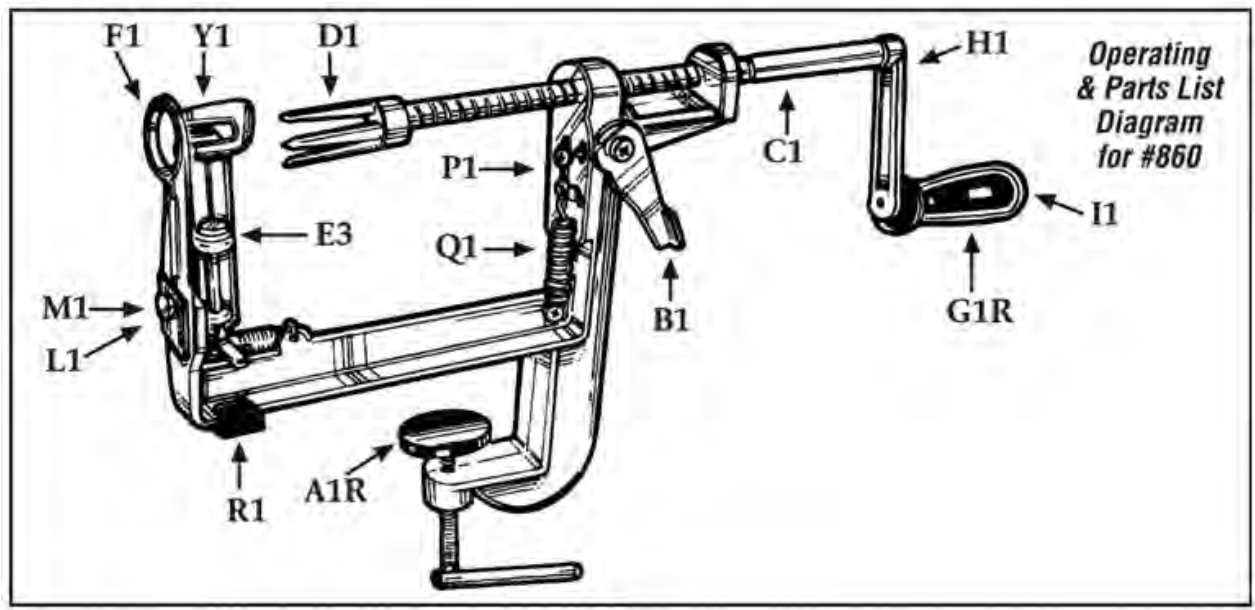
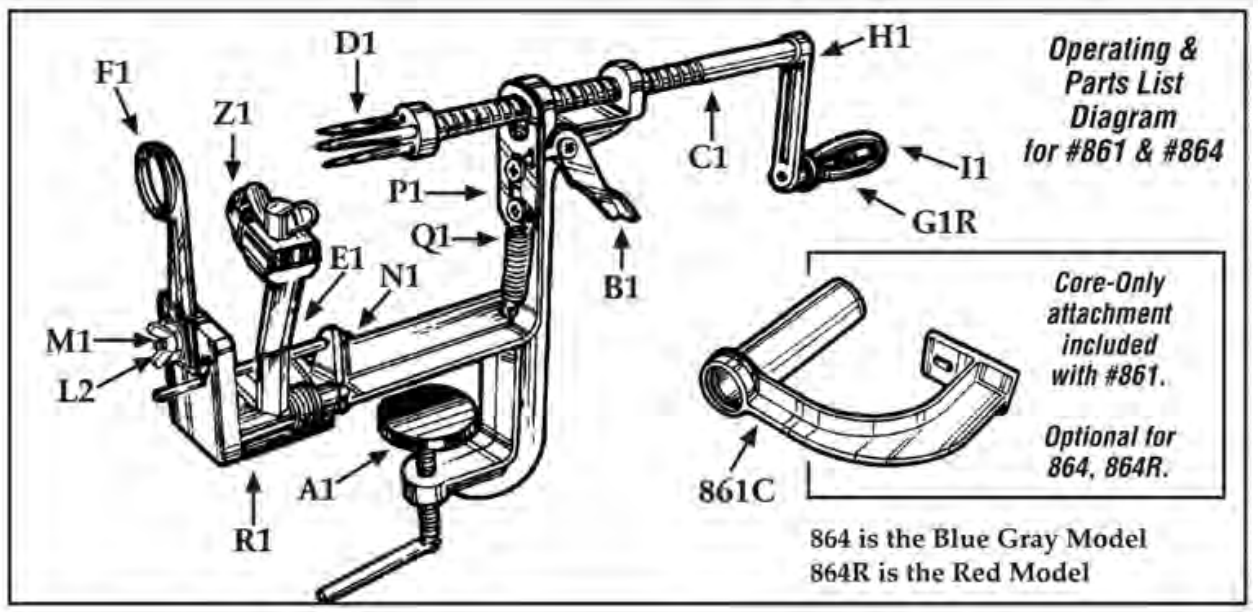
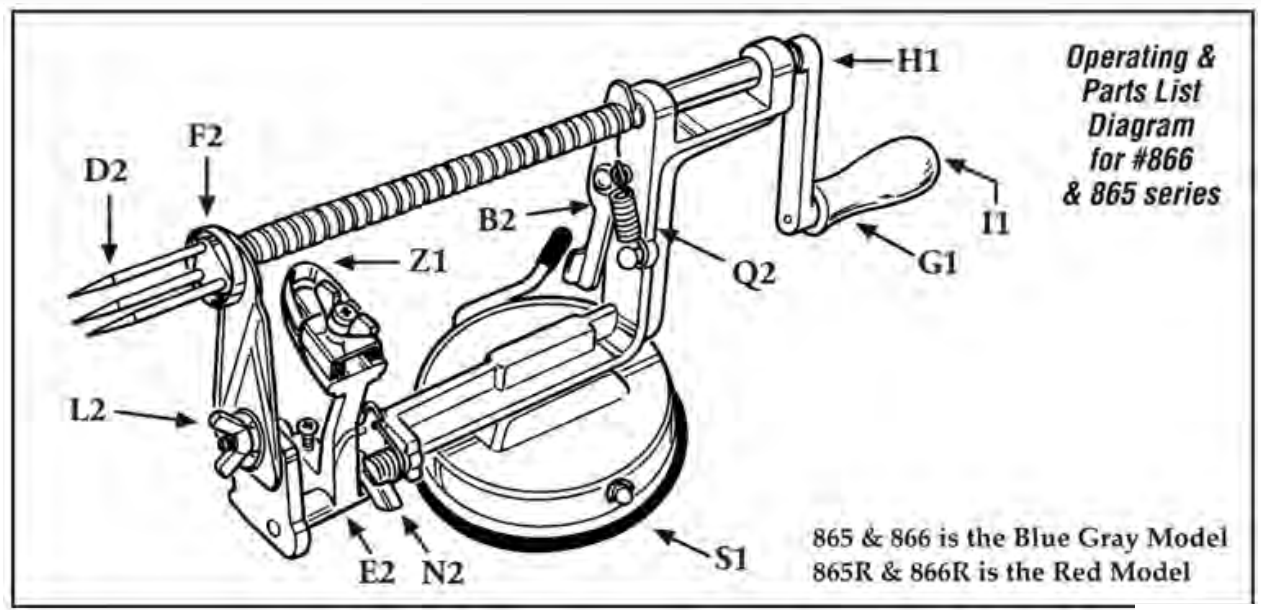
Machine Parts
For more Manuals by NORPOR, visit MANUALSDOCK
FAQS About Norpro 866R Master-Apple Parer Slicer and Corer
What is the Norpro 866R Master-Apple Parer Slicer and Corer?
The Norpro 866R is a kitchen tool designed to peel, slice, and core apples efficiently and quickly.
How does the Norpro 866R work?
The device features a hand crank mechanism that rotates the apple against a peeling blade, removing the skin. It also cores and slices the apple simultaneously.
Is it easy to use?
Yes, the Norpro 866R is relatively easy to use. Simply attach the apple, turn the hand crank, and watch as it peels, cores, and slices the apple.
What types of apples can be used with the Norpro 866R?
The Norpro 866R is designed to work with a variety of apple sizes and shapes, making it versatile for different recipes and preferences.
Is the Norpro 866R dishwasher safe?
The Norpro 866R is mostly made of metal components, so it’s recommended to hand wash it to preserve its longevity.
Can it be used for other fruits?
While primarily designed for apples, some users have reported success using the Norpro 866R for other similarly sized and shaped fruits such as pears.
Does it come with any warranties?
Warranty coverage may vary depending on the retailer or manufacturer. It’s recommended to check the warranty information before purchasing.
How do I clean the Norpro 866R?
To clean the Norpro 866R, disassemble the parts and wash them with warm, soapy water. Dry thoroughly before reassembly.
Is the Norpro 866R durable?
The Norpro 866R is made of sturdy materials like stainless steel and cast iron, making it durable for regular kitchen use.
Can children use the Norpro 866R?
While the Norpro 866R is generally safe to use, it involves sharp blades and moving parts, so it’s recommended to supervise children closely if they are using it.

