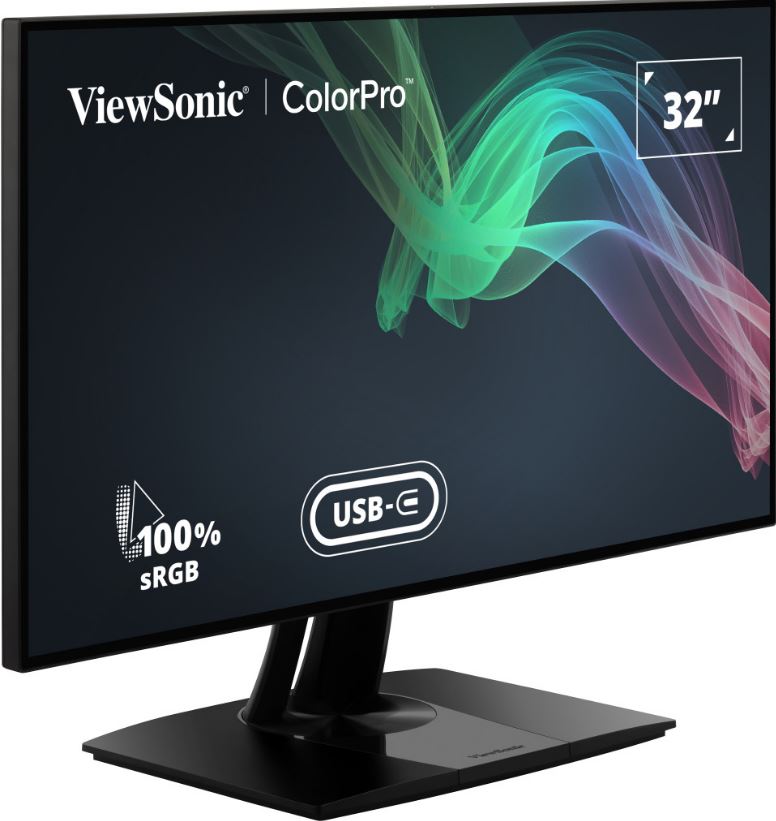
ViewSonic VP3268a-4K 32 Inch IPS 4K Monitor
Safety Precautions
Please read the following Safety Precautions before you start using the device.
- Keep this user guide in a safe place for later reference.
- Read all warnings and follow all instructions.
- Sit at least 18″ (45 cm) away from the device.
- Allow at least 4″ (10 cm) clearance around the device to ensure proper ventilation.
- Place the device in a well-ventilated area. Do not place anything on the device that prevents heat dissipation.
- Do not use the device near water. To reduce the risk of fire or electric shock, do not expose the device to moisture.
- Avoid exposing the device to direct sunlight or other sources of sustained heat.
- Do not install near any heat sources such as radiators, heat registers, stoves, or other devices (including amplifiers) that may increase the temperature of the device to dangerous levels.
- Use a soft, dry cloth to clean the external housing. For more information, refer to the “Maintenance” section of this manual.
- Avoid touching the screen, as oil may collect on the screen if you touch it.
- Do not touch the screen surface with sharp or hard objects, as it may cause damage to the screen.
- Do not place the device on cloth or other materials that may be placed between the product and supporting furniture.
- When moving the device, be careful not to drop or bump the device on anything.
- Do not place the device on an uneven or unstable surface. The device may fall over resulting in an injury or a malfunction.
- Do not place any heavy objects on the device or connection cables.
- Always use cabinets, stands, or installation methods recommended by the manufacturer of the device set.
- Always use furniture that can safely support the device.
- Always ensure the device is not overhanging the edge of the supporting furniture.
- Do not place the device on tall furniture, such as cupboards or bookcases, without anchoring both the furniture and the device to a suitable support.
- Always educate children about the dangers of climbing on furniture to reach the device or related equipment.
- Do not place the monitor where children are likely to be present.
- Do not place items that might tempt children to climb, such as toys and remote controls, on the top of the device or furniture on which the product is placed.
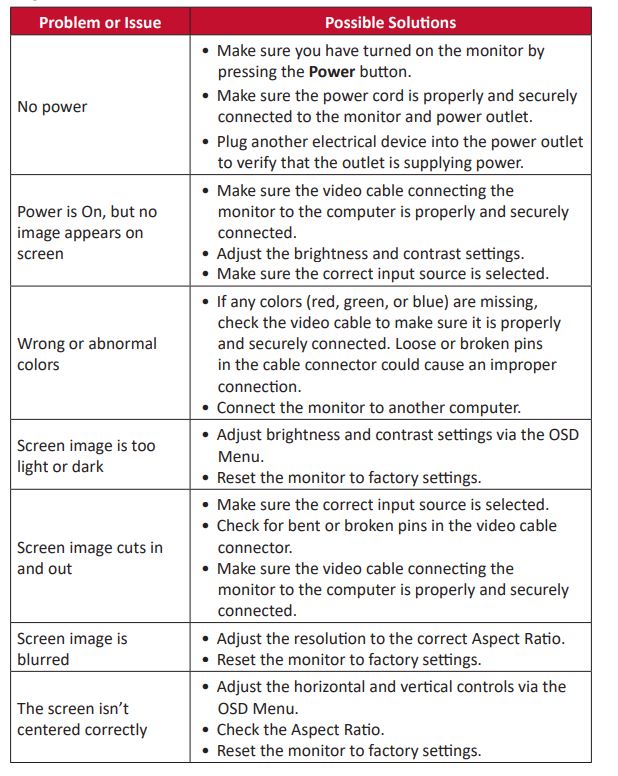
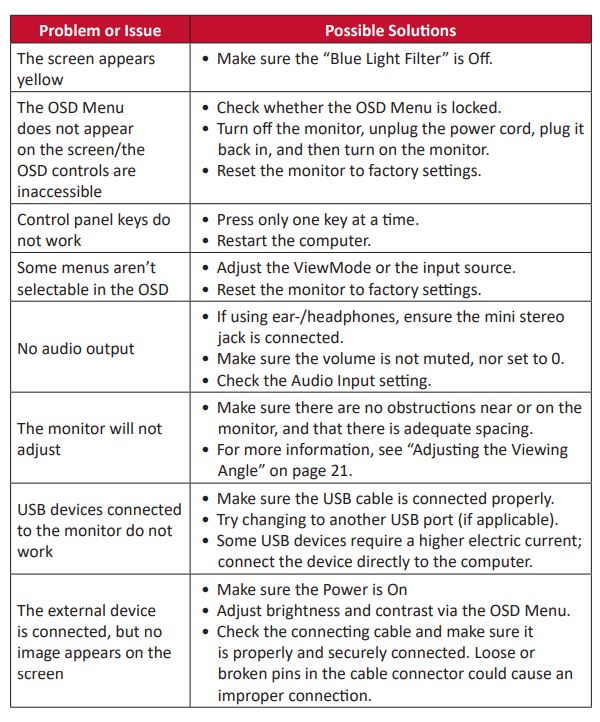
- If smoke, an abnormal noise, or a strange odor is present, immediately turn the device off and call your dealer or ViewSonic®. It is dangerous to continue using the device.
- Do not attempt to circumvent the safety provisions of the polarized or grounding-type plug. A polarized plug has two blades one wider than the other. A grounding-type plug has two blades and a third grounding prong. The wide blade and the third prong are provided for your safety. If the plug does not fit into your outlet, obtain an adapter and do not attempt to force the plug into the outlet.
- When connecting to a power outlet, Do not remove the grounding prong. Please ensure grounding prongs are never removed.
- Always route and manage cords and cables connected to your device so they cannot be tripped over, pulled, or grabbed.
- Protect the power cord from being trodden upon or pinched, particularly at the plug, and at the point where it emerges from the equipment. Ensure that the power outlet is located near the equipment so that it is easily accessible.
- Disconnect the power plug from the power outlet if the device is not being used for a long period.
- Please confirm the distribution system installed in the building. The system should provide a circuit breaker rated at 120/240V, 20A.
- Only use attachments/accessories, such as carts, stands, tripods, brackets, or tables, specified by the manufacturer.
- When a cart is used, use with caution when moving the cart/equipment combination to avoid injury from tipping over.
- Refer all servicing to qualified service personnel. Service will be required when the unit has been damaged in any way, such as:
- if the power supply cord or plug is damaged.
- if the liquid is spilled onto or objects fall into the unit.
- if the unit is exposed to rain or moisture.
- if the unit does not operate normally or has been dropped.
- When using ear-/headphones, adjust the volume to appropriate levels, or hearing damage may result.
- Fastening the display to a wall or fixed object using cordage or other restraining devices can help support the weight of the display to prevent the display from falling over.
NOTE:
- The restraining device/cordage should be able to withstand 100N force.
- Make sure the cordage is straightened, and any slack is removed. The back of the device shall face the wall to ensure the device cannot tilt under external force
- Make sure the display does not tilt under external force at any height and rotation angle of the device.
- If the existing display is going to be retained and relocated, the same considerations as above should be applied.
Product Overview
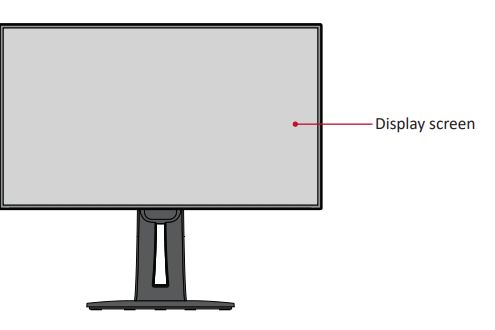
Front View
Rear View
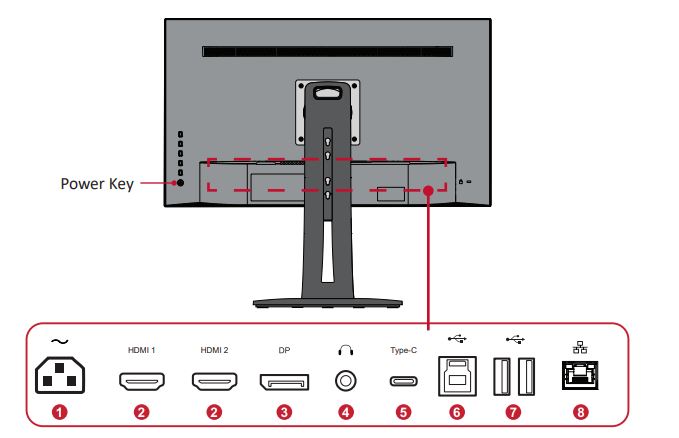
- AC IN
- HDMI
- DisplayPort
- Audio Out
- USB Type C
- USB Upstream
- USB Downstream
- LAN
NOTE:
For more information about the 1/2/3/4/5 key and its functions, refer to “Hot Keys” on page 28.
Initial Setup
This section provides detailed instructions for setting up your monitor.
Installing the Stand
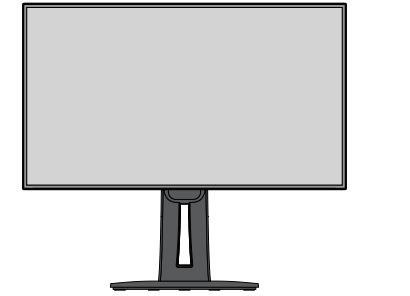
- Place the monitor on a flat, stable surface with the screen facing down.
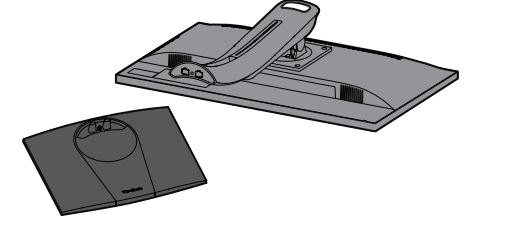
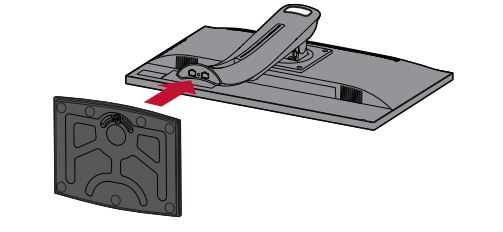
- Align and connect the two (2) points on the monitor stand’s base with the monitor stand’s neck.
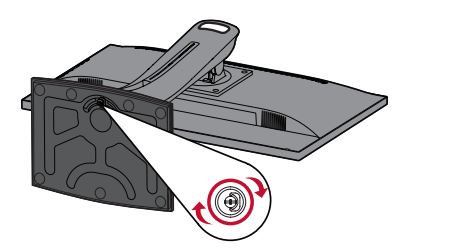
- Use the captured screw in the monitor stand’s base and secure it to the monitor stand’s neck.
- Lift the device into its upright position on a flat, stable surface.
NOTE:
Always place the device on a flat, stable surface. Failure to do so may cause the device to fall and damage the device and/or result in personal injury.
Wall Mounting
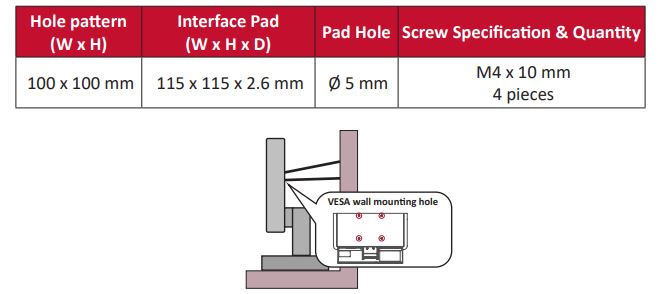
Refer to the table below for the standard dimensions for wall mount kits.
NOTE:
For use only with a UL-certified wall mount kit/bracket. To obtain a wall-mounting kit or height adjustment base, contact ViewSonic® or your local dealer.
- Turn off the device and disconnect all cables.
- Place the device on a flat, stable surface with the screen facing down.
- Remove the four (4) screws
- Pull down slightly to disengage the hooks and remove the stand.
- Attach the mounting bracket to the VESA mounting holes at the rear of the monitor. Then secure it with four (4) screws (M4 x 10 mm).
- Follow the instructions that come with the wall mounting kit to mount the monitor onto the wall.
Using the Security Slot
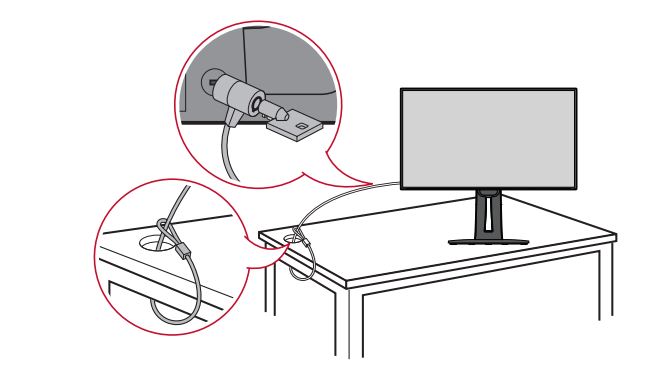
To help prevent the device from being stolen, use a security slot-locking device to secure the device to a fixed object. Additionally, fastening the monitor to a wall or fixed object using a security cable can help support the weight of the monitor to prevent the monitor from falling over. Below is an example of setting up a security slot-locking device on a table.
DisplayPort Connection
Connect one end of a DisplayPort cable to the DisplayPort port. Then connect the other end of the cable to the DisplayPort or mini DP port of your computer.
NOTE:
To connect the monitor to the Thunderbolt port (v. 1&2) on your Mac, connect the mini DP end of the “mini DP to DisplayPort cable” to the Thunderbolt output of your Mac. Then connect the other end of the cable to the DisplayPort port of the monitor.
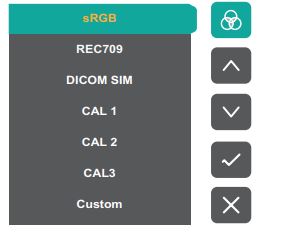
Standard Color
Select one of the preset standard color settings.
Configuring the Settings
General Operations
- Press the 1/2/3/4 key to display the Quick Menu. Then press the 4 key to display the OSD Menu.
- Press the 1 or 2 key to select the main menu. Then press the 3 key to enter the selected menu.
- Press the 1 or 2 key to select the desired menu option. Then press the 3 key to enter the sub-menu.
- Press the 1 or 2 key to adjust/select the setting. Then press the 3 key to confirm.
- Press the 4 key to return to the previous menu.
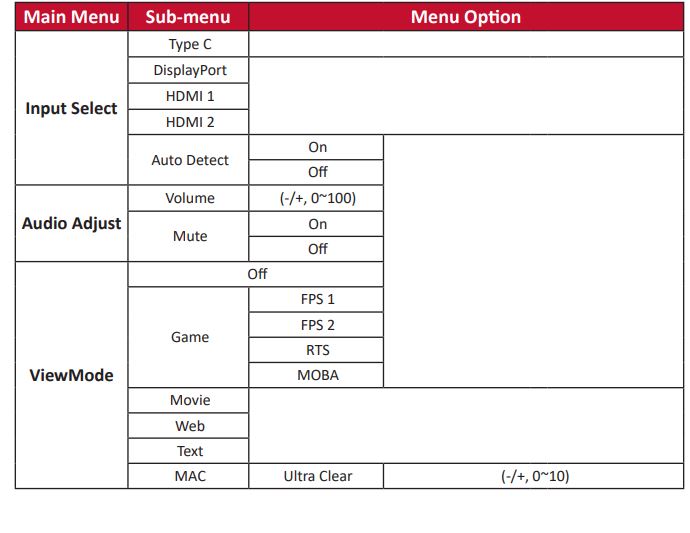
On-Screen Display (OSD) Menu Tree

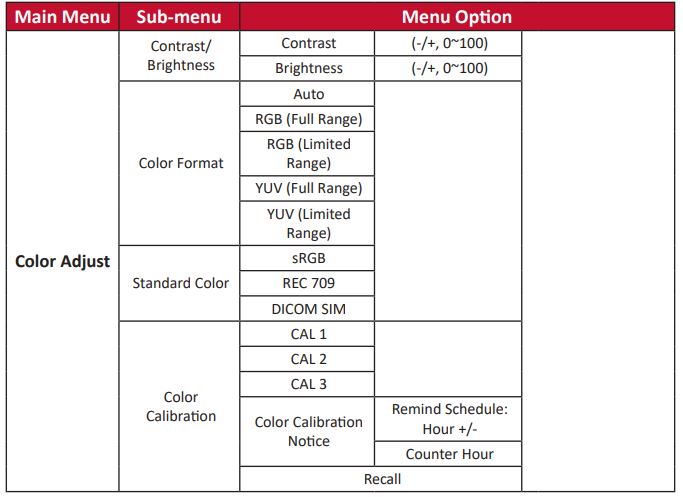
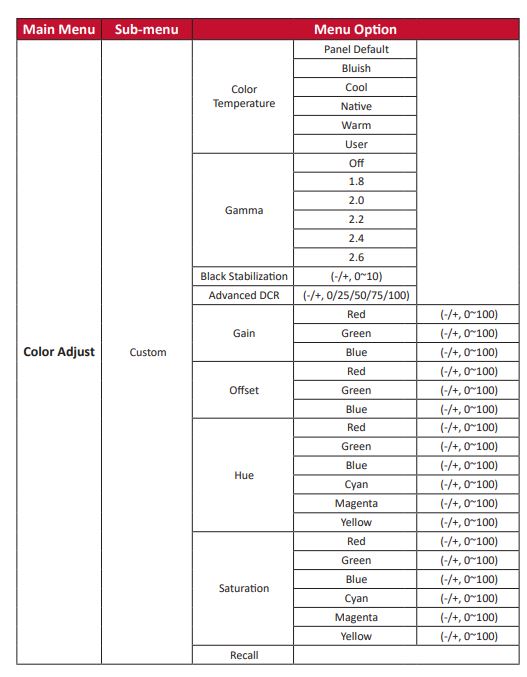
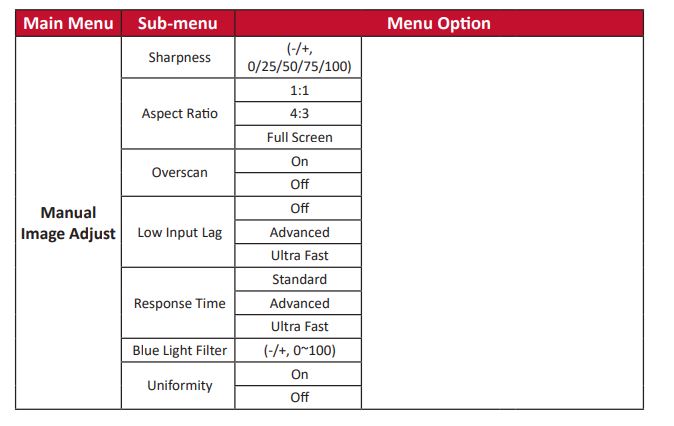
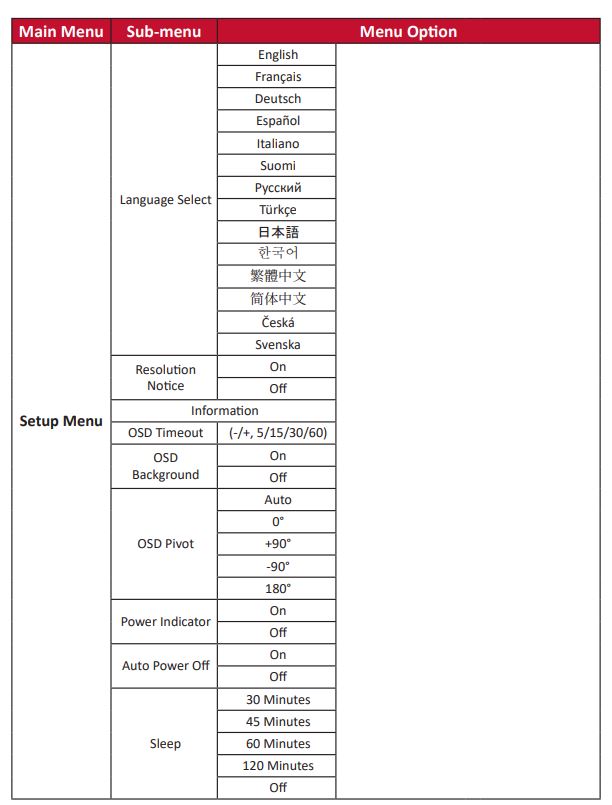
Audio Adjust
- Press the 1/2/3/4 key to display the Quick Menu. Then press the 4 key to display the OSD Menu.
- Press the 1 or 2 key to select Audio Adjust. Then press the 3 key to enter the Audio Adjust menu.
- Press the 1 or 2 key to select the desired option. Then press the 3 key to enter its sub-menu.
- Press the 1 or 2 key to adjust/select the setting, and press the 3 key to confirm the selection (if applicable).
View more
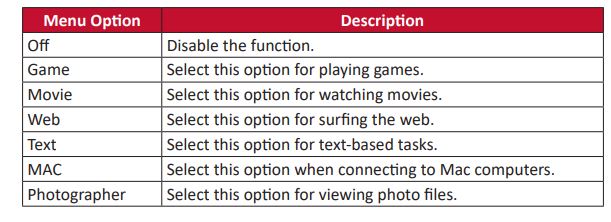
- Press the 1/2/3/4 key to display the Quick Menu. Then press the 4 key to display the OSD Menu.
- Press the 1 or 2 key to select ViewMode. Then press the 3 key to enter the ViewMode menu
- Press the 1 or 2 key to select the setting. Then press the 3 key to confirm the selection.
NOTE:
Some sub-menu options may have another sub-menu. To enter the respective sub-menu, press the 3 key. Follow the key guide that appears at the bottom of the screen to select the option or make adjustments.

Advanced Features and Settings
This section describes the advanced features of the monitor.
Auto Pivot
With the Auto Pivot function, the monitor can detect the image display and adjust the image’s orientation on the screen automatically when pivoting the screen vertically or horizontally.
NOTE:
The Auto Pivot function uses DDC/CI to communicate with the monitor. Before applying the Auto Pivot function, please make sure the DDC/CI setting is set to On.
To enable the DDC/CI setting:
- Open the OSD Menu and select the Setup Menu menu. Then press the 3 key to enter the menu.
- Press the 1 or 2 key to select DDC/CI. Then press the 3 key to enter its sub-menu.
- Press the 1 or 2 key to select On. Then press the 3 key to confirm.
After ensuring DDC/CI is On, proceed to set OSD Pivot to Auto:
- Open the OSD Menu and select the Setup Menu menu. Then press the 3 key to enter the menu.
- Press the 1 or 2 key to select OSD Pivot. Then press the 3 key to enter its submenu.
- Press the 1 or 2 key to select Auto. Then press the 3 key to confirm.
Colorbration+
To ensure long-term color accuracy, some specific models support the hardware color calibration function. The Colorbration+ application installation file can be found at: http://color.viewsonic.com/support/software/. Standard monitor packing does not include the color sensor, which the Colorbration+ application needs for the calibration process.
Compatible color sensors include:
- X-Rite i1 Display Pro
- X-Rite i1 Pro 2
- X-Rite i1 Studio
- Xrite Colormunki Photo
- Xrite Colormunki Design
- Datacolor Spyder 5
- Datacolor SpyderX series
Specifications


Troubleshooting


Regulatory and Service Information
Compliance Information
This section addresses all connected requirements and statements regarding regulations. Confirmed corresponding applications shall refer to nameplate labels and relevant markings on the unit.
FCC Compliance Statement
This device complies with part 15 of FCC Rules. Operation is subject to the following two conditions: (1) this device may not cause harmful interference, and (2) this device must accept any interference received, including interference that may cause undesired operation. This equipment has been tested and found to comply with the limits for a Class B digital device, under part 15 of the FCC Rules.
These limits are designed to provide reasonable protection against harmful interference in a residential installation. This equipment generates, uses, and can radiate radio frequency energy, and if not installed and used by the instructions, may cause harmful interference to radio communications.
However, there is no guarantee that interference will not occur in a particular installation. If this equipment does cause harmful interference to radio or television reception, which can be determined by turning the equipment off and on, the user is encouraged to try to correct the interference by one or more of the following measures:
- Reorient or relocate the receiving antenna.
- Increase the separation between the equipment and the receiver.
- Connect the equipment to an outlet on a circuit different from that to which the receiver is connected.
- Consult the dealer or an experienced radio/TV technician for help.
Warning:
You are cautioned that changes or modifications are not expressly approved by the party.
The following information is only for EU-member states:
The mark shown to the right complies with the Waste Electrical and Electronic Equipment Directive 2012/19/EU (WEEE). The mark indicates the requirement NOT to dispose of the equipment as unsorted municipal waste, but use the return and collection systems according to local law.
Declaration of RoHS2 Compliance
This product has been designed and manufactured in compliance with Directive2011/65/EU of the European Parliament and the Council on the restriction of the use of certain hazardous substances in electrical and electronic equipment (RoHS2 Directive) and is deemed to comply with the maximum concentration values issued by the European Technical Adaptation Committee (TAC) as shown below:
A Pantone® Validated Monitor
Pantone means color and provides a universal language of color that enables color-critical decisions through every stage of the workflow for designers, producers, and brands. The ViewSonic ColorPro VP68a Series is PANTONE Validated. Its out-of-box color accuracy has been verified and factory-tuned with a series of ViewSonic color tests.
In addition, a sample of this model series has been evaluated by Pantone and meets the requirements of PANTONE Validated as tested in the simulation of the full range of 2,161 colors of the PANTONE Formula Guide Coated. The ViewSonic ColorPro VP68a Series lets you design with confidence.
Variables
There are many variables in the reproduction process of colors generated by the VP3268a-4K display, any one of which may affect the quality of the PANTONE Color simulation, including:
- Display devices
- Hardware device settings
- Graphics card used
- Backlight panel settings
- Selected resolution
- Operating system
- Selected refresh rate
- Calibration method
- Other display settings
copyright Information
Copyright© ViewSonic® Corporation, 2021. All rights reserved. Macintosh and Power Macintosh are registered trademarks of Apple Inc. Microsoft, Windows, and the Windows logo are registered trademarks of Microsoft Corporation in the United States and other countries. ViewSonic®, the three birds logo, OnView, ViewMatch, and ViewMeter are registered trademarks of ViewSonic® Corporation.
VESA is a registered trademark of the Video Electronics Standards Association. DPMS, DisplayPort, and DDC are trademarks of VESA. ENERGY STAR® is a registered trademark of the U.S. Environmental Protection Agency (EPA). As an ENERGY STAR® partner, ViewSonic® Corporation has determined that this product meets the ENERGY STAR® guidelines for energy efficiency.
Disclaimer:
ViewSonic® Corporation shall not be liable for technical or editorial errors or omissions contained herein; nor for incidental or consequential damages resulting from furnishing this material, or the performance or use of this product. In the interest of continuing product improvement, ViewSonic® Corporation reserves the right to change product specifications without notice.
Information in this document may change without notice. No part of this document may be copied, reproduced, or transmitted by any means, for any purpose without prior written permission from ViewSonic® Corporation.
Customer Service
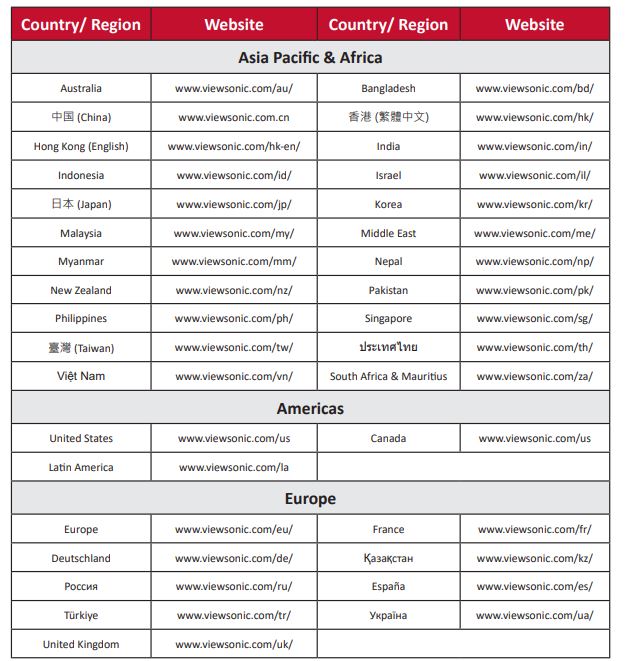
For technical support or product service, see the table below or contact your reseller.
NOTE:
You will need the product’s serial number.
Limited Warranty
What the warranty covers:
ViewSonic® warrants its products to be free from defects in material and workmanship during the warranty period. If a product proves to be defective in material or workmanship during the warranty period, ViewSonic® will, at its sole option, and as your sole remedy, repair or replace the product with a similar product. Replacement Products or parts may include remanufactured or refurbished parts or components.
The repair or replacement unit or parts or components will be covered by the balance of the time remaining on the customer’s original limited warranty and the warranty period will not be extended. ViewSonic® provides a warranty for any third-party software whether included with the product or installed by the customer, and installation of any unauthorized hardware parts or components (e.g. Projector Lamps). (Please refer to: “What the warranty excludes and does not cover” section).
How long the warranty is effective:
ViewSonic® displays are warranted for between 1 and 3 years, depending on your country of purchase, for all parts including the light source, and for all labor from the date of the first consumer purchase.
Who the warranty protects:
This warranty is valid only for the first consumer purchaser.
Sales outside the U.S.A. and Canada:
For warranty information and service on ViewSonic® products sold outside of the U.S.A. and Canada, contact ViewSonic® or your local ViewSonic® dealer. The warranty period for this product in mainland China (Hong Kong, Macao, and Taiwan Excluded) is subject to the terms and conditions of the Maintenance Guarantee Card. For users in Europe and Russia, full details of the warranty provided can be found at: http://www.viewsonic.com/eu/ under “Support/Warranty Information”.
FOR MORE MANUALS BY VIEWSONIC, VISIT MANUALSDOCK
FAQS About ViewSonic VP3268a-4K 32 Inch IPS 4K Monitor
What is the screen size of the ViewSonic VP3268a-4K monitor?
The ViewSonic VP3268a-4K monitor has a screen size of 32 inches diagonally.
What is the resolution of the ViewSonic VP3268a-4K monitor?
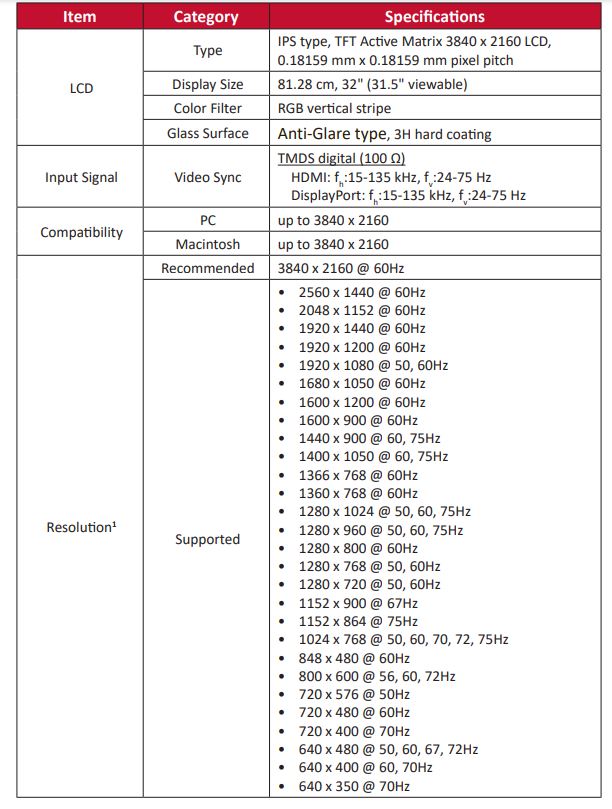
The monitor has a 4K resolution, which is 3840 x 2160 pixels.
What type of panel does the ViewSonic VP3268a-4K monitor use?
It uses an IPS (In-Plane Switching) panel, known for its superior color accuracy and wide viewing angles.
Does the ViewSonic VP3268a-4K monitor support HDR (High Dynamic Range)?
Yes, it supports HDR10 content, providing enhanced contrast and brightness levels for better image quality.
What is the refresh rate of the ViewSonic VP3268a-4K monitor?
The monitor has a refresh rate of 60Hz.
Does the ViewSonic VP3268a-4K monitor have built-in speakers?
Yes, it features dual integrated speakers for basic audio output.
What inputs does the ViewSonic VP3268a-4K monitor support?
The monitor supports a variety of inputs including HDMI 2.0, DisplayPort 1.2, Mini DisplayPort, and USB Type-C.
Is the stand of the ViewSonic VP3268a-4K monitor adjustable?
Yes, the monitor comes with a fully adjustable ergonomic stand that allows for height adjustment, swivel, tilt, and pivot.
Does the ViewSonic VP3268a-4K monitor have VESA mount compatibility?
Yes, it is VESA mount compatible, allowing users to mount the monitor on a compatible monitor arm or wall mount.
What color accuracy standards does the ViewSonic VP3268a-4K monitor adhere to?
The monitor is factory-calibrated to Delta E<2 for precise color accuracy and also supports various color spaces including sRGB, Rec.709, and DICOM-SIM for professional-grade color reproduction.

