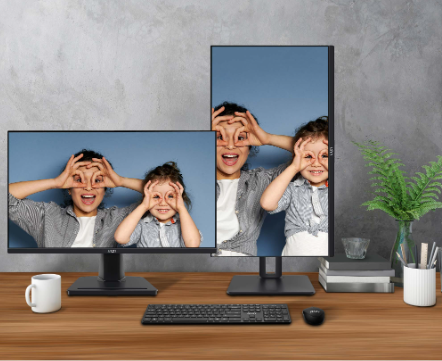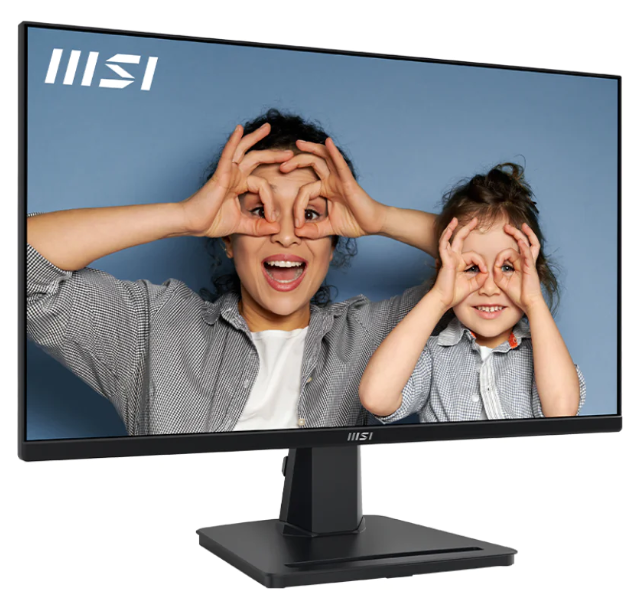
MSI PRO MP251 25-inch IPS FHD Computer Monitor
Getting Started
This chapter provides you with the information on hardware setup procedures. While connecting devices, be careful in holding the devices and use a grounded wrist strap to avoid static electricity.
Package Contents
Important
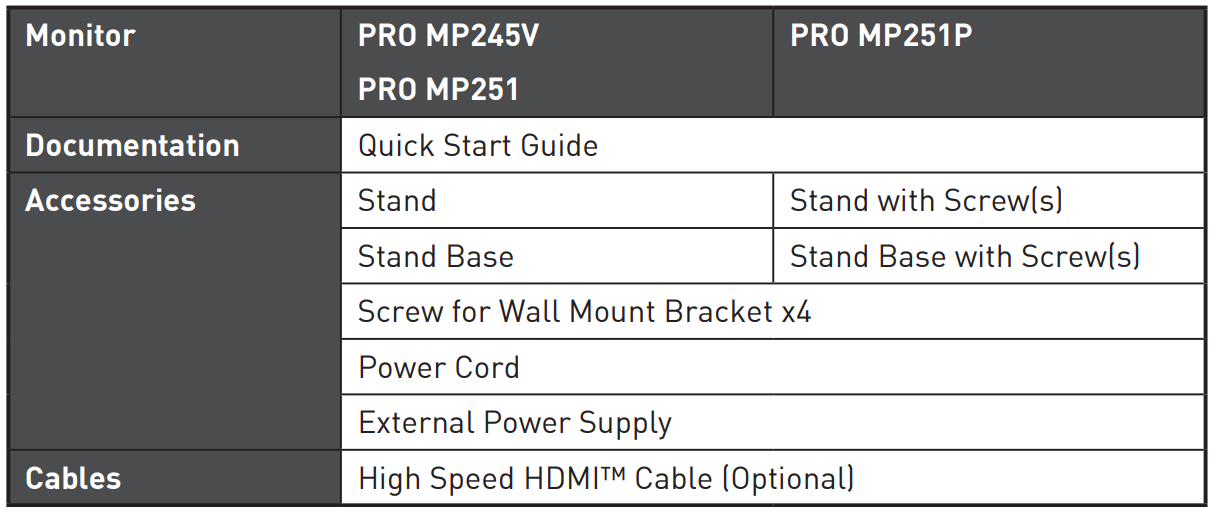
- Contact your place of purchase or local distributor if any of the items are damaged or missing.
- Package contents may vary by country.
- The included power cord is exclusively for this monitor and should not be used with other products.
Installing the Monitor Stand
Important
- Place the monitor on a soft, protected surface to avoid scratching the display panel.
- Do not use any sharp objects on the panel.
PRO MP245V
- Leave the monitor in its protective packaging. Align and gently push the stand bracket towards the monitor groove until it locks in place.
- Align and gently push the base towards the stand until it locks in place.
- Make sure the stand assembly is properly installed before setting the monitor upright.
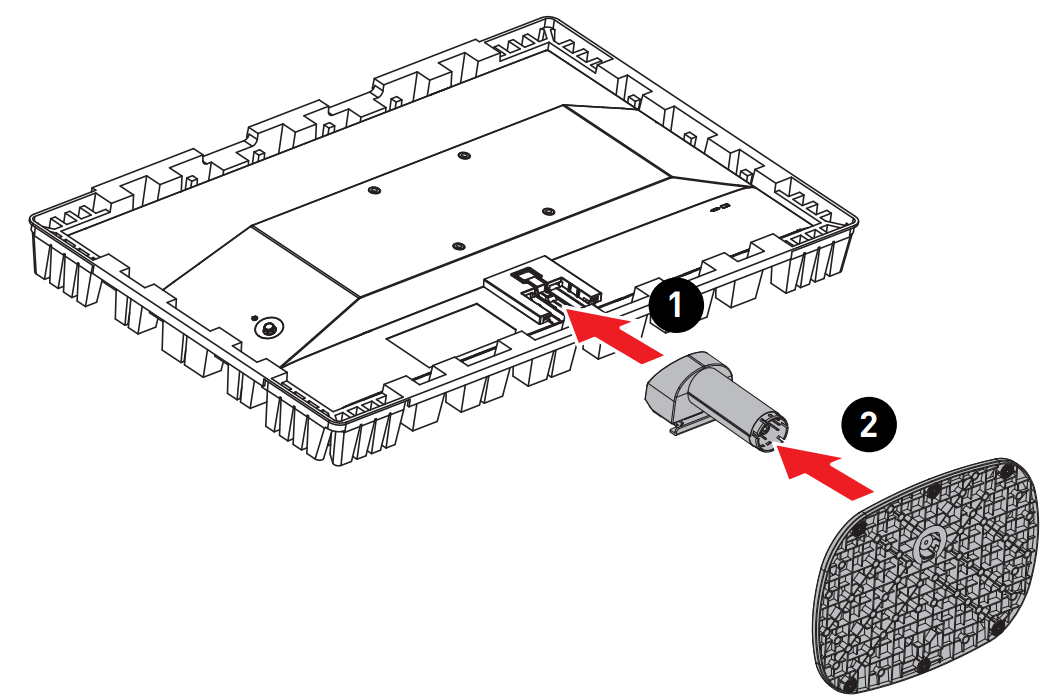
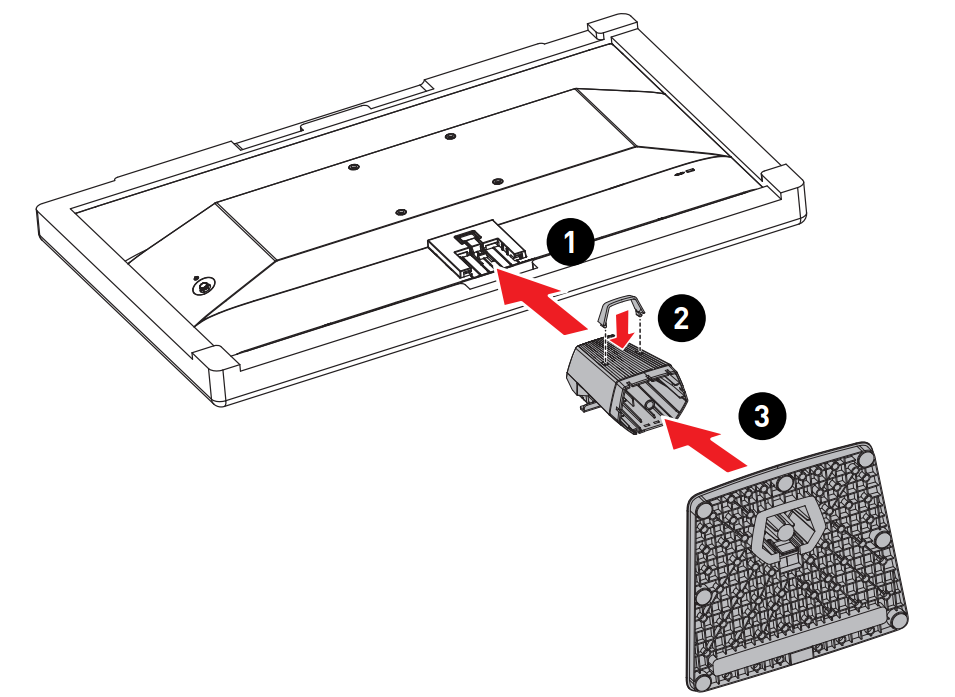
PRO MP251
- Leave the monitor in its protective packaging. Align and gently push the stand bracket towards the monitor groove until it locks in place.
- Align and gently push the cable organizer towards the stand until it locks in place.
- Align and gently push the base towards the stand until it locks in place.
- Make sure the stand assembly is properly installed before setting the monitor upright.
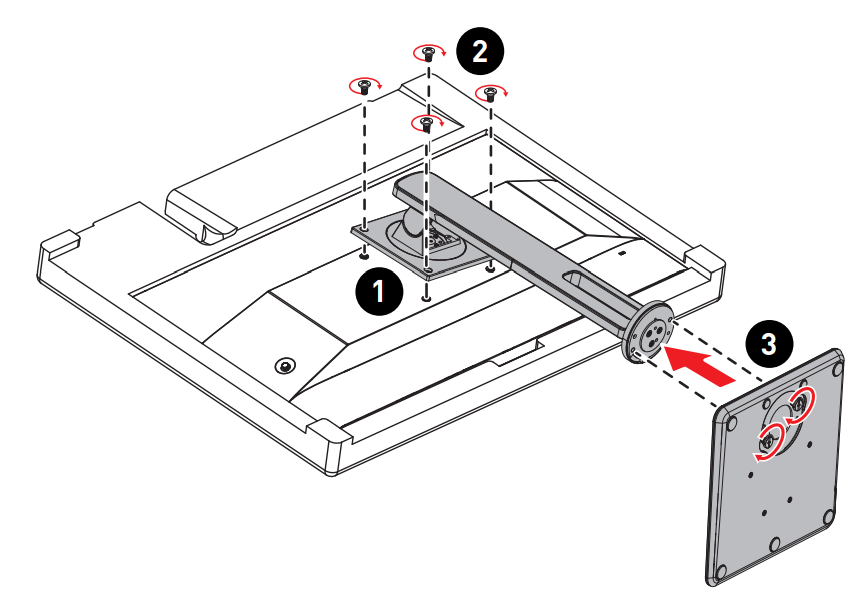
PRO MP251P
- Leave the monitor in its protective packaging. Align the stand bracket to the monitor groove.
- Tighten the stand bracket with screws.
- Connect the base to the stand and tighten the base screw to secure the base.
- Make sure the stand assembly is properly installed before setting the monitor upright.
Important
- The back of the monitor can also be used for wall mount. Please contact your dealer for a proper wall-mount kit.
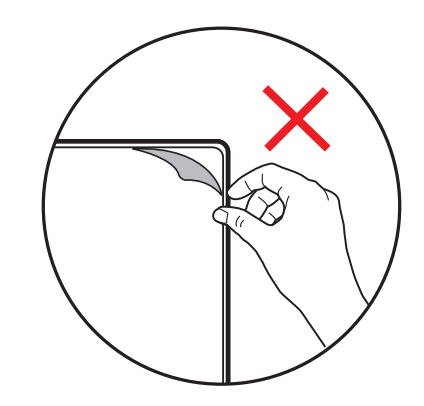
- This product comes with NO protective film to be removed by the user! Any mechanical damages to the product including removal of the polarizing film may affect the warranty!
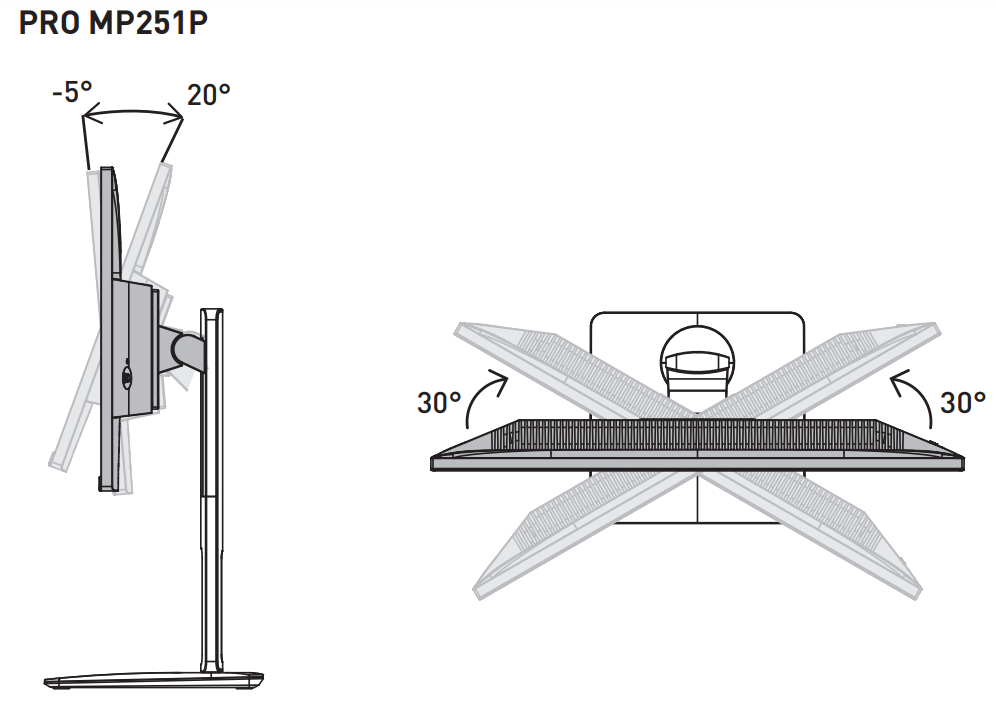
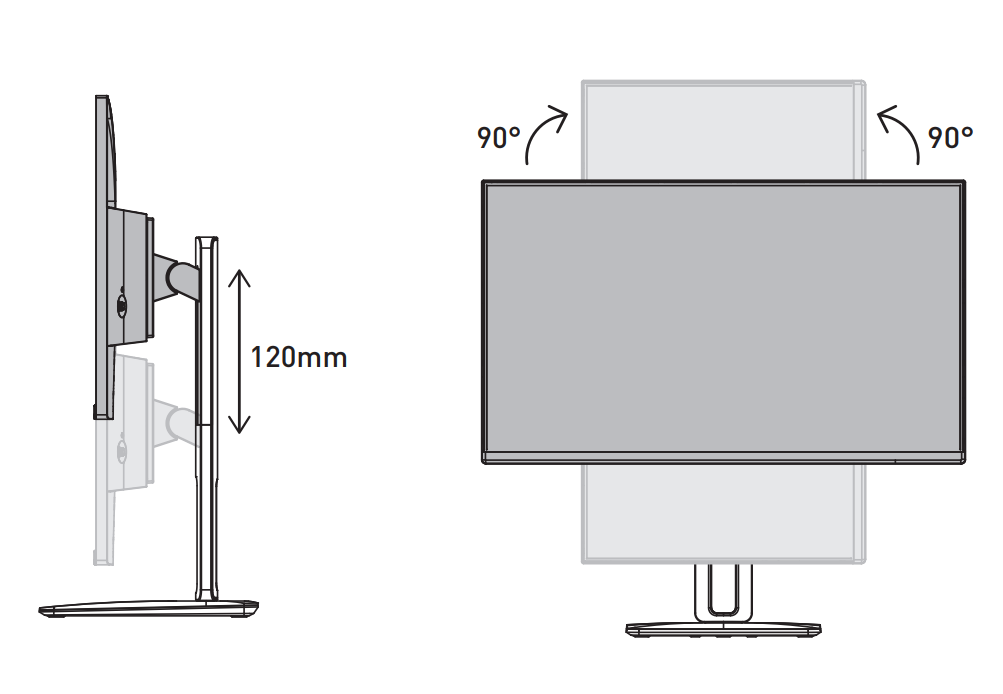
Adjusting the Monitor
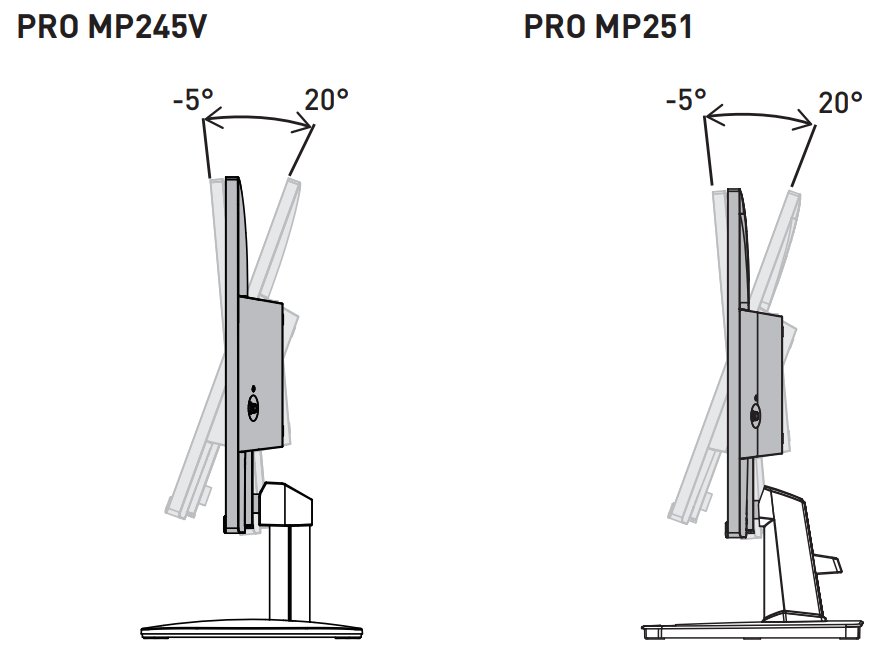
This monitor is designed to maximize your viewing comfort with its adjustment capabilities.
Important
- Avoid touching the display panel when adjusting the monitor.
- Please slightly tilt the monitor slightly before pivoting it.
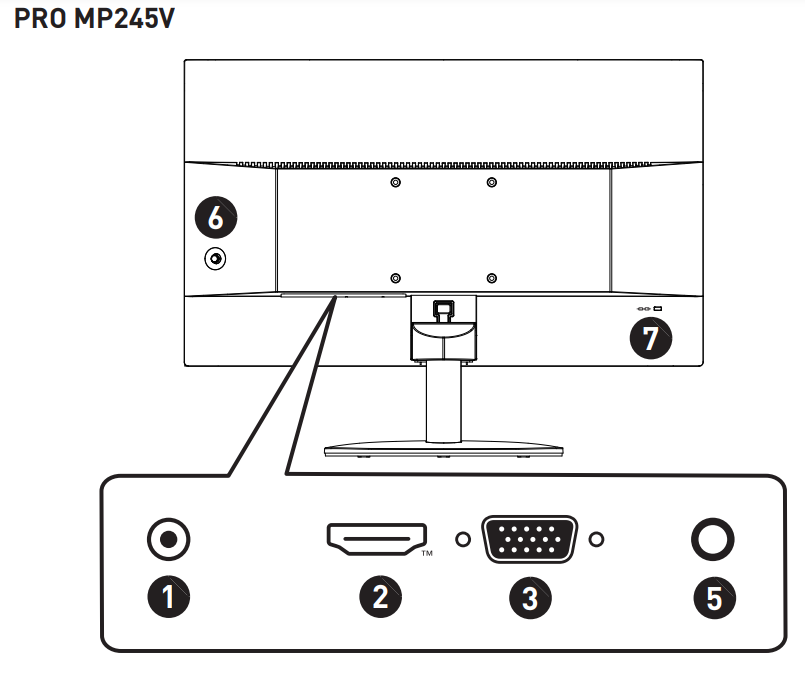
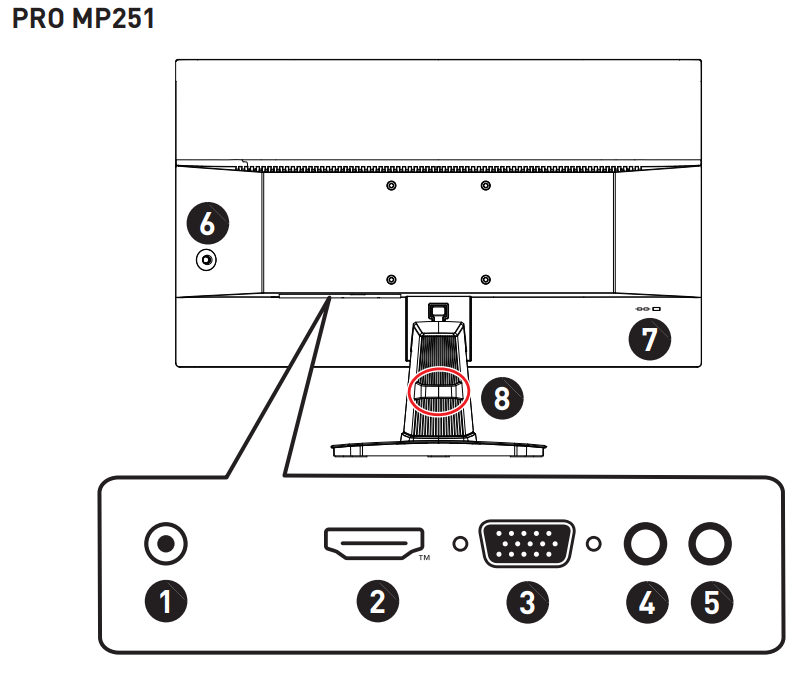
Monitor Overview
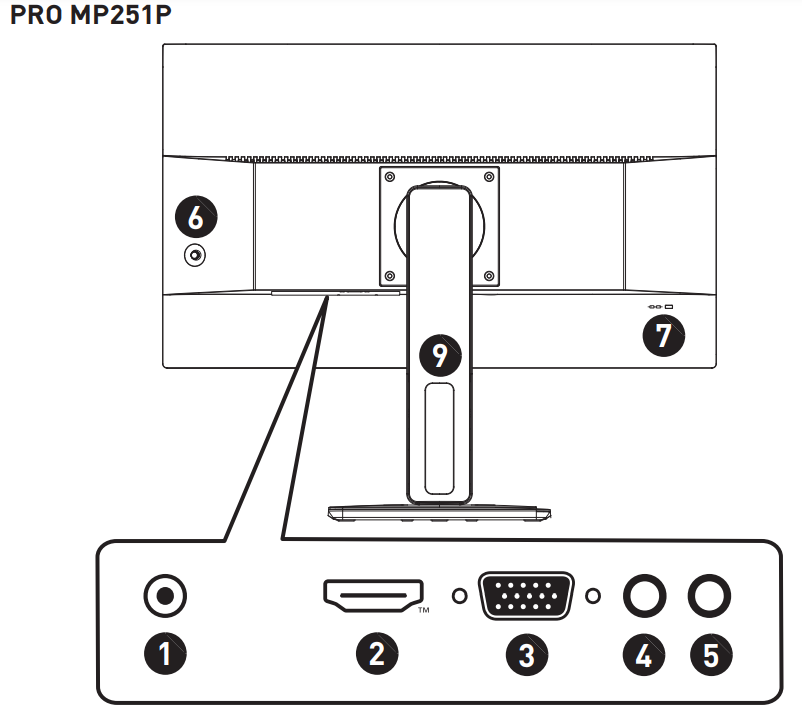
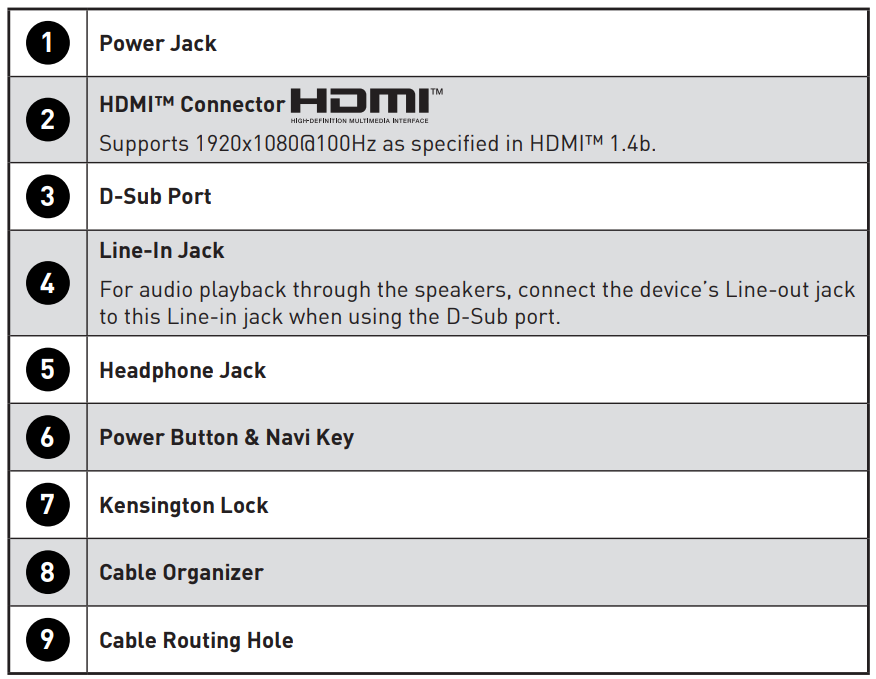
Connecting the Monitor to the PC
- Turn off your computer.
- Connect the video cable from the monitor to your computer.
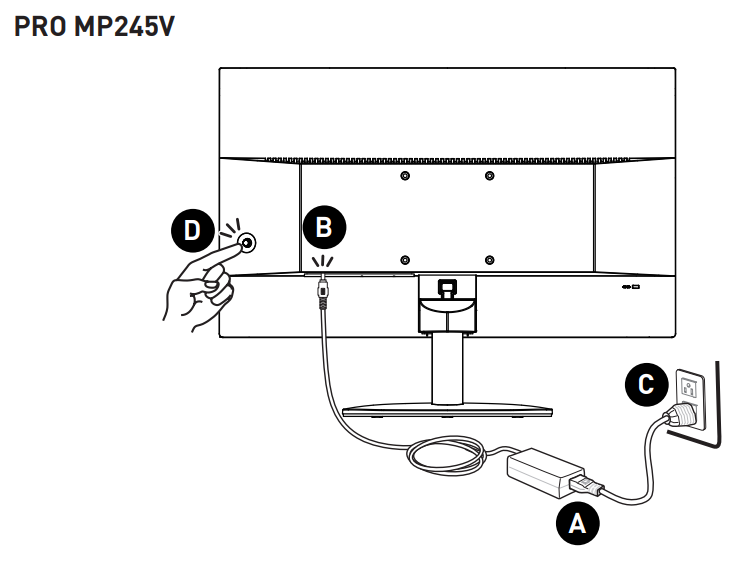
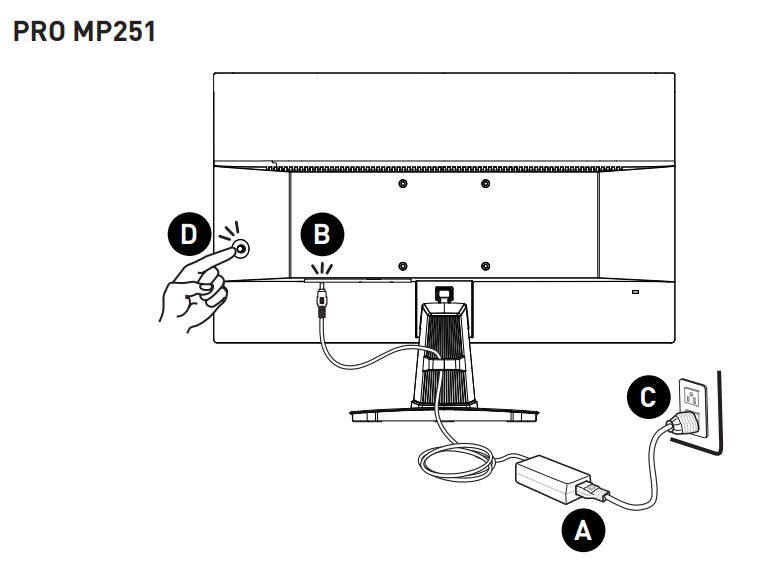
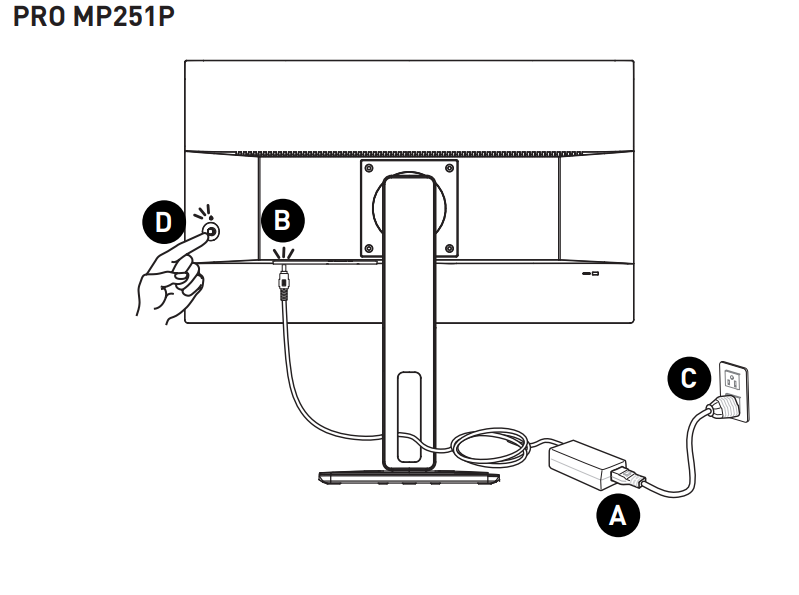
- Assemble the external power supply & power cord. (Figure A)
- Connect the external power supply to the monitor power jack. (Figure B)
- Plug the power cord into the electrical outlet. (Figure C)
- Turn on the monitor. (Figure D)
- Power on the computer and the monitor will auto-detect the signal source.
Important
External Power Supply may vary by country.

OSD Setup
This chapter provides you with essential information on OSD Setup.
Important
All information is subject to change without prior notice.
Navi Key
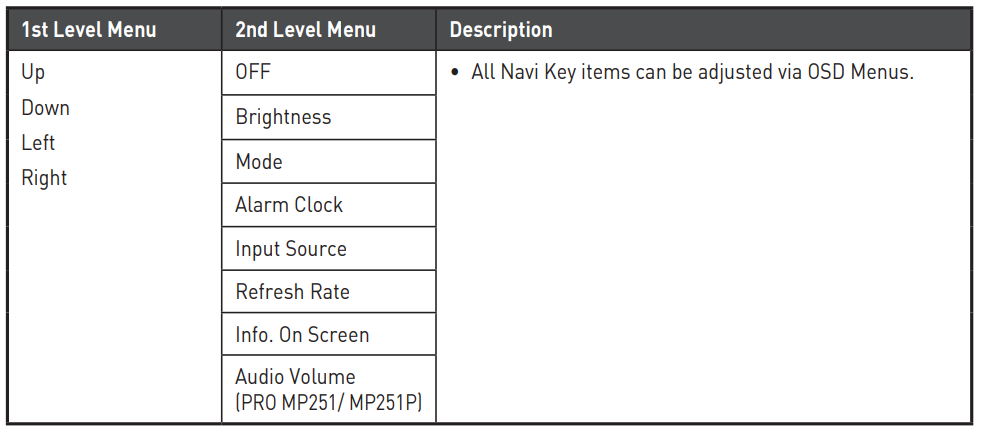
The monitor comes with a Navi Key, a multi-directional control that helps navigate the On-Screen Display (OSD) menu.
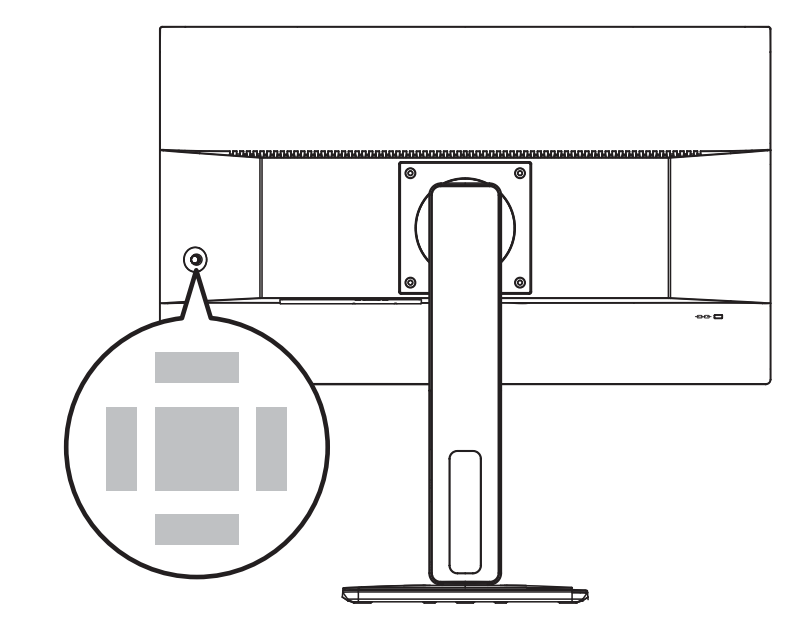
Up/ Down/ Left/ Right
- selecting function menus and items
- adjusting function values
- entering into/exiting from function menus
Middle
- launching the On-Screen Display (OSD)
- entering submenus
- confirming a selection or setting
Hot Key
- Users may enter into preset function menus by moving the Navi Key up, down, left, or right when the OSD menu is inactive.
- Users may customize their own Hot Keys to enter into different function menus.
OSD Menus
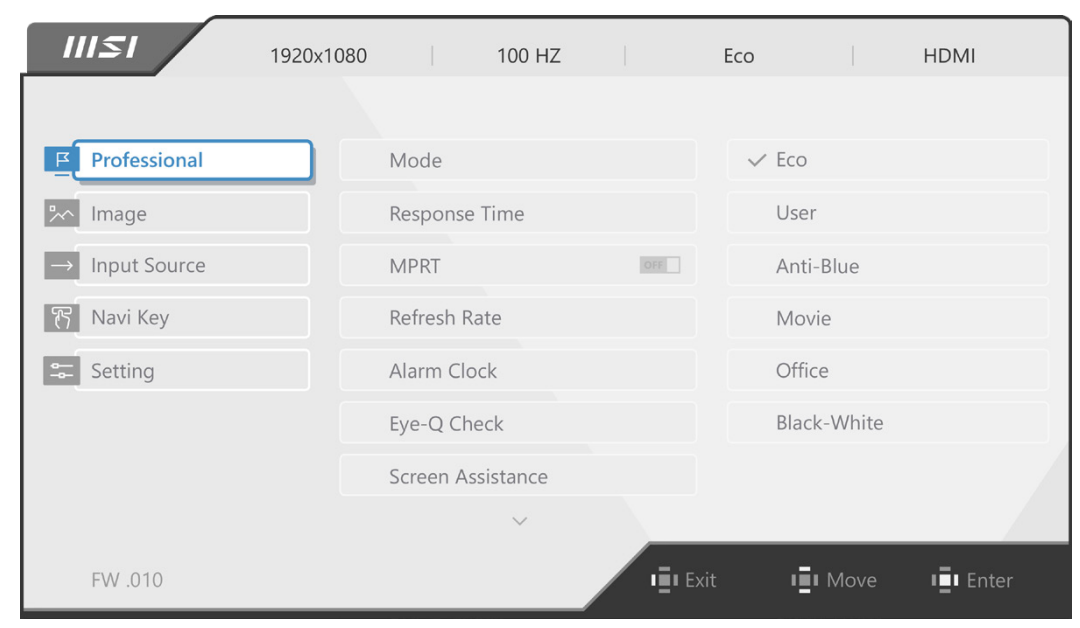
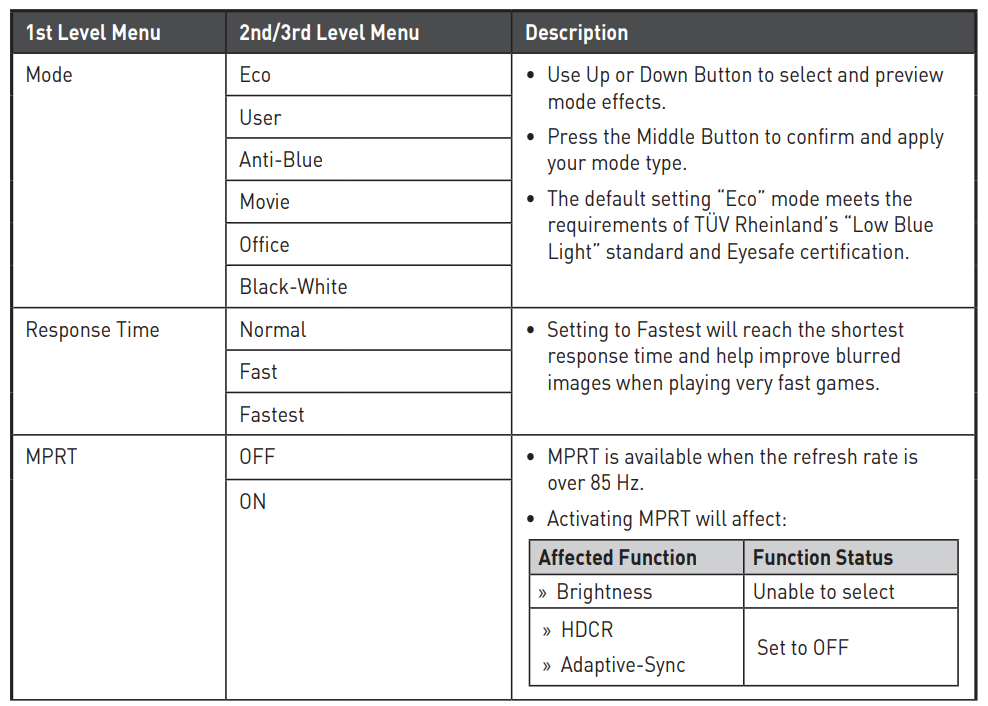
Professional
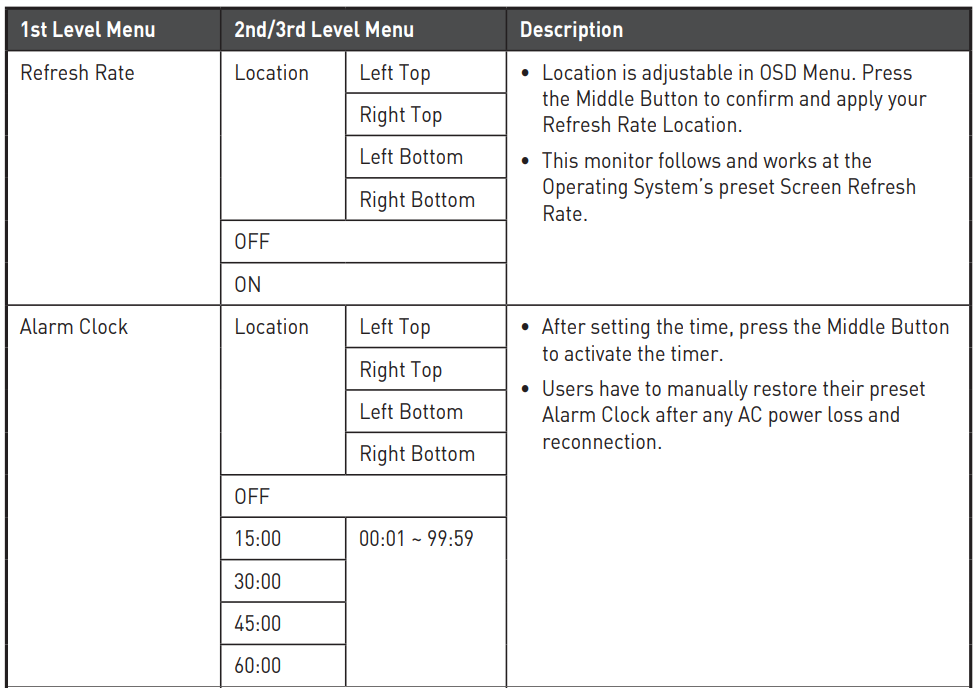
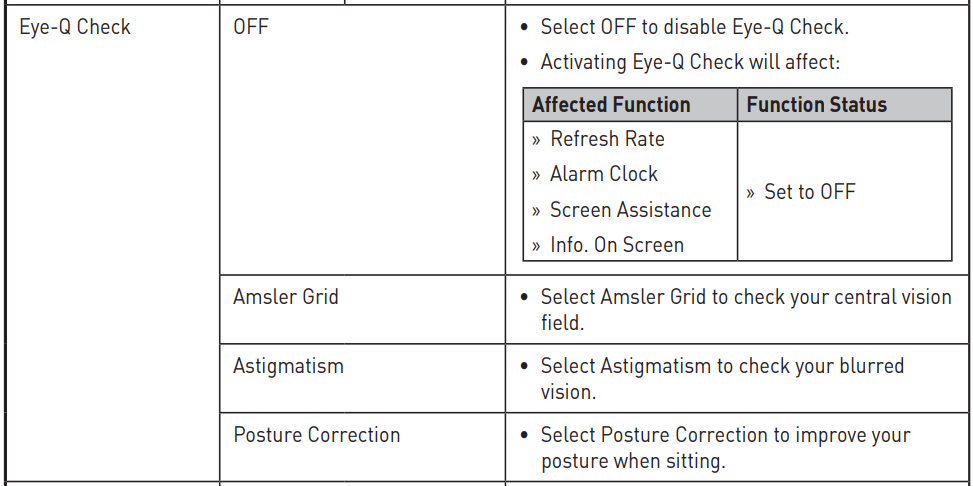
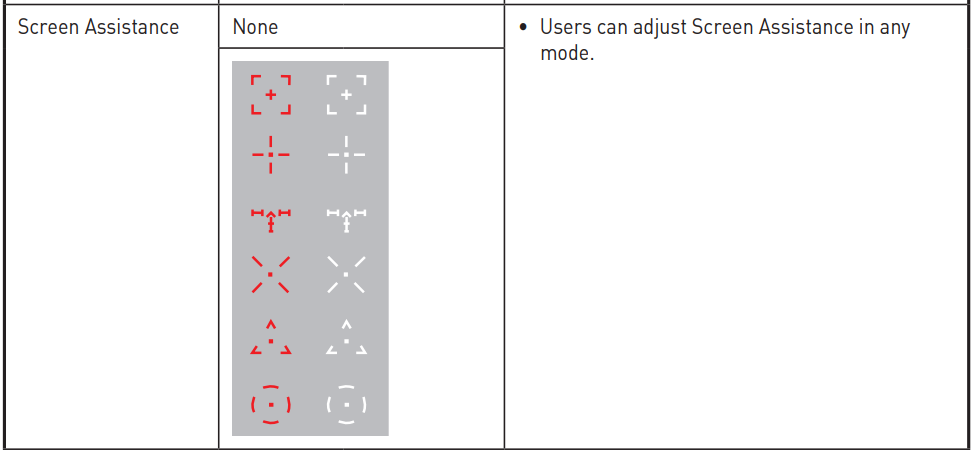
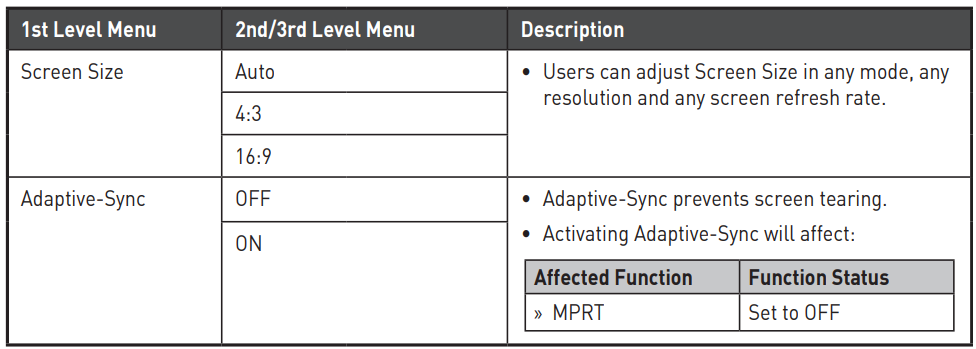
Image
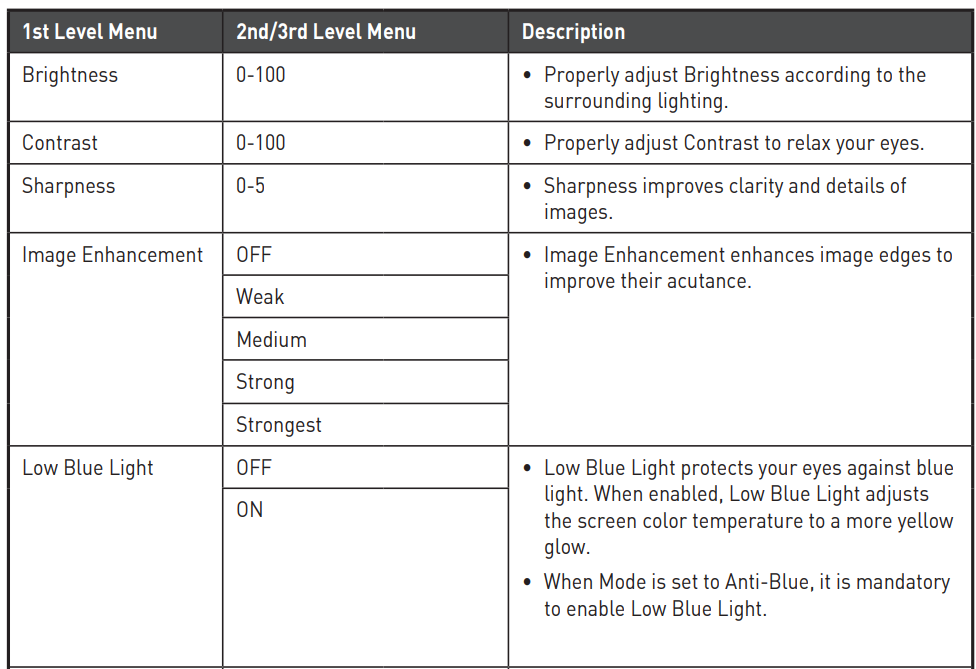
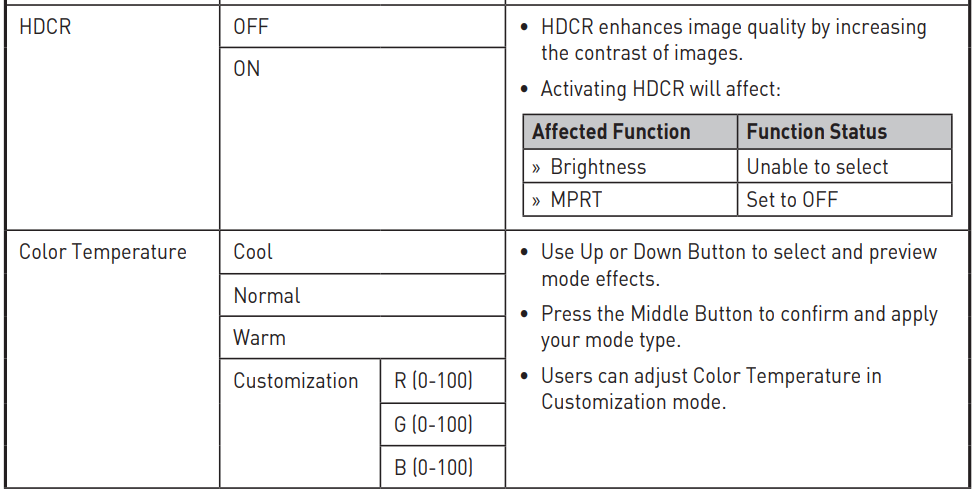
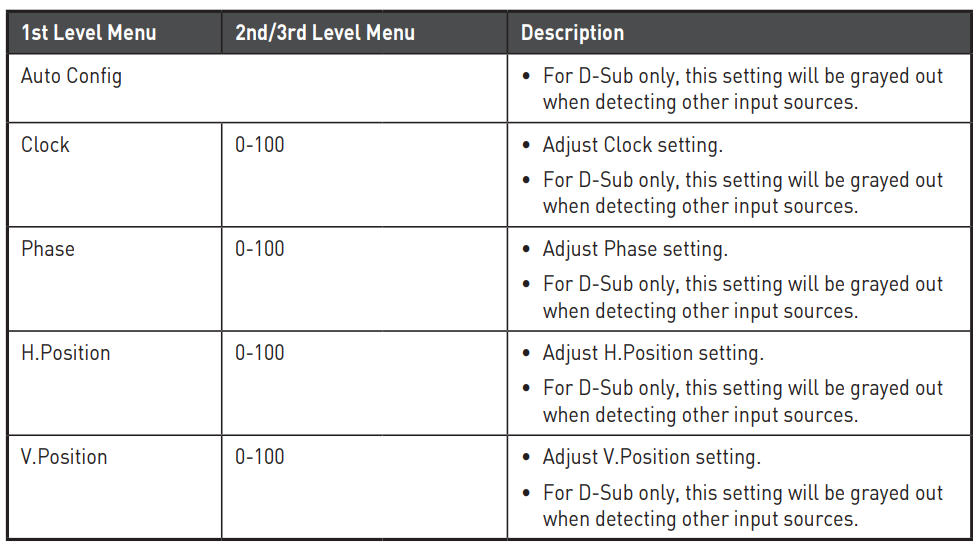
Input Source
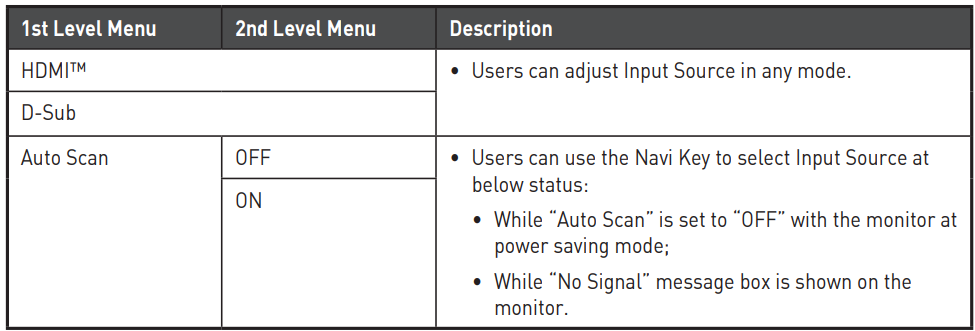
Navi Key
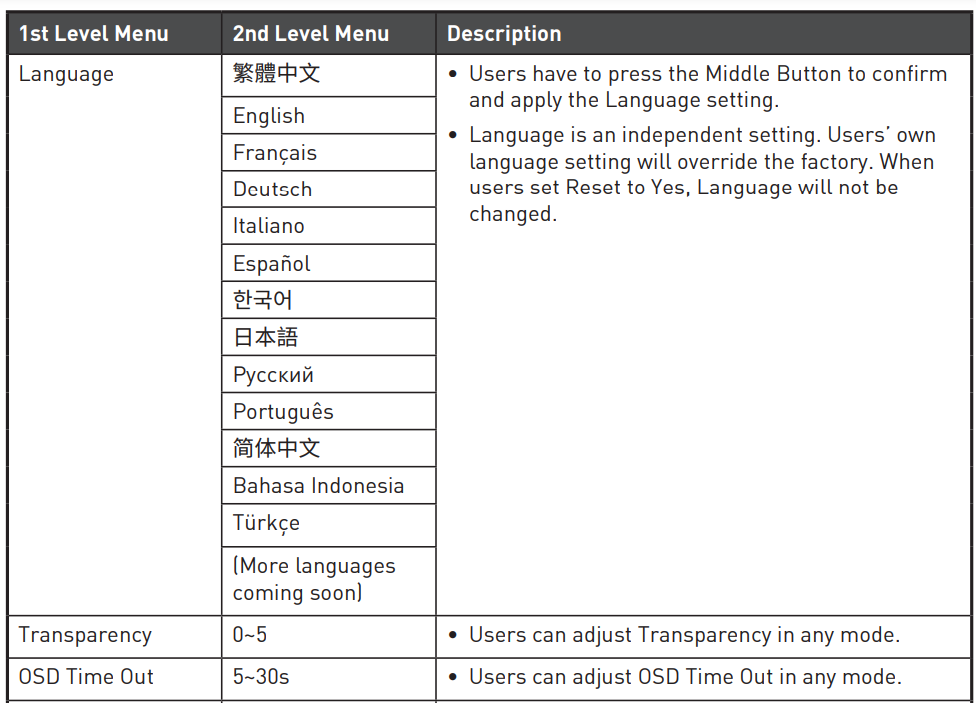
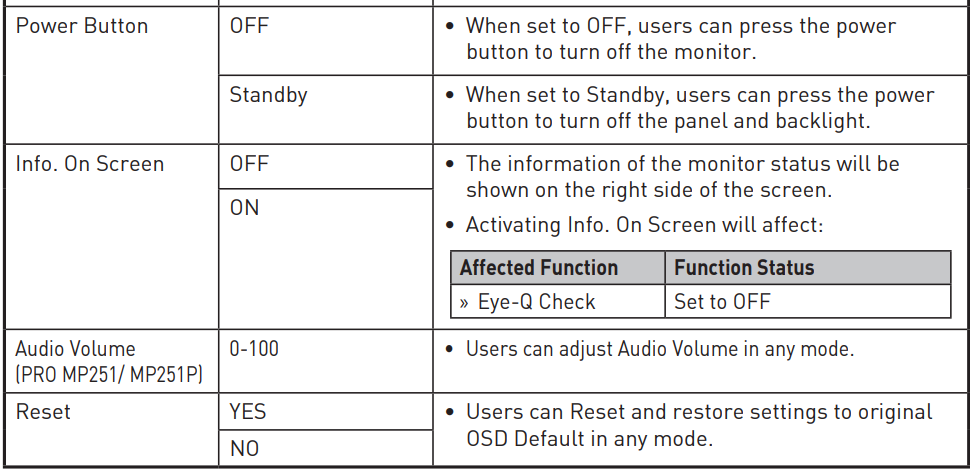
Setting
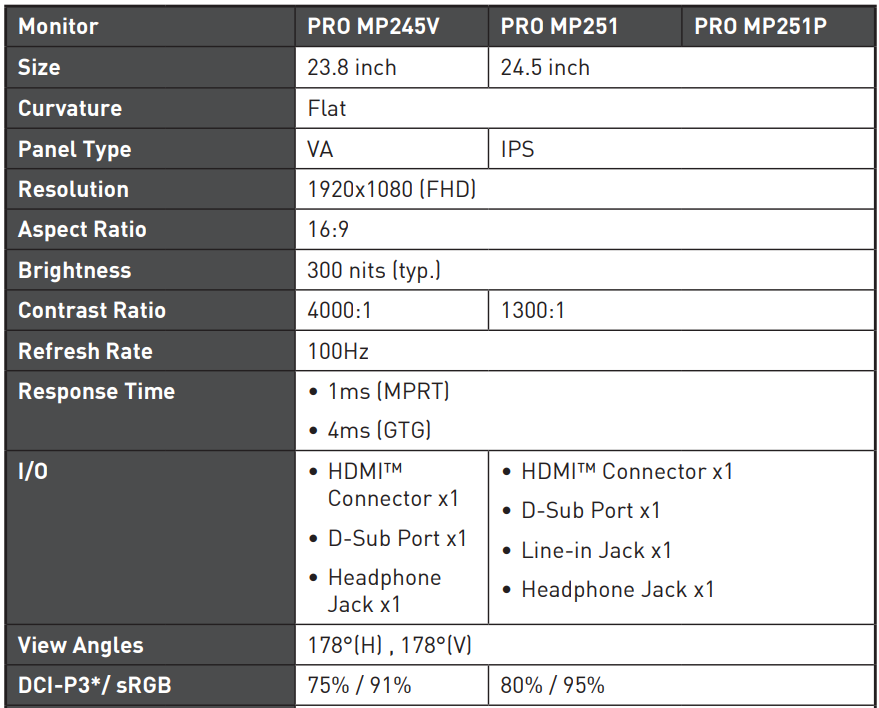
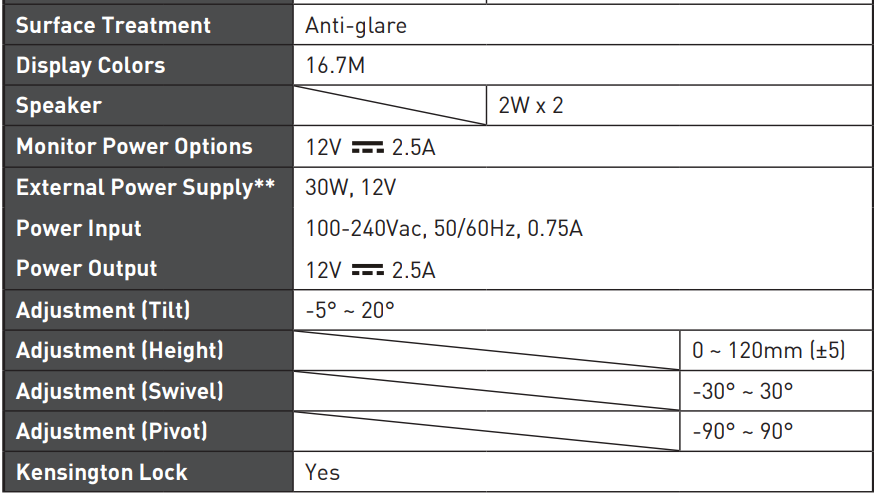
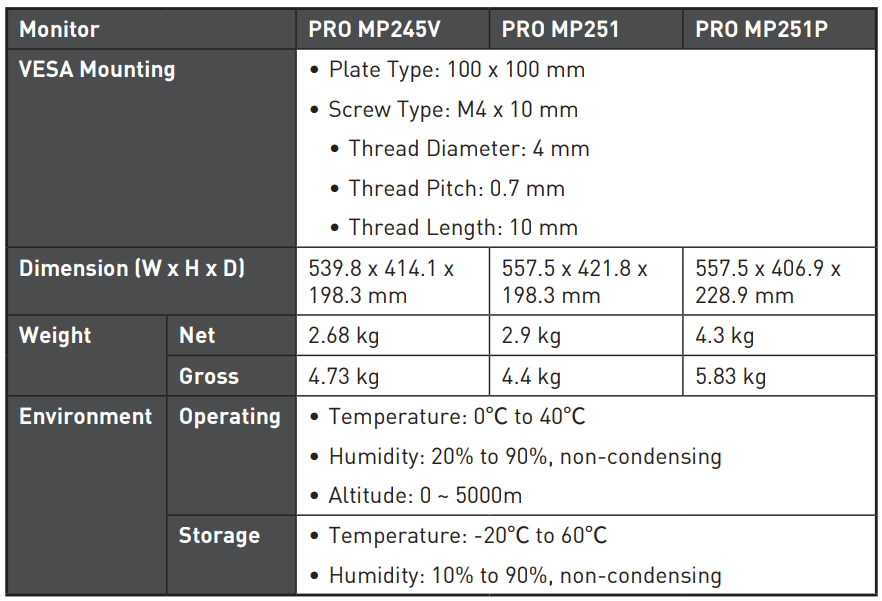
Specifications
Troubleshooting
The power LED is off
- Press the monitor power button again.
- Check if the monitor power cable is properly connected.
No image
- Check if the computer graphics card is properly installed.
- Check if the computer and monitor are connected to electrical outlets and are turned on.
- Check if the monitor signal cable is properly connected.
- The computer may be in Standby mode. Press any key to activate the monitor.
The screen image is not properly sized or centered
- Refer to Preset Display Modes to set the computer to a setting suitable for the monitor to display.
No Plug & Play
- Check if the monitor power cable is properly connected.
- Check if the monitor signal cable is properly connected.
- Check if the computer and graphics card are Plug & Play compatible.
The icons, font, or screen are fuzzy, blurry, or have color problems
- Avoid using any video extension cables.
- Adjust brightness and contrast.
- Adjust RGB color or tune color temperature.
- Check if the monitor signal cable is properly connected.
- Check for bent pins on the signal cable connector.
The monitor starts flickering or shows waves
- Change the refresh rate to match the capabilities of your monitor.
- Update your graphics card drivers.
- Keep the monitor away from electrical devices that may cause electromagnetic interference (EMI).
Safety Instructions
- Read the safety instructions carefully and thoroughly.
- All cautions and warnings on the device or User Guide should be noted.
- Refer servicing to qualified personnel only.
Power
- Make sure that the power voltage is within its safety range and has been adjusted properly to the value of 100~240V before connecting the device to the power outlet.
- If the power cord comes with a 3-pin plug, do not disable the protective earth pin from the plug. The device must be connected to an earthed main socket outlet.
- Please confirm the power distribution system in the installation site shall provide the circuit breaker rated 120/240V, 20A (maximum).
- Always disconnect the power cord or switch the wall socket off if the device is left unused for a certain time to achieve zero energy consumption.
- Place the power cord in a way that people are unlikely to step on it. Do not place anything on the power cord.
- If this device comes with an adapter, use only the MSI-provided AC adapter approved for use with this device.
Environment
- To reduce the possibility of heat-related injuries or overheating the device, do not place the device on a soft, unsteady surface or obstruct its air ventilators.
- Use this device only on a hard, flat, and steady surface.
- To prevent the device from tipping over, secure the device to a desk, wall, or fixed object with an anti-tip fastener that helps to properly support the device and keep it safe in place.
- To prevent fire or shock hazards, keep this device away from humidity and high temperatures.
- Do not leave the device in an unconditioned environment with a storage temperature above 60℃ or below -20℃, which may damage the device.
- The maximum operating temperature is around 40℃.
- When cleaning the device, be sure to remove the power plug. Use a piece of soft cloth rather than industrial chemicals to clean the device. Never pour any liquid into the opening; that could damage the device or cause electric shock.
- Always keep strong magnetic or electrical objects away from the device.
- If any of the following situations arise, get the device checked by service personnel:
- The power cord or plug is damaged.
- Liquid has penetrated the device.
- The device has been exposed to moisture.
- The device does not work well or you can not get it working according to the User Guide.
- The device has dropped and is damaged.
- The device has obvious signs of breakage.
Regulatory Notices
CE Conformity
This device complies with the requirements set out in the Council Directive on the Approximation of the Laws of the Member States relating to Electromagnetic Compatibility (2014/30/EU), Low-voltage Directive (2014/35/EU), ErP Directive (2009/125/EC) and RoHS directive (2011/65/EU). This product has been tested and found to comply with the harmonized standards for Information Technology Equipment published under Directives of the Official Journal of the European Union.
FCC-B Radio Frequency Interference Statement
This equipment has been tested and found to comply with the limits for a Class B digital device, under Part 15 of the FCC Rules. These limits are designed to provide reasonable protection against harmful interference in a residential installation. This equipment generates, uses, and can radiate radio frequency energy and, if not installed and used by the instruction manual, may cause harmful interference to radio communications.
However, there is no guarantee that interference will not occur in a particular installation. If this equipment does cause harmful interference to radio or television reception, which can be determined by turning the equipment off and on, the user is encouraged to try to correct the interference by one or more of the measures listed below:
- Reorient or relocate the receiving antenna.
- Increase the separation between the equipment and the receiver.
- Connect the equipment to an outlet on a circuit different from that to which the receiver is connected.
- Consult the dealer or an experienced radio/television technician for help.
Notice 1
The changes or modifications not expressly approved by the party responsible for compliance could void the user’s authority to operate the equipment.
Notice 2
Shielded interface cables and AC power cord, if any, must be used to comply with the emission limits. This device complies with Part 15 of the FCC Rules. Operation is subject to the following two conditions:
- This device may not cause harmful interference, and
- This device must accept any interference received, including interference that may cause undesired operation.
For more Manuals by MSI, visit MANUALSDOCK
FAQS About MSI PRO MP251 25-inch IPS FHD Computer Monitor
What is the screen size of the MSI PRO MP251 monitor?
The MSI PRO MP251 monitor has a screen size of 25 inches.
What is the resolution of the MSI PRO MP251 monitor?
The monitor has a Full HD (1920 x 1080 pixels) resolution.
What type of panel does the MSI PRO MP251 monitor use?
The monitor uses an IPS (In-Plane Switching) panel, known for its wide viewing angles and color accuracy.
Does the MSI PRO MP251 monitor have built-in speakers?
No, this monitor does not have built-in speakers. External speakers or headphones would be required for audio output.
What is the refresh rate of the MSI PRO MP251 monitor?
The refresh rate of the monitor is typically 60Hz, suitable for most productivity and general use tasks.
Does the MSI PRO MP251 monitor support AMD FreeSync or NVIDIA G-SYNC?
No, this monitor does not support adaptive sync technologies like AMD FreeSync or NVIDIA G-SYNC.
What inputs does the MSI PRO MP251 monitor support?
The monitor typically supports HDMI and VGA inputs, providing compatibility with various devices such as computers, laptops, and gaming consoles.
Does the MSI PRO MP251 monitor have VESA mounting support?
Yes, the monitor is typically compatible with VESA mounts (75mm x 75mm), allowing for easy installation on monitor arms or wall mounts.
Is the stand adjustable on the MSI PRO MP251 monitor?
Yes, the monitor stand typically offers tilt adjustment, allowing users to adjust the viewing angle for optimal comfort.
What is the warranty period for the MSI PRO MP251 monitor?
The warranty period may vary depending on the region and retailer, but it typically comes with a standard limited warranty covering manufacturing defects. Be sure to check the warranty information provided by MSI or your retailer for specific details.

