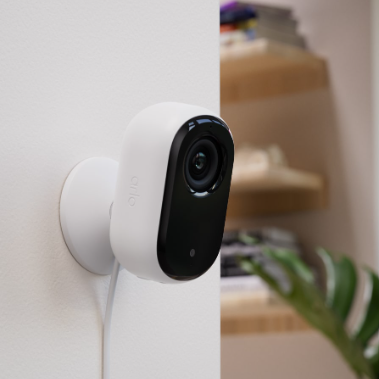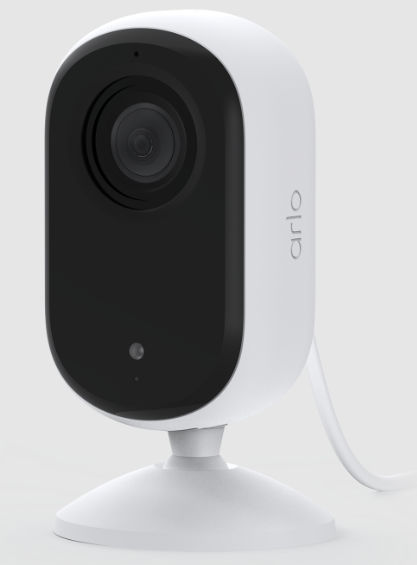
Arlo Essential Indoor Camera 2nd Gen 2K
Get to Know Your Essential Camera 2nd Generation
There are two Arlo Essential Indoor cameras (2nd Generation):
- Essential Indoor Camera 2K (VMC3060)
- Essential Indoor Camera HD (VMC3060)
Get the Arlo Secure App
Download the Arlo Secure App. The Arlo Secure App lets you create an Arlo account in the cloud and set up and manage all your Arlo devices. You can either search for it in your phone’s app store or scan the QR code below to download or update your Arlo Secure App.

Note
If you already use the Arlo Secure App, make sure that you’re using the latest version. To find out if an update is available, go to the app store and search for Arlo Secure.
Meet your Essential Indoor Camera
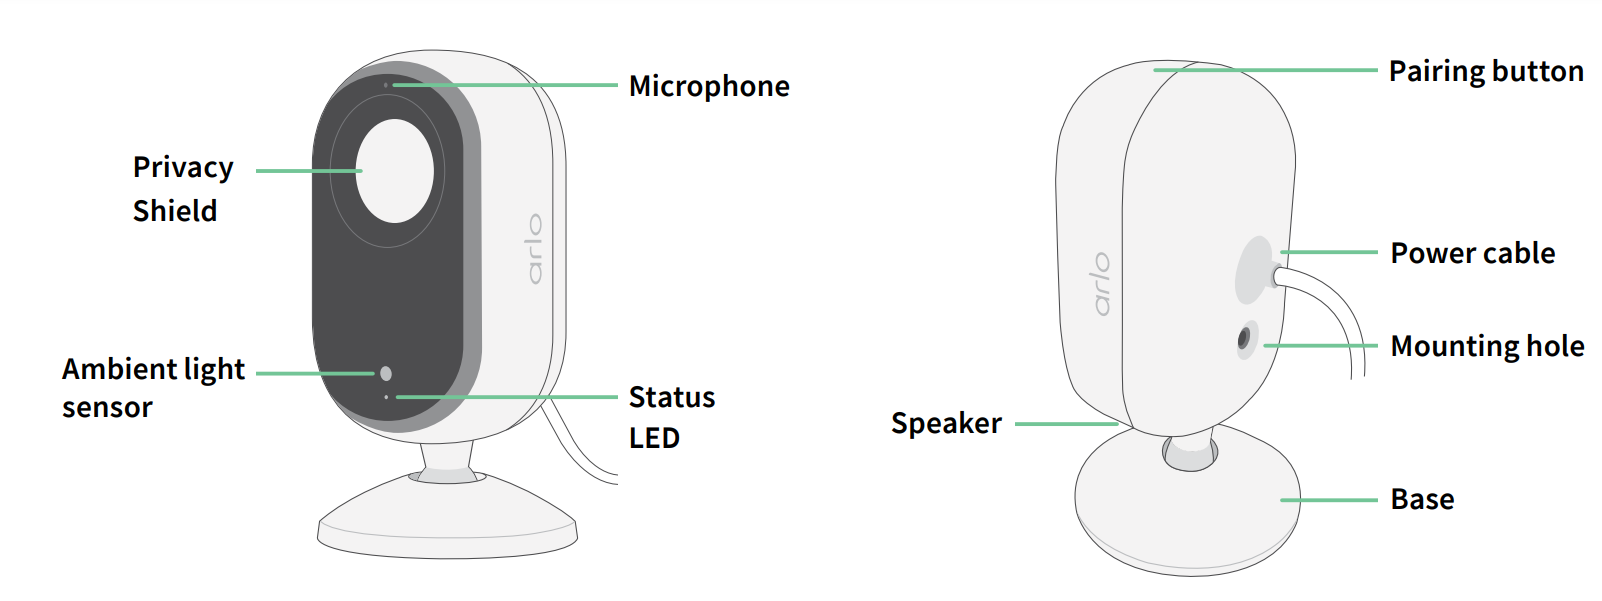
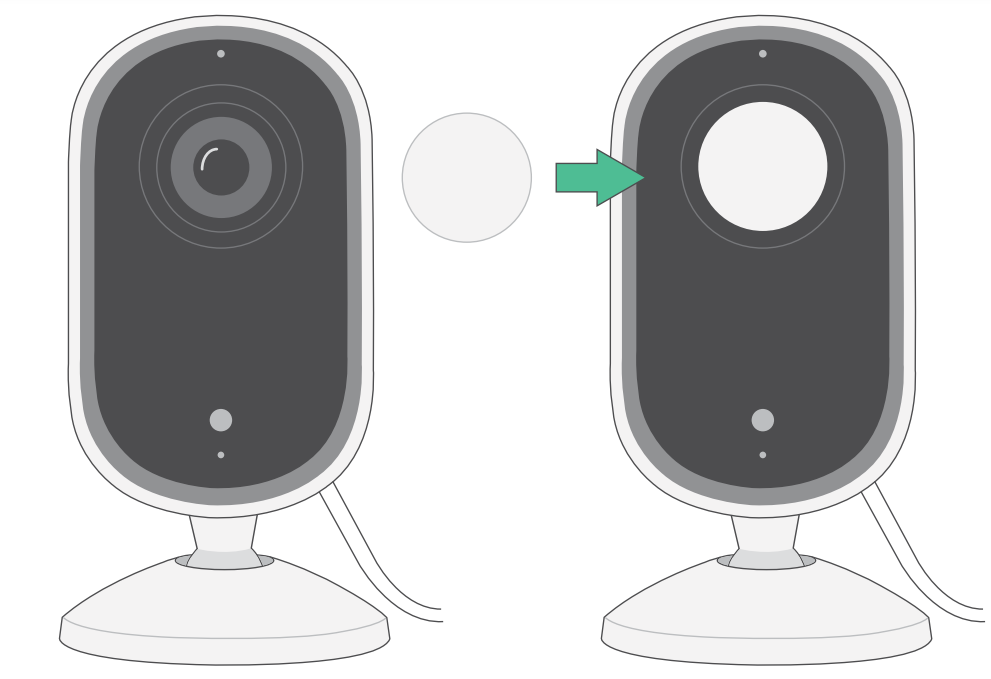
Privacy Shield
Use the Arlo Secure App to open and close the Privacy Shield. For more information.
Features
- Capture clear details in full high-definition. Record video in 2K or HD for clear, crisp imagery.
- Receive alerts when motion is detected. Notifications are sent directly to your phone.
- Automated Privacy Shield. Easily open and close the privacy shield to keep your private moments private.
- See visitors at night. View details and check in on your home, kids, and pets in low light with Night Vision.
- Hear and speak with visitors. Tap a button in the app to use 2-Way Audio.
- Use the built-in siren to deter unwanted guests. Siren can be triggered remotely or automatically during an event.
- Keep an eye on what matters with a wide field of view. 130° viewing angle lets you see more.
- Security in the palm of your hand. Watch live streams or recorded video from your smartphone or tablet using the Arlo Secure App.
Do more with Arlo
- Expand coverage in more areas. Cover more areas in and around your home by adding cameras, floodlights, security systems, or video doorbells. Visit arlo.com to view available options.
- Add an Arlo Secure plan. Continue enjoying enhanced security features after your trial, with one of our Arlo Secure plans. For more information, visit What are the available Arlo subscription plans and how much cloud recording is available?
Get Started
Use the Arlo Secure App for setup
The free Arlo Secure App helps you complete the setup and guides you through the installation process. Open the Arlo Secure App and connect to your Wi-Fi network. If you don’t have the app, you can download it from your phone’s app store and create your Arlo account. Once you set up your Arlo account, you can access it from the Arlo Secure App on a smartphone or tablet, or from a computer using a web browser. If you’re using a computer, enter https://my.arlo.com/#/login in the address bar of the browser.
Onboarding your camera with the Arlo Secure App
- Open the Arlo Secure App.
- To power on your camera, connect the USB-C cable to the included power adapter and plug it into an indoor power outlet.
- Make sure your phone is connected to your internet and ensure your phone’s Bluetooth is turned on.
- Select Devices from the bottom bar of your app, tap the Plus icon at the top of the app, and select Cameras, Essential Series, Essential Cameras 2nd Generation.
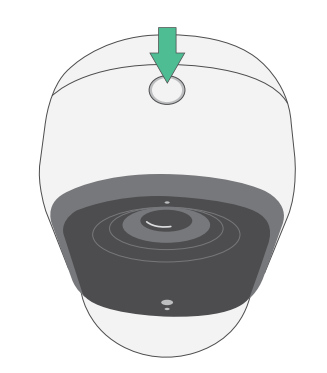
- Press the pairing button of your camera for 3 seconds.
 Select your 2.4GHz Wi-Fi network. Enter the Wi-Fi password and wait for it to be verified.
- Enter a name for your camera and select Continue.
- Your camera will check for firmware updates.
- The Arlo Secure App will then guide you through camera placement and mounting. Your camera is now onboarded!
Find a good location for your camera
Select a location for your camera with a clear vantage point to fully optimize the wide field of view. For the best experience, choose a location with a strong Wi-Fi signal and check the Wi-Fi signal strength in the Arlo Secure App. For information about Wi-Fi connections.
Wall mount your camera
Your camera comes with a mount and a screw kit.
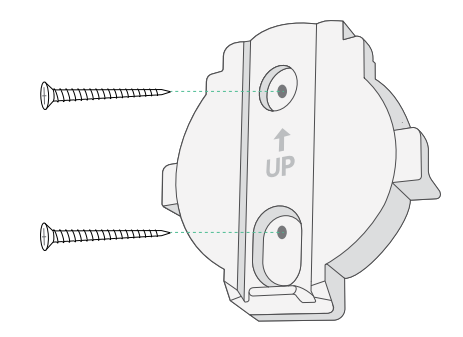
- Place the mount and secure it with screws. If you’re mounting the camera on drywall, use the drywall anchors we provide. The arrows on the mount should be pointed upwards.
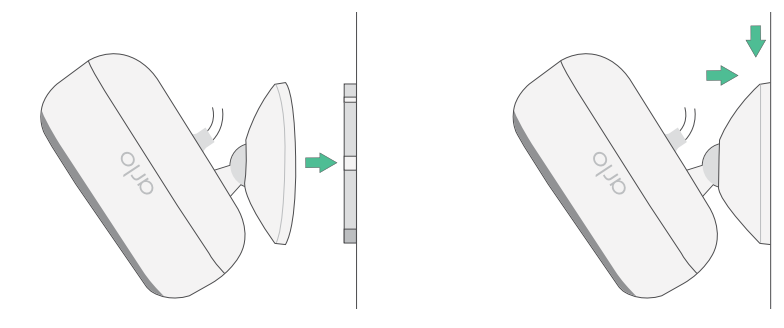
 Attach the camera to the mount by sliding the camera base down until you hear an audible click. Make sure both arrows are aligned and pointing upwards.
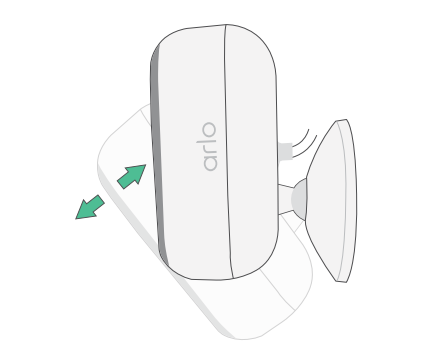
 Tilt and swivel to adjust the camera angle.
Use the pairing button to wake up the camera
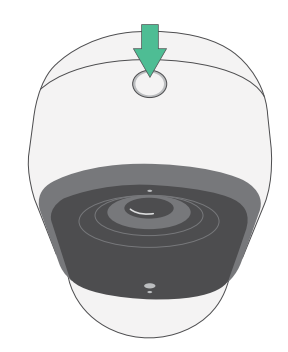
Press and hold the pairing button for 3 seconds. The camera wakes and the LED flashes blue for two minutes. Follow the instructions in the Arlo Secure App to add your camera to your Arlo account.
Check the LED
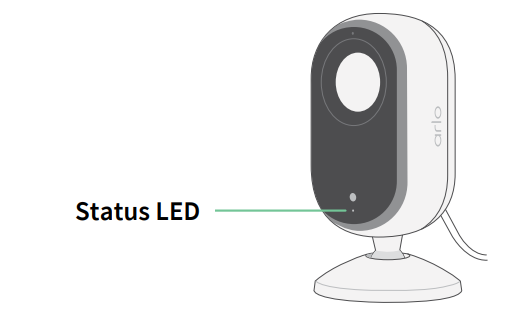
The LED on the camera lights up when the camera is powered on. The LED changes color and blinks to indicate the status of activities like pairing the camera and updating the camera firmware.
- Slow blinking blue. The camera is in the process of pairing to a Wi-Fi network.
- Fast blinking blue. The camera is paired with a Wi-Fi network and connected.
- Blinking amber. The camera is out of range, a connection error occurred during pairing.
- Alternating blue and amber. A firmware update is in process.
Test motion detection
You can use the motion detection test to customize the right motion sensitivity setting for your camera.
- Open the Arlo Secure App.
- Tap Devices and then tap the Menu icon in the upper right corner
- Tap the Device Settings icon next to the camera you want to modify.
- Tap Default Mode Settings > Motion Detection Test.
- Move in front of the camera. During this test, the LED blinks amber when motion is detected.
- Move the slider to adjust the motion sensitivity level as needed. This motion sensitivity setting is used during the motion detection test. It is not automatically applied to the camera rules used by modes to arm your camera. When you are satisfied with a particular motion sensitivity level in the test, note the setting so that you can add it to your rules.
- Edit the rule for your camera to enter the motion sensitivity level that you want to use.
Position your camera to detect motion in specific areas
You can mount and aim your camera in different ways to optimize the camera’s ability to detect motion in specific areas. It’s best to position the camera so that motion is moving from side to side across its field of view rather than directly toward or away from the camera. Also, though the camera can detect motion up to 23 feet (7 meters) away, the best area for motion detection is 5 to 20 feet (1.5 to 6 meters) from the camera position.
Wi-Fi Setup and Connections
When you install and set up your camera, the Arlo Secure App guides you through the process of connecting the camera to your router’s 2.4 GHz Wi-Fi network.
Tips for optimal Wi-Fi performance
The distance between Wi-Fi devices can affect the Wi-Fi signal:
- Maximum recommended distance. We recommend that you place your camera within 300 feet (90 meters) of the router. The maximum line-of-sight range of 300 feet is reduced by each wall, ceiling, or other major obstruction between the camera and the router.
- Minimum recommended distance. To reduce Wi-Fi interference, allow at least 6½ feet (2 meters) between your camera and any Arlo cameras that you install.
These materials can reduce Wi-Fi signal strength if they are located between Wi-Fi devices:
- Unusually thick walls and ceilings
- Brick
- Concrete
- Stone
- Ceramic
- Glass, especially mirrors
- Metal
- Large quantities of water, such as the water in a fish tank or water heater
Change your camera’s Wi-Fi connection
You can change your camera’s Wi-Fi to a different 2.4GHz Wi-Fi network. To change your camera’s Wi-Fi connection:
- Enable your device’s Bluetooth connection.
- Open the Arlo Secure App and log into the same Arlo account that your camera is connected to.
- Tap Devices and then tap the Menu icon in the upper right corner.
- Tap the Device Settings icon next to the camera you want to modify.
- Tap on Connected to.
- Select Change Network.
- Follow the on-screen directions on how to change your camera’s Wi-Fi connection.
View your camera feeds
- Open the Arlo Secure App.
- Tap Play on the camera feed. The camera feed updates and camera feed icons display.
- To stop viewing and listening to the live feed, tap Stop.
Pan and zoom your video feed
- Open the Arlo Secure App.
- Tap Devices and then select your camera by tapping on the edge of the camera image.
- Tap Play on the camera feed. On a mobile device, use the pinch gesture to zoom, and touch-and-drag to move around the zoomed-in frame.
Enable or disable your Privacy Shield
The Privacy Shield is enabled when the camera is on standby. If your Essential Indoor Camera is set to respond to motion or sound, the Privacy Shield will be open.
To enable your Privacy Shield:
- Launch the Arlo Secure App.
- Tap Routines.
- Select Arm Away, Arm Home, or Standby.
- Tap Add Device Rules > Save.
To disable your Privacy Shield:
- Launch the Arlo Secure App.
- Tap Routines.
- Select Arm Home or Standby.
Download recordings
- Open the Arlo Secure App.
- Tap Feed.
- Tap a recording.
- Tap the Menu icon in the upper right corner of the page.
- Tap Download.
- Tap OK to confirm.
Make a recording of a favorite
- Open the Arlo Secure App.
- Tap Feed.
- Tap the Menu icon in the upper right corner of the page.
- Tap Favorite.
Share recordings
- Open the Arlo Secure App.
- Tap Feed.
- Tap the Menu icon in the upper right corner of the page.
- Tap Share.
- Share the file.
Delete recordings
- Open the Arlo Secure App.
- Tap Feed.
- Tap a recording.
- Tap the Menu icon in the upper right corner of the page.
- Tap Delete.
- Tap OK to confirm.
Change Your Settings
You can use the Arlo Secure App to view and change the settings for your Arlo devices.
Camera settings
You can view or change the settings for each camera using either of these methods:
- Tap Devices and select the camera by tapping on the outer edge of the camera feed image. Tap the Device Settings icon on the top right corner of the screen.
- Tap the Menu icon or the Device Settings icon below the camera feed.
Change the camera name
- Open the Arlo Secure App.
- Tap Devices and then tap the Menu icon in the upper right corner.
- Tap the Device Settings icon next to the camera you want to modify.
- Tap the camera.
- Tap Edit next to Camera. Enter a new name that reminds you of the camera’s location, such as Garage or Front Door. Camera names are limited to 32 characters.
- Tap Save.
Change the time zone
- Open the Arlo Secure App.
- Tap Profile.
- Select Home > Time Zone.
- Tap a time zone. If you’re using a computer, click Save
Video Settings
Change the video quality
- Open the Arlo Secure App.
- Tap Devices and then the Menu icon in the upper right corner.
- Tap the Device Settings icon next to the camera you want to modify.
- Tap Video Settings > Video Resolution.
- Tap to select 2k, 1080p, or 720p.
Rotate the image 180 degrees
- Open the Arlo Secure App.
- Tap Devices and then the Menu icon in the upper right corner.
- Tap the Device Settings icon next to the camera you want to modify.
- Tap Video Settings.
- Tap Rotate Image 180.
Turn night vision on and off
When night vision is enabled, the camera automatically turns on infrared (IR) LEDs to record in low-light conditions. We recommend that you turn off night vision if the camera is facing reflective surfaces, such as windows.
- Open the Arlo Secure App.
- Tap Devices and then tap the Menu icon in the upper right corner.
- Tap the Device Settings icon next to the camera you want to modify.
- Select Night Vision.
- Tap Night Vision. If you’re using an Android device, tap the slider.
Change the audio settings
You can adjust the settings to reduce wind noise, turn the microphone off and on, and adjust the speaker.
- Open the Arlo Secure App.
- Tap Devices and then the Menu icon in the upper right corner.
- Tap the Device Settings icon next to the camera you want to modify.
- Select Audio Settings.
- Adjust the settings:
-
- The microphone toggle turns the microphone off and on.
- Speaker toggle and volume. To turn the speaker off and on, tap Speaker. To change the speaker volume, move the Speaker Volume slider.
Adjust recording length
- Open the Arlo Secure App.
- Tap Devices and then the Menu icon in the upper right corner.
- Tap the Device Settings icon next to the camera you want to modify.
- Select Default Mode Settings.
- Under Recording Length, select Record until activity stops (up to 5 min) or Record for a fixed length.
If you select Record for a fixed length, set the length of recordings (10 seconds to 2 minutes).
Troubleshooting
Arlo doesn’t discover your camera during setup
If you’re trying to set up and connect your Arlo camera directly to your Wi-Fi router and Arlo doesn’t discover your camera, here are some things to check to identify and correct the problem. When you’re using the Arlo Secure App to add your camera, check the following:
- Make sure that you select the correct camera model after you tap the Plus icon in the Evices tab in the Arlo Secure App. The Arlo Secure App only tries to discover the Arlo device that you select. To find your camera’s model number, check the box that your camera came in.
- You’re entering the correct Wi-Fi network SSID (network name) and password. The network SSID and password are case-sensitive and must be exactly correct.
- Your mobile device and Arlo camera are within the Wi-Fi signal range of your Wi-Fi router. During setup, we recommend placing your camera within 10-15 feet (3-4.5 meters) of your Wi-Fi router. After the camera is set up and connected, you can move the camera to any place within range of your Wi-Fi router. For more information.
- Check the camera LED. When you press the pairing button during setup, the LED blinks blue for two minutes while the camera is being discovered and then blinks blue fast when it connects to your Wi-Fi network. If the camera doesn’t connect to your Wi-Fi network within two minutes, it times out and the LED stops blinking. If the camera times out, press the pairing button again. Make sure that the LED blinks blue during the entire connection process.
Wi-Fi signal interference
Environments with multiple Wi-Fi networks, Wi-Fi devices, or frequencies can cause signal interference. If possible, minimize the number of networks, Wi-Fi devices, and transmitted frequencies in the area where you place your camera. For help with adjusting Wi-Fi settings such as the channel for your router, check the instructions that came with your router or contact your internet service provider (ISP) if they installed your router.
Out of range
Make sure that your camera is close enough to receive a strong Wi-Fi signal. The range of your router’s Wi-Fi signal can vary depending on the router model and conditions in your local environment. Make sure that your camera displays three or four bars of signal strength in the area where you intend to install it. The camera can work when signal strength is at one or two bars but might go out of range intermittently due to fluctuations in the environment.
Use the pairing button to reset the camera
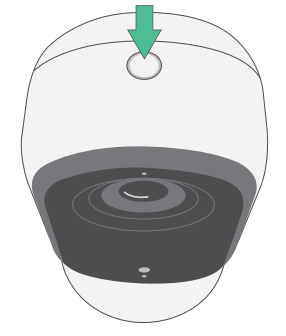
The button on the top of your camera is the pairing button.
Note
The pairing button is also used to wake the camera when it is shut down and to pair the camera with a Wi-Fi network. We recommend that you follow the instructions in the Arlo Secure App to wake and pair your camera.
Reset the camera to its factory settings
This process returns the camera to its default settings and removes it from your Arlo account. This means that you must follow the Arlo Secure App setup process to use your camera after a factory reset.
- Press and hold the pairing button for about 15 seconds, until the camera LED begins blinking amber, then let go.
- Ensure that the camera LED blinks amber three times. Make sure to let go of the pairing button when the camera LED begins blinking amber. If you hold the pairing button too long, you must restart the factory reset process until the camera LED blinks amber three times after you let go of the pairing button. After a factory reset, the camera still appears in the Arlo Secure App, but it is disabled.
- To remove the camera from the Arlo Secure App, tap Devices, select your camera, tap Settings, scroll down, and tap Remove Device.
- To add the camera back to your Arlo account, tap the Plus icon in the upper right corner on the Devices page and follow the prompts to connect your camera to your Wi-Fi network and set it up.
Compliance
The regulatory marking is located at the bottom of the unit. For regulatory compliance information including the EU Declaration of Conformity and where to find e-label information for Compliance Taiwan NCC, US FCC & Industry Canada, visit www.arlo.com/about/regulatory/. Some Arlo products have a regulatory e-label that you can access in the Arlo app or web portal. This is because a printed regulatory label does not fit all of the regulatory information on the Arlo product label. To find the regulatory e-label for your Arlo product:
- Launch the Arlo app or log in to my.arlo.com.
- From the Devices screen, open the Device Settings page for your Arlo product.
- On iOS and web browsers, tap the Settings icon next to your Arlo device.
- On Android, tap the menu icon next to your Arlo device, then tap Device Settings.
- Tap or click Device Info > Regulatory.
Note
If the Arlo Secure App does not show a Regulatory sub-menu for your Arlo product, then the product does not have a regulatory e-label, and you can find all regulatory information on the physical label located either at the base, inside the battery compartment, or near the power input port of the Arlo product.
For additional compliance information on Arlo products, visit https://www.arlo.com/en-us/about/regulatory/.
For more Manuals by ARLO, visit MANUALSDOCK
FAQS About Arlo Essential Indoor Camera 2nd Gen 2K
What is the resolution of the Arlo Essential Indoor Camera 2nd Gen 2K?
The Arlo Essential Indoor Camera 2nd Gen 2K offers a resolution of up to 2K, providing clear and crisp video quality.
Does it support two-way audio?
Yes, this camera supports two-way audio, allowing you to communicate with people in your home remotely using the Arlo app.
Can it be used in complete darkness?
Yes, the camera is equipped with infrared night vision, enabling it to capture footage in complete darkness.
Does it have a motion detection feature?
Yes, the Arlo Essential Indoor Camera 2nd Gen 2K has a motion detection feature that sends alerts to your smartphone when activity is detected.
What is the field of view of this camera?
The camera has a wide 130-degree field of view, providing comprehensive coverage of the room it’s placed in.
Does it require a subscription for cloud storage?
While the camera comes with a free trial of Arlo Smart, a subscription service is required for extended cloud storage and advanced features like person detection and package detection.
Can it be integrated with smart home systems like Alexa or Google Assistant?
Yes, the Arlo Essential Indoor Camera 2nd Gen 2K is compatible with both Alexa and Google Assistant, allowing you to control it using voice commands.
Is it easy to install?
Yes, the camera is designed for easy DIY installation, with simple setup instructions provided in the Arlo app.
What is the power source for this camera?
The Arlo Essential Indoor Camera 2nd Gen 2K can be powered using a standard electrical outlet.
Does it have a privacy feature?
Yes, the camera features a privacy shield that allows you to physically block the lens when you want to ensure your privacy.

