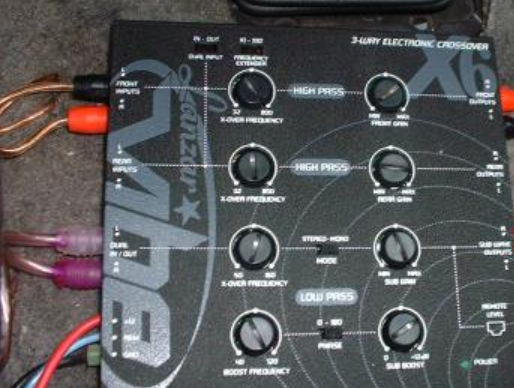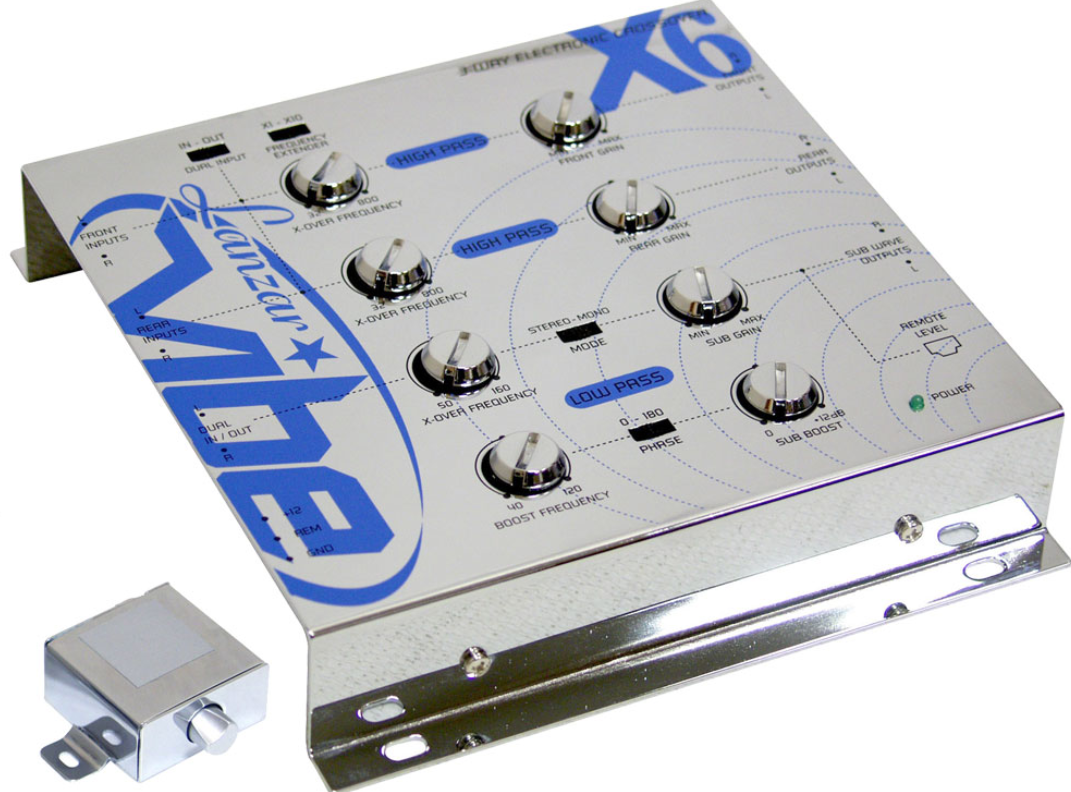
LANZAR VIBEX6 3-Way Electronic Audio Crossover Network
FEATURES:
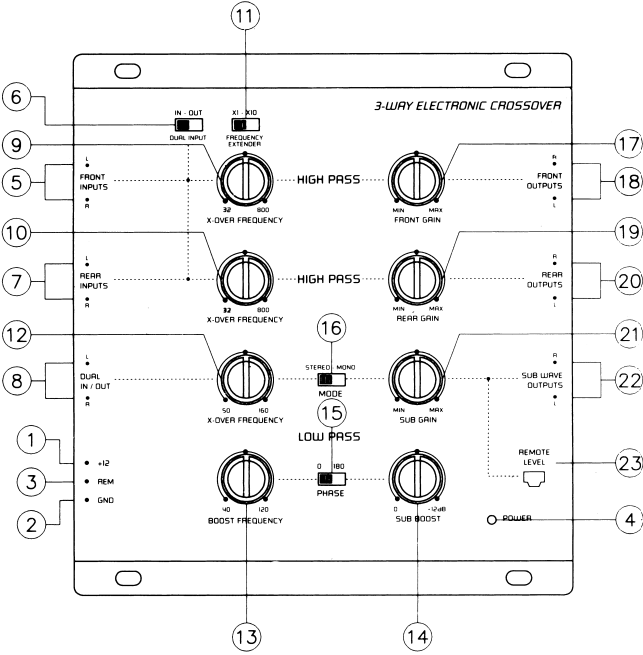
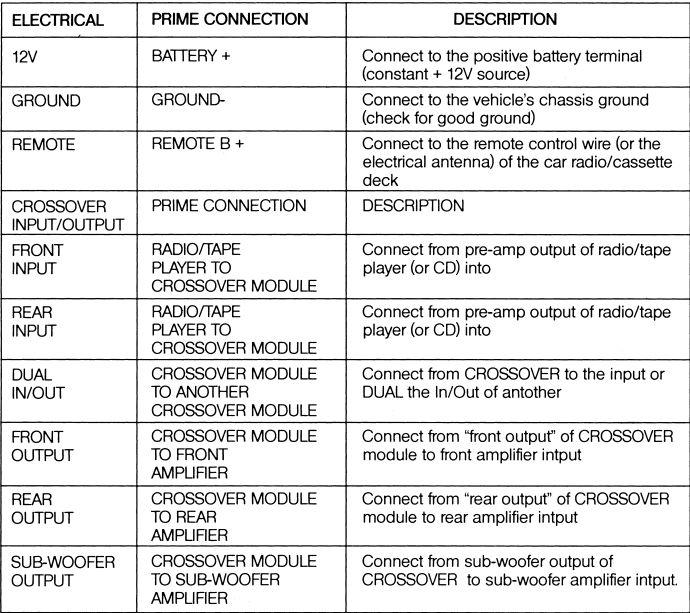
- POWER INPUT TERMINAL (12V) To be connected to the positive terminal of your vehicle battery or another constant + 12V source.
- GROUND INPUT TERMINAL To be wired to the vehicle’s chassis ground.
- REMOTE TURN-ON INPUT TERMINAL (REMOTE) To be connected to the remote control wire or antenna lead of the source unit for remote ON/OFF.
- POWER INDICATOR This indicator lights up when the internal switching power supply is activated and the unit is operational.
- LEFT/RIGHT FRONT CHANNEL SIGNAL INPUTS To be connected to the front channel output of the source unit.
- DUAL INPUT SWITCH “IN”: When the parallel input is at the “IN” position, the input signals coming in through the front channel signal inputs are split and directed to the front and rear channels simultaneously. (This feature is to be engaged where the source unit has no separate front, rear, or subwoofer channel outputs.) “OUT”: If the source unit has independent front and rear channel outputs, disengage the parallel innit by sliding the switch to the “OUT position.
- LEFT/RIGHT REAR CHANNEL SIGNAL INPUTS To be connected to the rear channel outputs of the source unit. BUT MAKE SURE THAT THE DUAL INPUT SWITCH IS AT THE “OUT” POSITION.
- LEFT/RIGHT DUAL IN/OUT TERMINALS As Input Terminal: To be connected to the subwoofer output of the source unit. As Output Terminal: To be connected to the front channel input terminal of another electronic crossover in a multi-crossover system.
- FRONT CHANNEL HIGH-PASS FREQUENCY SELECTOR For selection of front channel high-pass crossover frequency between 32 Hz and 800 Hz (or 320 Hz and 8K Hz when its frequency multiplier is at “x10” position).
- REAR CHANNEL HIGH-PASS FREQUENCY SELECTOR For selection of rear channel high-pass crossover frequency between 32 Hz and 800 Hz.
- FRONT CHANNEL HIGH-PASS FREQUENCY EXTENDER Positioning this switch at the “x10” position changes, the range of selectable crossover frequency for the front channel high-pass from 32 Hz – 800 Hz to 320 Hz – 8KHz
- SUBWOOFER FREQUENCY SELECTOR For the selection of the low-pass crossover frequency for the subwoofer channel between 50 H and 160 Hz.
- BASS-BOOST FREQUENCY CONTROL For setting the frequency (from 40 Hz to 120 Hz) at which the BASS-BOOST circuitry generates a frequency boost to equalize the woofer enclosure.
- BASS-BOOST LEVEL CONTROL For the selection of the boost level (from 0 to +12 dB).
- PHASE INVERTER Positioning the switch to the “180” position shifts the subwoofer output signals 180 degrees out-of-phase relative to the front and rear output signals.
- SUBWOOFER STEREO/MONO SWITCH For the selection of stereo or mono mode subwoofer output.
- FRONT CHANNEL OUTPUT GAIN CONTROL For adjusting the front channel output signal level.
- LEFT/RIGHT FRONT CHANNEL OUTPUT TERMINALS To be connected to the front channel amplifier left/right inputs.
- REAR CHANNEL OUTPUT GAIN CONTROL For adjusting the rear channel output signal level.
- LEFT/RIGHT REAR CHANNEL OUTPUT TERMINALS To be connected to the rear channel amplifier left/right inputs.
- SUBWOOFER OUTPUT GAIN CONTROL For adjusting the subwoofer channel output signal level.
- LEFT/RIGHT SUBWOOFER OUTPUT TERMINALS To be connected to the subwoofer channel amplifier left/right inputs.
- SUBWOOFER OUTPUT LEVEL REMOTE CONTROL TERMINAL To be connected to the remote control for exclusive maneuver of the subwoofer output level and the subwoofer output level control on the unit (*21″ above) is by-passed.
ELECTRICAL & AUDIO CONNECTIONS
- 2-Channel Two-Way System (tweeter + full range)
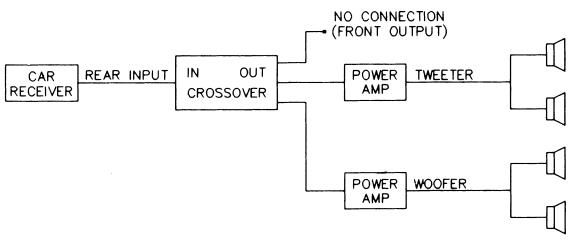
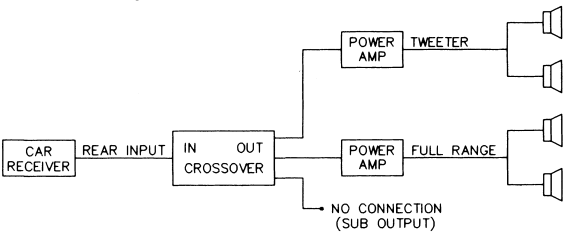 2-Channel Two-Way System (tweeter + woofer)
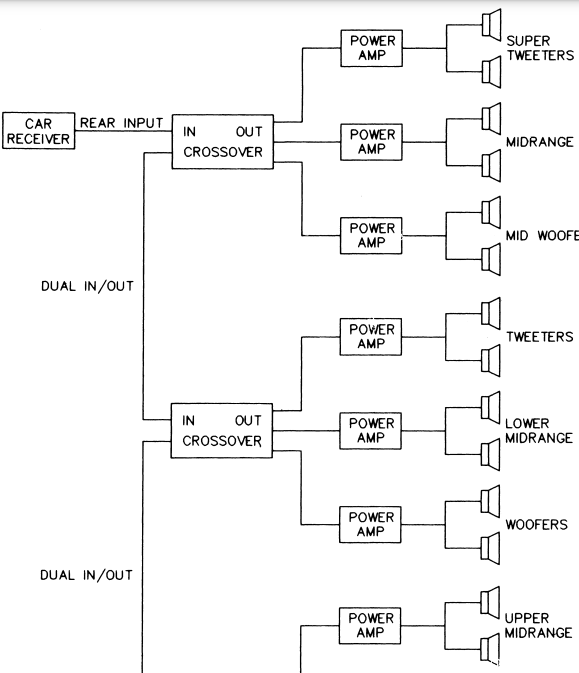
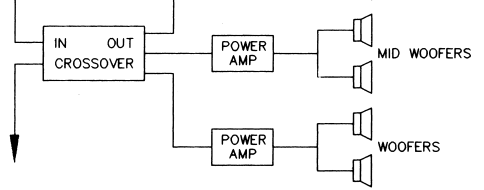
 4-Channel TRI-AMP System
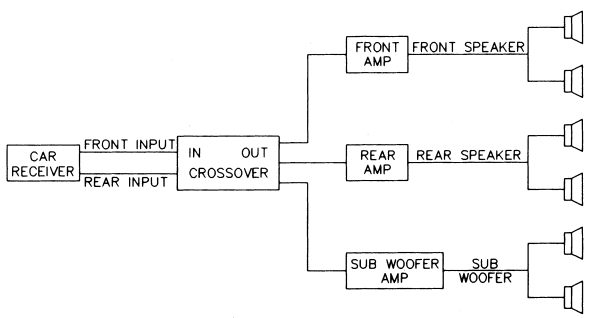 2-Channel multiple-purpose system
ELECTRICAL & AUDIO CONNECTIONS
Precautions
- To prevent short circuits, be sure to disconnect the negative battery ground lead before wiring the system up.
- When you finish the installation, be sure to make one more check to be sure everything is done correctly.
- Reinstate all car parts that were removed.
- Reconnect the negative battery ground lead.
Primary Wiring Descriptions
NOISE CHECK & SYSTEM ADJUSTMENT
NOISE CHECK
Check the entire audio system for noise before permanently securing the CROSSOVER mounting
- Start the engine.
- Turn the audio system on.
- Rev the engine and vary the VOLUME of the audio system to determine if there is any unwanted noise. If so, turn both the audio system and the engine off. Do not secure the CROSSOVER mounting screws. Refer to the “Trouble Shooting Guide” in this manual.
- If the audio system does not have any noise, securely tighten the CROSSOVER mounting screws and double-check the wiring cables for safe placement.
SYSTEM ADJUSTMENT
Preliminary Adjustments
Pre-setting the system provides a necessary starting point for fine-tuning the entire audio system to maximum performance.
NOTE: DO NOT MOUNT CROSSOVER UNTIL THE FOLLOWING PROCEDURES HAVE BEEN COMPLETED
- Preset each amplifier input gain adjustment at the amplifier to half of the maximum.
- Before turning the audio system on, preset-adjust the front, rear, and sub-woofer output level controls, as well as the front channel high-pass and sub-woofer channel low-pass crossover points.
- Slowly turn the volume up and listen carefully for Obvious trouble in sound (distortion, no sound, no hiss, total silence). To turn the system off refer to the “Trouble Shooting Guide” in this manual.
Caution
DO NOT ROUTE AUDIO CABLES AND POWER CABLES TOGETHER! THIS CAN CAUSE ENGINE NOISE IN YOUR AUDIO SYSTEM. ALWAYS DISCONNECT THE SYSTEM FROM THE BATTERY BEFORE ATTEMPTING TO MAKE OR ALTER ANY CONNECTIONS. THIS PRODUCT IS DESIRED FOR USE IN ANY 12-VOLT NEGATIVE GROUND ELECTRICAL SYSTEM ONLY. INSTALLING THIS PRODUCT IN ANY POSITIVE GROUND ELECTRICAL SYSTEM COULD SERIOUSLY DAMAGE THE AUDIO SYSTEM.
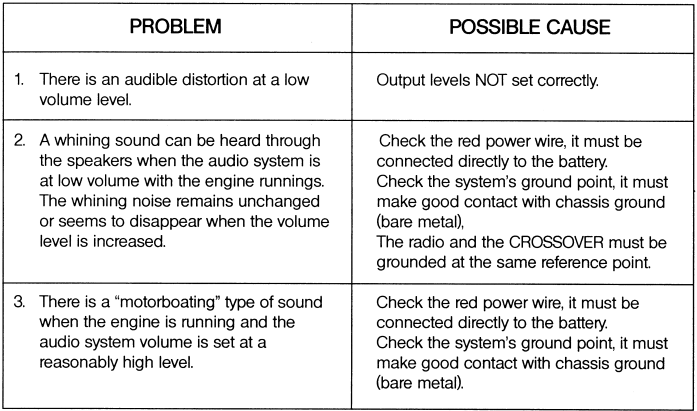
TROUBLESHOOTING GUIDE
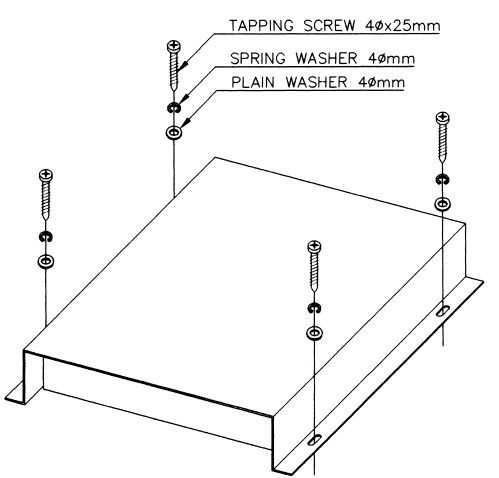
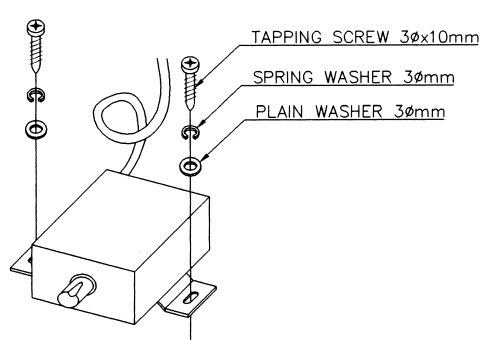
INSTALLATION
For more Manuals by Lanzar, visit ManualsDock
FAQS About LANZAR VIBEX6 3-Way Electronic Audio Crossover Network
What is the purpose of the Lanzar VIBEX6 crossover network?
The VIBEX6 is designed to split the audio signal into different frequency bands and send them to specific speakers, ensuring optimal sound reproduction and clarity in car audio systems.
How many channels does the VIBEX6 crossover support?
The VIBEX6 supports up to 3 channels, allowing for precise control over the distribution of frequencies to tweeters, midrange drivers, and subwoofers.
What is the crossover frequency range of the VIBEX6?
The crossover frequency range typically spans from 40Hz to 400Hz, providing flexibility to tailor the audio output to the characteristics of the connected speakers.
Does the VIBEX6 feature adjustable crossover slopes?
Yes, it often includes adjustable crossover slopes, allowing users to fine-tune the transition between frequency bands for seamless integration between speakers.
Is the VIBEX6 compatible with both passive and active speaker systems?
Yes, it can be used with both passive and active speaker systems, making it versatile for various car audio setups.
Does the VIBEX6 require external power?
Yes, it typically requires a 12-volt power source to operate, which is commonly provided by the car’s electrical system.
Is the VIBEX6 easy to install in a car audio system?
Yes, it is designed for straightforward installation and often comes with mounting hardware and wiring instructions for convenience.
Does the VIBEX6 include protection features for the connected speakers?
Yes, it often includes protection circuits to safeguard against overloading, overheating, and short circuits, helping to protect the speakers from damage.
Can the VIBEX6 be adjusted while driving?
While adjustments are typically made while the vehicle is stationary, some models may feature remote control capabilities for convenience.
What kind of warranty does Lanzar offer for the VIBEX6?
Lanzar typically offers a manufacturer’s warranty on their products, providing coverage for defects in materials and workmanship for a specified period. It’s advisable to check the warranty details provided with the VIBEX6 for specific terms and conditions.

