TP-Link Tapo 2K Pan-Tilt Security Camera
About TP-Link
TP-Link, a leading manufacturer of dependable networking hardware and accessories, was established in 1996 and is present in all facets of modern life. IDC, an analytical agency, has ranked the company as the top seller of Wi-Fi equipment for continuous 12 years*, with distribution to more than 170 nations and services to billions of people globally.
With a track record of stability, performance, and value, TP-Link has chosen a range of products to satisfy every user’s networking requirements. Now, as the connected lifestyle continues to develop, the business is growing to meet and surpass demands for the future.
About This Guide
This guide provides a brief introduction to the Pan/Tilt Home Security Wi-Fi Camera and the Tapo app, as well as regulatory information. Please note that features available in Tapo may vary by model and software version. Tapo availability may also vary by region. All images, steps, and descriptions in this guide are only examples and may not reflect your actual Tapo Camera experience.
Conventions
In this guide, the following convention is used:
| Convention | Description |
| Blue | Key information appears in teal, including management page text such as menus, items, buttons, and so on. |
| Underline | Hyperlinks are in teal and underlined. You can click to redirect to a website. |
| Note: | Ignoring this type of note might result in a malfunction or damage to the device. |
More Info
- Specifications can be found on the product page at https://www.tapo.com.
- Our Technical Support and troubleshooting information can be found at https://www.tapo.com/support/.
- The setup video can be found at https://www.tp-link.com/support/setup-video/#cloud-cameras.
Introduction
When you are away from home, there is always something you care about. This is where the smart camera functions. No matter whether your child is climbing the kitchen cabinet, or the pet is stealing snacks, the Pan/Tilt Home Security Wi-Fi Camera helps you stay with them anytime, anywhere. Receive a notification whenever your camera detects motion and see a video clip of this motion to check everything.
- Smooth Pan and Tilt – 360° horizontal range.
- 3MP High-Definition – Provide greater sharpness and clarity.
- Advanced Night View – Even at night, the camera can provide a visual distance of up to 30 ft.
- Live View – Always stay with what matters most to you from anywhere, anytime.
- Two-Way Audio – Communicate with others with the built-in microphone and speaker.
- Sound and Light Alarm – Trigger light and sound effects to frighten unwanted visitors.
- Privacy Mode – Shut down the surveillance to protect your privacy.
- Sharing – Share the memorable moments with your family and friends.
- Safe Storage – Store up to 256 GB on a microSD card*, equal to 512 hours (21 days) of footage.
- microSD card needs to be purchased separately. The data comes from the TP-Link laboratory.
Appearance
The Pan/Tilt Home Security Wi-Fi Camera has a system LED that changes color according to its status, a lens, microphone, speaker, DC power port, RESET button, and a microSD card slot. Refer to below for details.
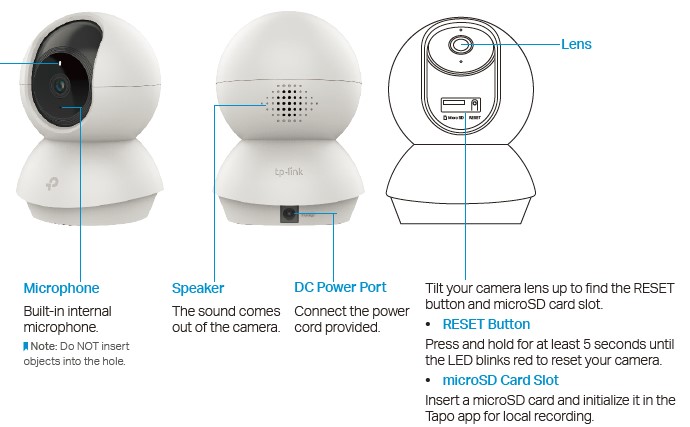
System LED
- Solid red: Starting up
- Blinking red and green: Ready for setup
- Blinking red slowly: Connecting to Wi-Fi
- Solid amber: Connected to Wi-Fi
- Solid green: Connected to TP-Link Cloud server
- Blinking red quickly: Camera resetting
- Blinking green quickly: Camera updating
Set Up Your Camera
Follow the steps below to get started with your new camera.
- Step 1. Download Tapo App
Get the Tapo app from the Apple App Store or Google Play, or by scanning the QR code below.
- Step 2. Log In
Open the app, and log in with your TP-Link ID. If you don’t have an account, create one first.
- Step 3. Add Your Camera
Tap the button in the app and select your model.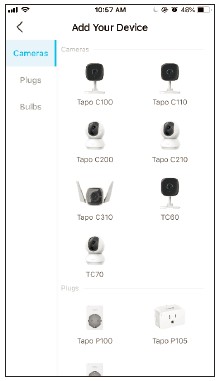
- Step 4. Configure Camera
Follow the app instructions to configure your camera and add it to your home network.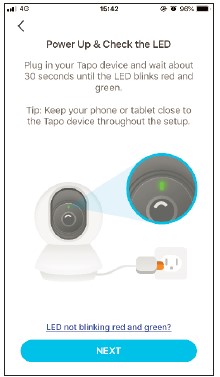
- Step 5. Place Camera
Place your camera on a flat surface, or install it on a wall or ceiling with the provided mounting template and screws.
Note: Make sure you affix the camera base using screws before securing the camera.
Setup using Amazon Frustration-Free Setup
What is Amazon Frustration-Free Setup?
Amazon Frustration-Free Setup can help connect and set up Tapo smart devices in fewer steps, without having to remember and re-enter your Wi-Fi password on each device.
To use this feature, confirm the following:
- The new Tapo device supports Amazon FFS.
- You have an Amazon FFS-enabled Alexa device or router.
- You have saved your Wi-Fi information to Amazon by using Alexa Echo.
- Your Tapo device and router are on the same network as your Alexa Echo.
LED Indications during Amazon Frustration-Free Setup
| LED | Status |
| Blinking orange and green | Ready for setup |
| Blinking orange | FFS setup in progress |
| Solid green | Working properly |
If the LED does not turn solid green after a long time, you can try to add the Tapo device manually. (Press the Reset button on your Tapo device once. Then open the Tapo app, tap the + button on the page, select your device model, and follow the app instructions. )
How to use Amazon Frustration-Free Setup with Tapo devices
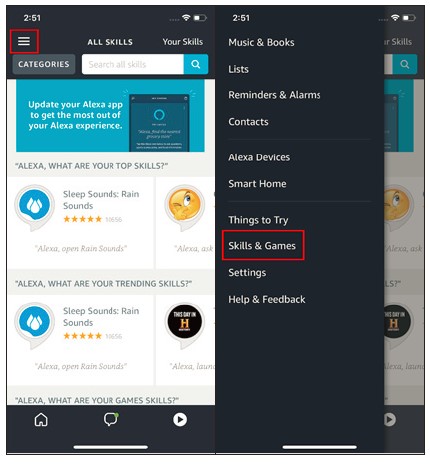
- Open the Amazon Alexa app. Then tap on the hamburger icon in the upper left corner and select Skills & Games.
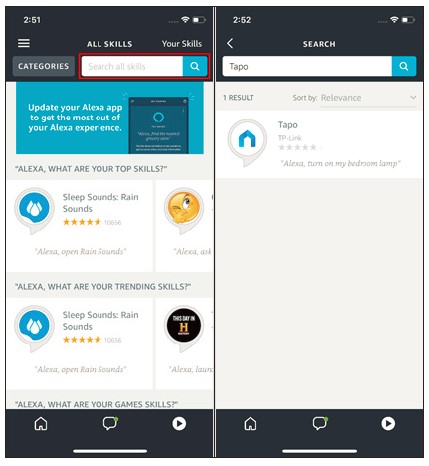
- Enter Tapo in the search bar and choose Tapo.
- Tap the ENABLE button.
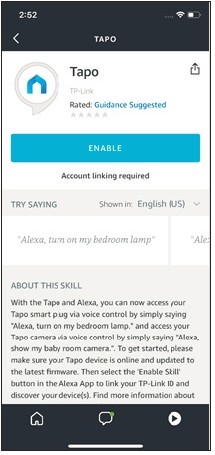
- Log in with your TP-Link ID that is bound to your Tapo device, and tap Authorize. After being authorized successfully, the message Tapo has been successfully linked will come up.
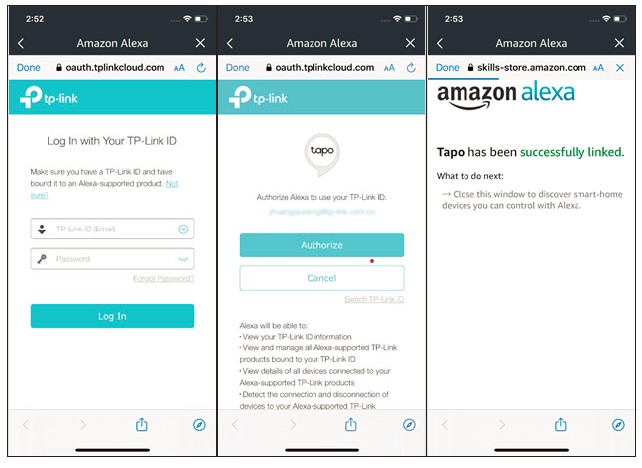
- Plug in your Tapo device and the setup will complete automatically in two minutes.
Main Camera Controls
After you successfully set up the camera, you will see your camera listed on the home page. You can view and manage your camera from anywhere at any time with the Tapo app.
Home Page
This page lists all the cameras you’ve added and you can view them directly and manage them easily. Tap the camera or go to Camera Preview > Manage to enter the Live View page.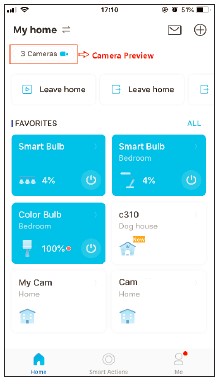
Live View
- Talk or Voice Call: Communicate with loved ones
- Pan & Tilt: Rotate your camera to monitor every angle of your room Privacy Mode: Enable to temporarily
- Shut down the surveillance for privacy Alarm: Turn on to get noticed when motion detected
- Playback & Memory: Check all recordings and saved moments
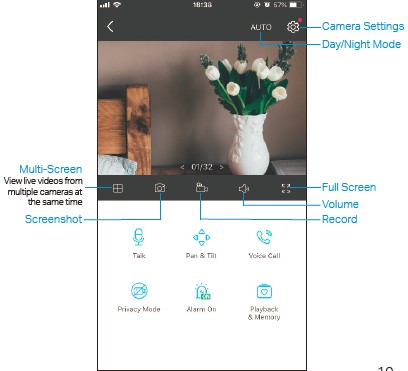
Camera Settings
On the Live View page, tap to enter the Camera Settings page. You can change the settings of your camera to meet various needs, such as changing your camera name, customizing detection settings and recording schedules, turning on or off notifications, setting activity zones, etc.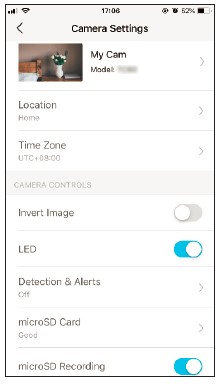
Me
On this page, you can edit your account, quickly check the memorable moments you saved, or find the FAQs and other features related to the Tapo app.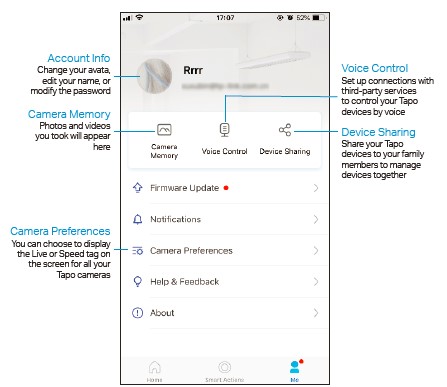
Pan & Tilt Control
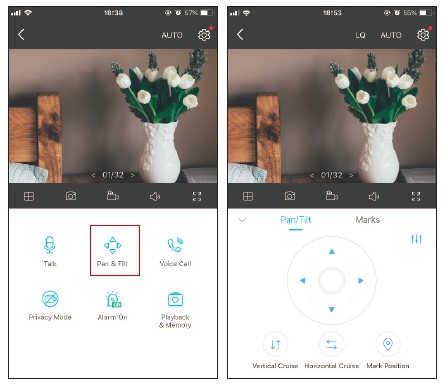
On the Live View page, tap to enter the control page. Tap on the Pan & Tilt panel to control your camera’s movement.
- Pan & Tilt Settings: Tap to set how many degrees the camera will move per tap of the Pan & Tilt.
- Vertical Cruise: Persistently move up and down.
- Horizontal Cruise: Persistently move from left to right.
- Mark Position: Tap to mark your current position, and then you can quickly rotate your camera to the marked direction with just a tap.
Motion Detection
With motion detection, the Tapo app alerts you of activity that matters and sends notifications straight to you when motion is detected. Insert a microSD card to record the clips when motion is detected. Otherwise, you can only receive the notifications.
Note: Initialize the SD card on the app before using it.
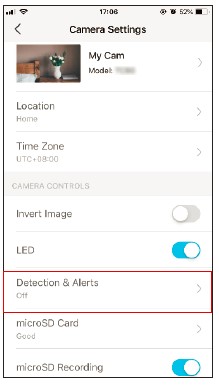
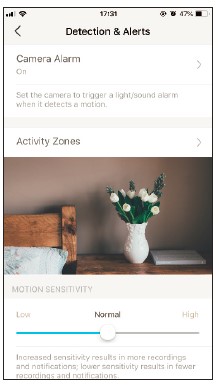
- Go to the Camera Settings page and tap Detection & Alerts to customize its current detection settings.
- On the Detection & Alerts page, enable the Motion Detection function. It’s recommended to enable the Notifications function to receive motion detection messages.
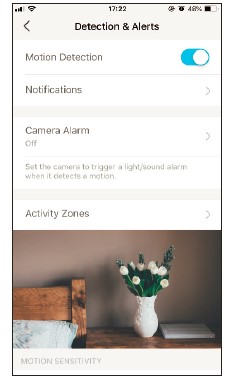
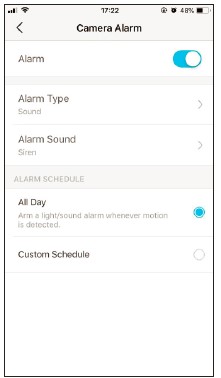
- Customize Camera Alarm settings. Choose the Alarm Type (Sound/Light) and Alarm Sound (Siren/Tone), and set the Alarm Schedule as needed.
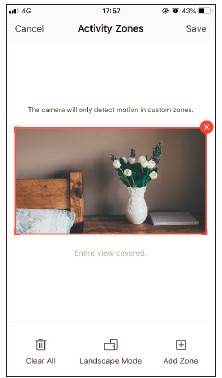
- Customize Activity Zones and the camera will only detect motion in custom zones. The entire view is covered by default.
- Adjust Motion Sensitivity (Low/Normal/High) as needed. Increased sensitivity results in more recordings and notifications.
- After editing the detection settings for the camera, you can set the Recording Schedule for the motion detection.
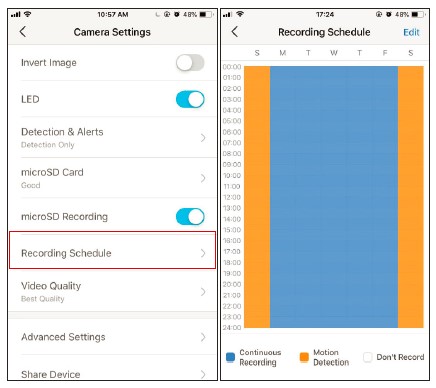
- On the Live View page, tap to find all recordings. The orange sections are recordings for motion detection.
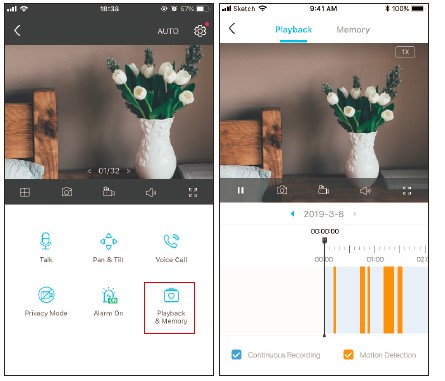
Note: The microSD card is needed for recordings. Initialize the SD card on the app before using it.
24-hour Recordings
The microSD card is needed for 24-hour recording and it’s suggested to initialize the SD card on the app before using it.
- On the Live View page, tap to enter the Camera Settings page.
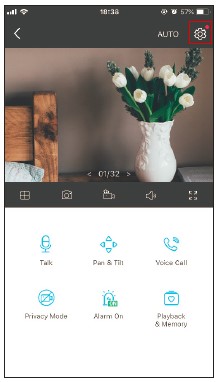
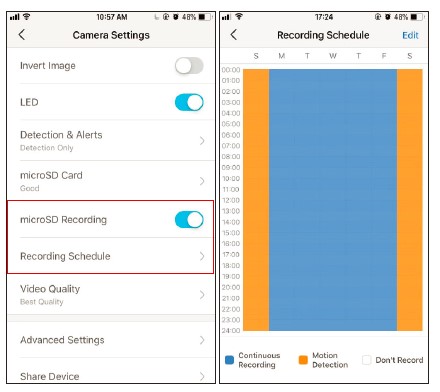
- Toggle on to enable the microSD Recording function and set the Recording Schedule for Continuous Recording (24-hour Recording) as needed.
- On the Live View page, tap to find all recordings. The blue sections mean continuous recording.
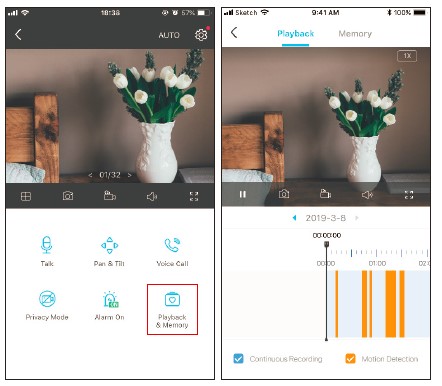
Note: The microSD card is needed for recordings. Initialize the SD card on the app before using it.
Privacy Mode
On the Live View page, tap to enable the Privacy Mode. When enabled, streaming and recording functions will be temporarily disabled to protect your privacy.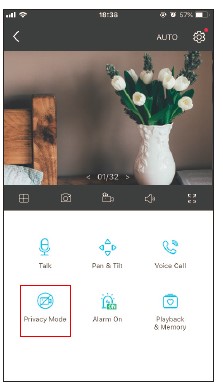
FCC STATEMENT
This equipment has been tested and found to comply with the limits for a Class B digital device, pursuant to part 15 of the FCC Rules. These limits are designed to provide reasonable protection against harmful interference in a residential installation. This equipment generates, uses, and can radiate radio frequency energy and, if not installed and used in accordance with the instructions, may cause harmful interference to radio communications. However, there is no guarantee that interference will not occur in a particular installation. If this equipment does cause harmful interference to radio or television reception, which can be determined by turning the equipment off and on, the user is encouraged to try to correct the interference by one or more of the following measures:
- Increase the separation between the equipment and the receiver.
- Connect the equipment to an outlet on a circuit different from that to which the receiver is connected.
- Consult the dealer or an experienced radio/ TV technician for help.
This device complies with part 15 of the FCC Rules. Operation is subject to the following two conditions:
- This device may not cause harmful interference.
- This device must accept any interference received, including interference that may cause undesired operation.
FCC compliance information statement Product Name: AC ADAPTER
Model Number: T090060-2B1 Responsible Party:
TP-Link USA Corporation
Address: 10 Mauchly, Irvine, CA 92618 Website: http://www.tp-link.com/us/Tel: +1 626 333 0234
Fax: +1 909 527 6804
E-mail: sales.usa@tp-link.com
FAQs About TP-Link Tapo 2K Pan-Tilt Security Camera
How reliable are Tapo cameras?
The cameras have two-way audio, and remarkably good sound quality is sent to and from the cameras.
Is Tapo a reliable name?
Despite a few minor difficulties, the Tapo IP cameras have demonstrated their ability to perform my request very successfully.
Is Tapo camera Wi-Fi capable?
In cases where wireless is down or not accessible, tapo cameras can be used. However, a Wi-Fi connection must first be set up and configured for the cameras.
Are Tapo cameras energy-efficient?
The power consumption of this camera is constant at 1W, however, it peaks at 4W when panning or tilting when the infrared LEDs are on.
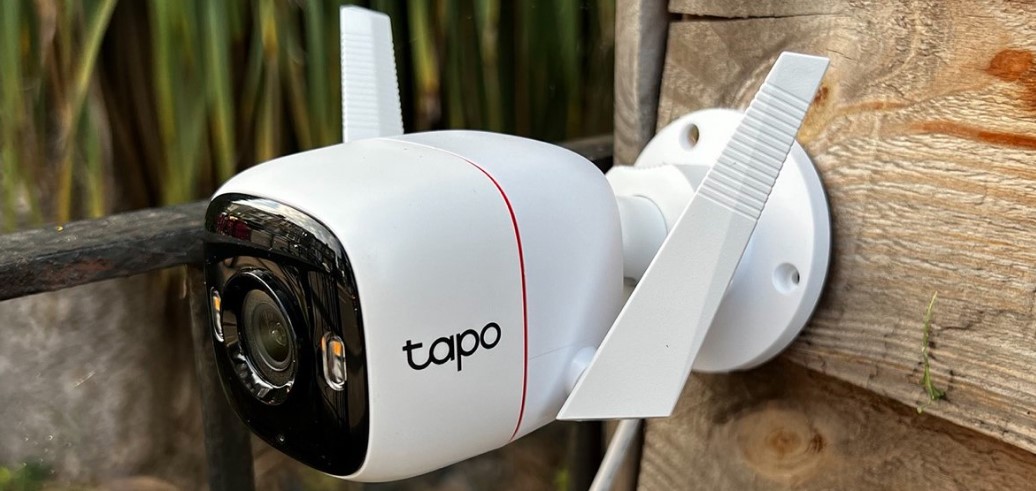
Tapo CCTV is water resistant.
aids the Tapo C310’s performance even in challenging conditions like rain and dust.
How many mobile devices can be linked to Tapo?
Please Take Note Other Smart Home Devices may be shared with up to eight (8) additional accounts, while Tapo Cameras, Doorbells, and Robot Vacuums may be shared with up to five TP-Link Accounts.
Is Tapo an Asian business?
The company TP-Link (Tapo and Kasa) is privately held and Chinese-owned.
Why does my Tapo camera move so slowly?
Update the camera’s and router’s firmware to the most recent version. Keep the camera away from other sources of interference, such as Bluetooth devices, freezers, and ovens. To improve your network stability based on your network topology, get in touch with your router’s support.
What is the TP Tapo’s range?
Wireless vs. Wired Networking: For more flexible installation, connect your camera to the network using Ethernet or WiFi. Even in complete darkness, advanced night vision can see up to 98 feet (30 meters) away.
Can anyone see what my Tapo camera is recording?
Without an internet connection, you can operate the camera or view the live feed, but please make sure your phone and the camera are both linked to the same wireless network.
For more manuals by TP-Link Manuals Dock
[embeddoc url=”https://manualsdock.com/wp-content/uploads/2023/09/TP-Link-Tapo-2K-Pan-Tilt-Security-Camera.pdf” download=”all”]

