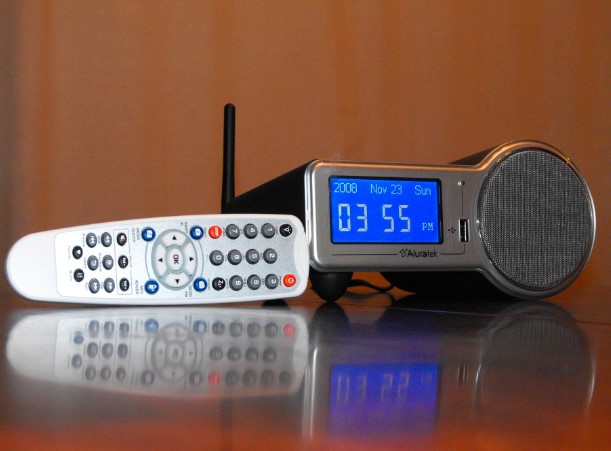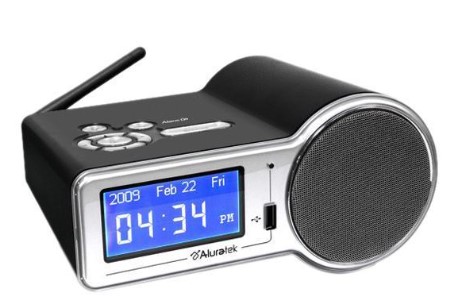
Aluratek Internet Radio Alarm Clock
About Aluratek
They produce goods for everyday use. Technology should make life simpler, whether it’s a portable battery charger for your smartphone, the integration of their SmartHome accessories into your house, or a digital photo frame to liven up your living room. Their products are made to improve your life at home, at work, and on the go.
When a group of seasoned business people decided to launch attractive items in the consumer electronics sector, their journey officially began in 2006. Their company’s roots began with networking goods before expanding into the market for digital photo frames, where they are still a leader today. Throughout the United States and Canada, dozens of reputable merchants and resellers sell Aluratek products.
Introduction
Overview
Thank you for choosing Aluratek’s® Internet Radio Alarm Clock with Built-in WiFi. Once I’m connected to the internet you will have access to 11,000+ live-streaming internet radio stations from around the globe at your fingertips. This includes any music genre you can think of including talk, sports, and local news from over 150 countries. That’s pretty much free music for life playing from any room in your home or office. Just use your existing WiFi and internet connection. If you have internet you are all set! In addition to making sure only quality materials are used for manufacturing, Aluratek® is also dedicated to providing the best customer satisfaction and support. The goal of Aluratek is to embody “Simple Elegance” in every product it designs, manufactures, and sells.
The product focus of Aluratek is to bring simple yet elegant connectivity solutions to consumers to enhance their consumer electronics, communications, and computing experience. Each product is carefully designed with the consumer in mind. Each product is solution-driven to address the needs of the consumers and is deliberately planned to provide the ultimate user experience. Read this guide thoroughly and follow the installation and operation procedures carefully to prevent any damage to the unit and/or any of the devices it connects to.
Features
- Choose between more than 11,000+ radio stations worldwide via built-in vTuner with no monthly cost
- Search music by genre, i.e. classic, pop, talk, news, sports, etc., and geographically over 150 countries
- Compatible with universal Plug-n-Play audio servers such as Microsoft Media Player 11 (WMP11), Microsoft Media Connect, and MusicMatch Jukebox
- Wireless access WIFI 802.11 b/g, Ethernet and USB 2.0 (host only) connectivity
- Built-in FM radio tuner for local FM broadcast service
- Access music files stored on a USB 2.0 flash drive, MP3 player, or Hard drive through the unit’s USB port
- The alarm clock function with 2 programmable alarms wakes you up to internet radio, FM radio, digital music, or a choice of several alarm tones
- Integrated amplifier: 2x2W stereo
- External plug for headsets (3.5mm)
- 2 RCA plugs (Stereo Lineout) for external speakers
- No PC is required
- 1 Year limited warranty
Requirements
- Wired/wireless router
- Internet connection
Package Contents
Your order has been carefully packaged and inspected. The following should be included in your package. Please inspect the contents of the package to ensure that you have received all items and that nothing has been damaged. If you discover a problem, please contact us immediately for assistance.
- WiFi Internet Radio
- Remote Control
- FM Antenna
- Power Adaptor
- Instructional Manual / CD
- Quick Start Guide
- Warranty / Registration Card
Product Application
Keypad Functions
The following tables show the keypad function definition in various situations when you operate AIRMM01F.
When you are browsing the menu list, or when the device is idle
| Screen with Menu List | Clock Screen (Standby Screen) | ||
| SNOOZE | No function | No function | |
|
STOP |
1. Stop Music
2. Go back to the main menu |
Enter the alarm menu |
|
| Short press=Light ON/OFF Long press=standby mode | Short press=Light ON/OFF Long press=standby mode | ||
| OK | Select the function | Enter the main menu | |
| UP | Move to the previous item | Enter the main menu | |
| DOWN | Move to the next item | Enter the main menu | |
|
LEFT |
Int. Radio |
Back to the upper layer of lists |
Enter the main menu |
| FM Radio | |||
| Media Serv. | |||
| MP3 Player | |||
|
RIGHT |
Int. Radio |
Enter the next layer of lists |
Enter the main menu |
| FM Radio | |||
| Media Serv. | |||
| MP3 Player | |||
| (B) When you are playing music | ||||
| Screen with the name of the Station / Song | Clock screen & Music Playing | Clock Screen & Alarm Music | ||
| Enable or disable | Enable or disable | STOP the music. | ||
| sleep function. | sleep function. | Go back to the clock | ||
|
SNOOZE |
Start the timer for
15/30/45/60 min. |
Start the timer for
15/30/45/60 min. |
screen & restart the
alarm in 10 min. |
|
| (stop current mu- | (stop current mu- | |||
| sic source after | sic source after | |||
| time is up) | time is up) | |||
|
STOP |
1. Stop Music
2. Go back to the main menu |
1. Stop Music
2. Go back to the main menu |
1. STOP alarm
2. Go back to the clock screen |
|
|
|
Short press = Light ON / OFF | Short press = Light ON / OFF | Short press = Light ON /OFF | |
| Long press = Standby mode | Long press = Standby mode | Long press = Standby mode | ||
|
OK |
Go to the option menu |
Show the playback screen | Show the playback screen | |
| UP | Volume up | Volume up | Volume up | |
| DOWN | Volume down | Volume down | Volume down | |
|
LEFT |
Int. Radio | Go back to the radio list |
Show the playback screen |
Show the playback screen |
| FM Radio | Go back to the radio list | |||
| Media Serv. | Go back to the song list | |||
| MP3 Player | Go back to the song list | |||
| (B) When you are playing music (cont.) | ||||
| Screen with the name of the Station / Song | Clock screen & Music Playing | Clock Screen & Alarm Music | ||
|
RIGHT |
Int. Radio | Go back to the radio list |
Show the playback screen |
Show the playback screen |
| FM Radio | Go back to the radio list | |||
| Media Serv. | Go back to song list | |||
| MP3 Player | Go back to the song list | |||
Getting Started
Hardware Installation
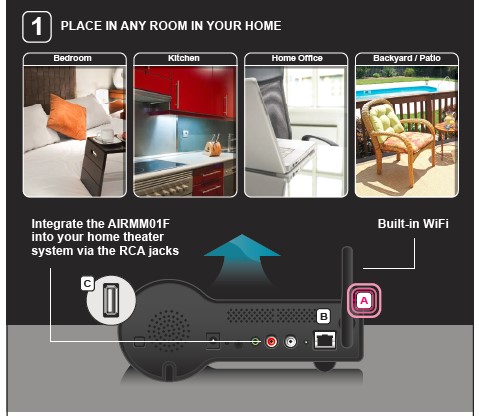
Please fasten the wireless antenna and the FM antenna to the appropriate antenna connectors at the rear panel of the device. If you prefer to use Ethernet for a wired network connection, please plug in your Ethernet cable to the LAN (RJ45) port. Please plug in the DC power adapter to the outlet and the DC power jack carefully. To operate the device, you can use both the supplied remote control and the keypad buttons.
Software Installation
AIRMM01F can work as a stand-alone device or as a media streamer of a media server. As a stand-alone unit, you can use it to listen to Internet radio, FM radio, and external USB storage/MP3 players. No computer is needed. For digital music files that are stored on your computer, you need to install the streaming server software on the computer so that AIRMM01F can request the streaming service from that server. AIRMM01F is compliant with UPnP protocol. It works with media server software such as Microsoft Windows Media Player 11 (WMP11), Microsoft Media Connect 2.0 (WMC2.0), and Musicmatch Jukebox. Once you have the software installed on the computer, you can stream your music collection to AIRMM01F. Please find Appendix A and B for instructions on how to connect AIRMM01F to your computer via WMP11, and WMC2.0.
Configuration
There are three modes of network configuration for AIRMM01F. It can be a wireless client, a wired client, or even a wireless access point (Wireless AP).
Configure as a Wireless Client
The factory default mode is the wireless client code. According to the availability of an Ethernet cable, the device will automatically select a suitable client mode to operate. Users can also manually change the setting of network configuration through the Setup menu “Setup/Advanced Setup/Configure Network”. AIRMM01F will connect wirelessly if it detects an 802.11b/g wireless network. With no Ethernet cable attached, you just need to power on the device and AIRMM01F will automatically enter the wireless client mode.
To connect AIRMM01F to the wireless network for the first time, you will need to set the encryption key for a secured network. Once the setting is finished, the device will remember the related settings and try to connect to the designated AP when it is powered on next time. However, if there is some trouble in connecting to the designated AP, the device will show the AP list screen for you to configure again
First time using the device without an Ethernet cable plugged in:
| Instructions | Screenshot | Go to the next screen | Notes | |
| 1. | POWER ON | |||
| 2. |  |
The device is running as a Wireless Client. | ||
| 3. |  |
Scanning for available APs. | ||
| First time using the device without an Ethernet cable plugged in (cont.): | ||||
| Instructions | Screenshot | Go to the next screen | Notes | |
| 4. | “ ” button |  |
“ ” button or “OK” button | Select the desired AP to connect |
| 5. | Numeric keypads |  |
“OK” button | Type in the encryption key if the AP is encrypted. |
| 6. |  |
“OK” button | Set a proxy server if any. | |
| 7. |  |
“OK” button | Confirm to the
settings. |
|
| 8. |  |
Apply new settings. | ||
| Manually configured as the Wireless Client Mode: | ||||
| Instructions | Screenshot | Go to the next screen | Notes | |
| 1. |  |
“OK” button | Select “Setup”
menu |
|
| 2. | “ ” button (4 times) |  |
“ ” button or “OK” button | Enter the “Advanced Setup” menu |
| 3. | “ ” button (1 time) |  |
“ ” button or “OK” button | |
| 4. |  |
“ ” button or “OK” button | Manually select the wireless client mode. | |
| 5. |  |
Scanning for available APs. | ||
| 6. | “ ” button |  |
“ ” button or “OK” button | Select the desired AP to connect |
| 7. | Numeric keypads |  |
“OK” button | Type in the encryption key if the AP is encrypted. |
| Manually configured as the Wireless Client Mode (cont.): | ||||
| Instructions | Screenshot | Go to the next screen | Notes | |
| 8. |  |
“OK” button | Set a proxy server if any. | |
| 9. |  |
“OK” button | Confirm to the
settings above. |
|
| 10. |  |
Apply new settings. | ||
Configure as a Wired Client
If there is no 802.11b/g wireless network, AIRMM01F can also connect to the wired network through an Ethernet cable. For this case, prior to powering the device, you have to plug the Ethernet cable into the LAN (RJ45) connector on the back of the unit. After you power on the device, it will automatically go into the wired client mode when it detects a link status through the Ethernet connection.
First time using a device with an Ethernet cable plugged in:
| Instructions | Screenshot | Go to the next screen | Notes | |
| 1. | POWER ON | |||
| 2. |  |
The device is running as a Wireless Client. | ||
| 3. |  |
The device is in wired client mode now. It already connected to your
network. |
| Manually configured as the Wired Client Mode: | ||||
| Instructions | Screenshot | Go to the next screen | Notes | |
| 1. |  |
The “OK” button | Select “Setup”
menu |
|
| 2. | “ ” button (4 times) |  |
“ ” button or “OK” button | Enter the “Advanced Setup” menu |
| 3. | “ ” button (1 time) |  |
“ ” button or “OK” button | |
| 4. | “ ” button (1 time) |  |
“ ” button or “OK” button | Manually select the wired client mode. |
| 5. | “ ” button (1 time) |  |
“ ” button or “OK” button | Select the DHCP for auto-configured IP address. |
| 6. |  |
The “OK” button | Confirm to the
settings above. |
|
| 7. |  |
Apply new settings. | ||
Listen to Various Music
It takes a few seconds to get the latest list from the Internet. And you will see the next screen.
This means the AIRMM01F is connected to the Internet server and receives the information from the server.
If you see the following screen instead, it means that the device has encountered a problem in retrieving the list from the internet server, please try again.
| The following screenshots illustrate the sequence of browsing to a specific ratio station such as “4U Classic Rock” in France and starting to playback the music from it. | ||||
| Instructions | Screenshot | Go to the next screen | Notes | |
| 1. |  |
Select “Internet Radio” function | ||
| 2. |  |
“ ” button or “OK” button | ||
| 3. |  |
“ ” button or “OK” button | ||
| 4. | “ ” button (4 times) |  |
“ ” button or “OK” button | |
| 5. | “ ” button (14 times) |  |
“ ” button or “OK” button | |
| 6. |  |
“ ” button or “OK” button | ||
| Instructions | Screenshot | Go to the next screen | Notes | |
| 7. | “ ” button (5 times) |  |
“ ” button or “OK” button | Press the “button to add the current station to your favorite list for
Quick access later. |
| 8. |  |
Connecting to the radio station. | ||
| 9. |  |
Start buffering the music from the radio station. | ||
| 10.. |  |
Music started… | ||
Listen to FM Radio
Before you can listen to the FM radio, please install the supplied FM antenna to the back of the device.
To listen to music or broadcast programs from local FM radio stations, please select the “FM Radio” function from the main menu and then press the OK button to enter the FM Radio function.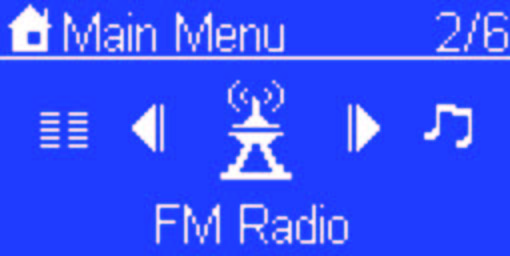
The first screen of the FM Radio function shows 5 items for you to select: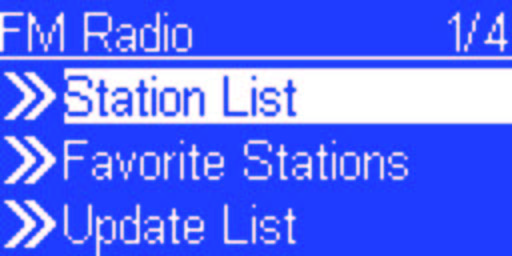
- “Station List”: Retrieve the tuned radio station lists from the device.
- “Favorite Stations”: Retrieve the favorite station lists that are stored in the device.
- “Update List”: Activate the auto scan procedure to discover all the available FM stations, and keep the tuned stations in the device memory.
- “Direct Access”: Allows you to fine tune the frequency of the station or tune to the previous/next FM station manually.
- “FM Sensitivity”: Allows you to change FM sensitivity to high or low.
| The following screenshots illustrate the sequence to pre-set the FM stations tune to a specific ratio station 98.70 MHz and start the broadcast program. | ||||
| Instructions | Screenshot | Go to the next screen | Notes | |
| 1. |  |
“ ” button or “OK” button | Select “FM Radio” function | |
| 2. |  |
“ ” button or “OK” button | ||
| 3. |  |
Scanning for available FM stations. | ||
| 4. |  |
Found 15 stations | ||
| 5. | “ ” button |  |
“ ” button or “OK” button | Press the “” button to add the current station to your favorite list for quick access later. |
| 6. |  |
Tuned to the station and the music started… | ||
How to Add Stations Through the Web Portal
- Please make sure you have the latest firmware. Please refer to sections 5.6 and 5.7 for steps on how to determine the current firmware version on your device. Firmware can be found at http://www.aluratek.com/download_drivers_manuals.php
- Please go to http://aluratek.vtuner.com
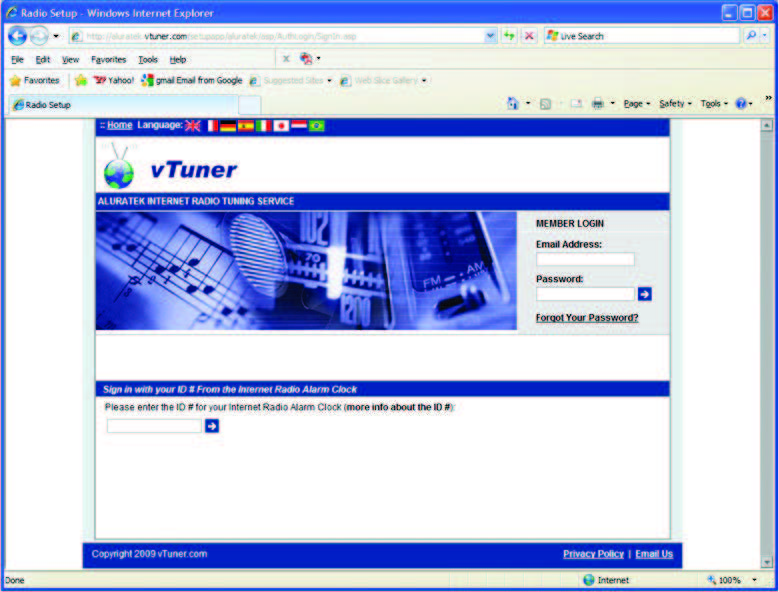
- Use vTuner ID (you can find the ID either from the menu Setting > vTunerID or the MAC address on the label that is on the bottom of the unit)
- Please use your vTuner ID to login to the website
- Create an account login by providing your email address and password
- Please login to your account after the above step
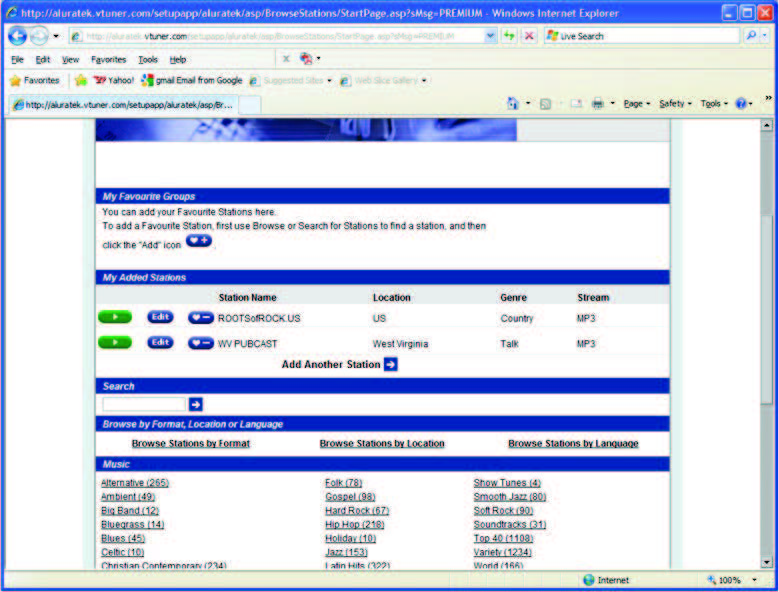
- Click Add station
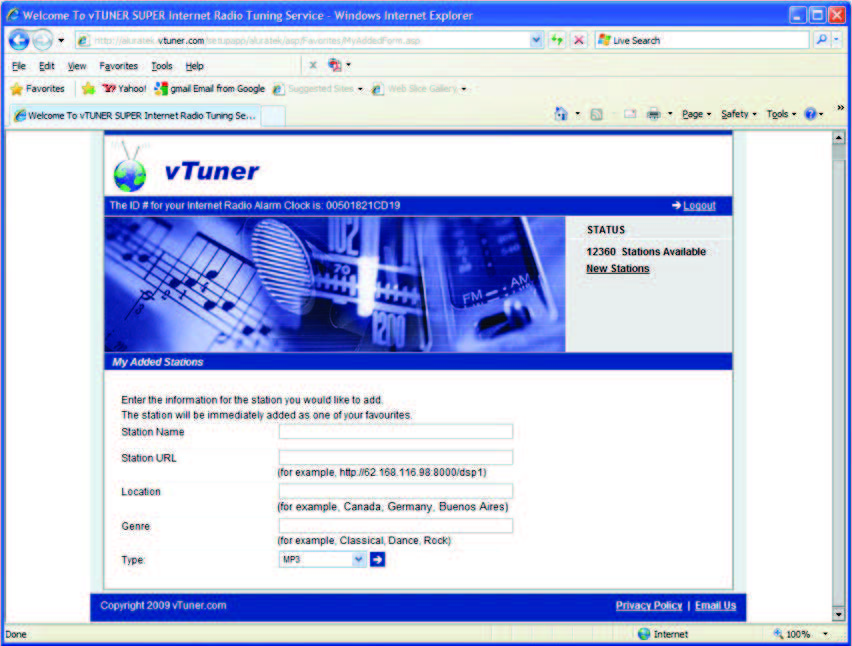
- Please fill in info for the station that you wish to add
- Power Off/On the unit
- You should able to access the newly added station under Stations List>Added Stations Folder on your Internet radio
Advanced Tools
There are some useful setup functions that can help you to operate the device properly.
Network Setting
Check current network information.
Configure Network
Please refer to Chapter 3 for network configuration.
Reset to Default
When you reset the device to its factory default, your “favorites” Internet radio and FM radio will not be erased.
Clear Favorites
Clear all “favorites” Internet radio stations and FM radio stations stored.
Device MAC Address
Check the MAC address of the device.
Firmware Version
Check the current firmware version.
Firmware Upgrade
If there is any new firmware released, please download and follow the upgrade procedure below.
Steps to upgrade new firmware in the device via a USB drive
- Step 1.
Copy the new firmware to the ROOT directory of a USB drive or a USB MP3 player. (Note. Please DON’T modify the file name, otherwise, the AIREC01F can’t find the new F/W) - Step 2.
Power on the AIRMM01F and then plug the USB drive into the front USB port of the AIRMM01F. - Step 3.
Operate the AIRMM01F to get into the F/W upgrade menu (“Setup\Ad-advanced Setup\F/W Upgrade(thru. USB)”), then press the OK button to activate the F/W Upgrade function. You should see the following messages “F/W Upgrading”, and “Don’t Power OFF!!”. After a few seconds, the device will reboot automatically when the upgrade operation is completed. - Step 4.
You can verify the firmware upgrade is successful by checking the firm-ware version from the menu “Setup\Advanced Setup\Firmware Version”.
Misc
Clock Setting
Prior to setting the alarm, you need to set the clock of AIRMM01F. First, select the Setup function from the Main Menu.
The first item “Clock” is for the date and time setting. Press OK “ button to set the clock value.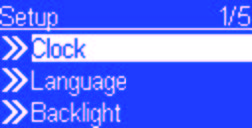
There are 3 items in the clock menu, the first one will display the current date and time; the second item is for you to set the date and time manually or via auto-sync (automatically synchronize with the network time server). If you select the “Auto-sync” function, the device will periodically synchronize with the server. The third option lets you change the time display format between 12 hours and 24 hours. There is a built-in battery in the device, so if you power off the device, the clock will continue to run.
Alarm Setting
To set up an alarm, you have to set up the time and alarm music properly. The following procedures illustrate a typical alarm-setting operation. It sets Alarm 1 to generate an alarm (play music) at 7:00 AM with Internet radio station “4U Classical Rock” as the source of the music.
| Instructions | Screenshot | Go to the next screen | Notes | |
| 1. |  |
“OK” button | Alarm Menu | |
| 2. |  |
“ ” button or “OK” button | Set Alarm 1 | |
| 3. | “ ” button (1 time) |  |
“ ” button or “OK” button | Enable Alarm 1 |
| 4. |  |
“OK” button | Use the 4 directional buttons to set the time | |
| 5. |  |
“ ” button or “OK” button | Set Internet radio as an alarm source. | |
| 6. |  |
“OK” button | Select the specific station or Favorites. (section 4.1) |
| Instructions | Screenshot | Go to the next screen | Notes | |
| 7. |  |
“OK” button | Use the 4 directional buttons to set the volume | |
| 8. |  |
Final alarm setting, lasting for 3~5 seconds | ||
| 9. |  |
The setting is
finished. |
After you set and enable the alarm, you will see there is a bell icon on the clock screen.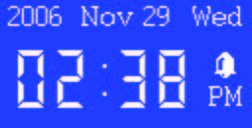
When the alarm time is up, the device will activate the alarm operation and playback the specified music. Like traditional clock alarms, AIRMM01F also provides the SNOOZE function for you to temporarily stop the alarm, and after 10 minutes, the alarm will start again. You can press the STOP button to terminate the alarm.
Listen to Music via WMP 11
Install and connect to Windows Media Player 11
Please follow the steps below:
Step 0. Download WMP11.
- Please download Windows Media Player 11 (WMP11) installation file, e.g., wmp11-windowsxp-x86-enu.exe, from Microsoft’s website.
- Install wmp11-windowsxp-x86-enu.exe without any changes needed.
- Just click on ‘next’ to finish the installation.
Step 1. Activate the Media Player.
- Find the “Windows Media Player” icon from the Program list,

and click on this program to activate it.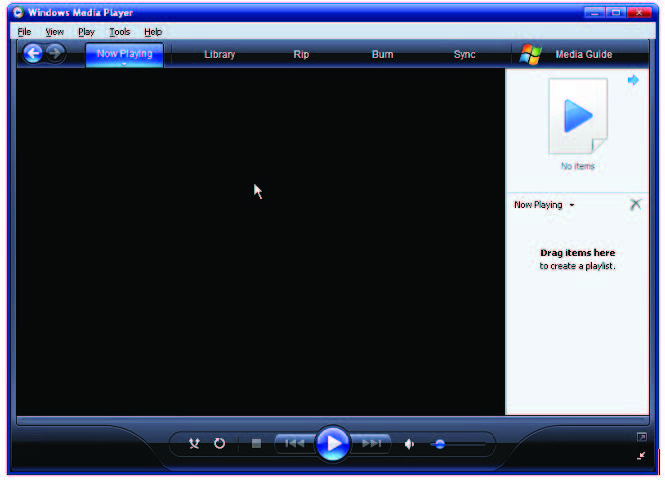
Change the view
- Change the view from “Now Playing” to “Library” view by clicking on the Library Tab to manage the content and share your media. You will see the following view:

Step 3. Add your Media content to the WMP11 media library.
- Click on the “Library” tab again, you can see a pull-down menu.
- To add your media files to the WMP11 media library, please click on the item “Add to Library…”
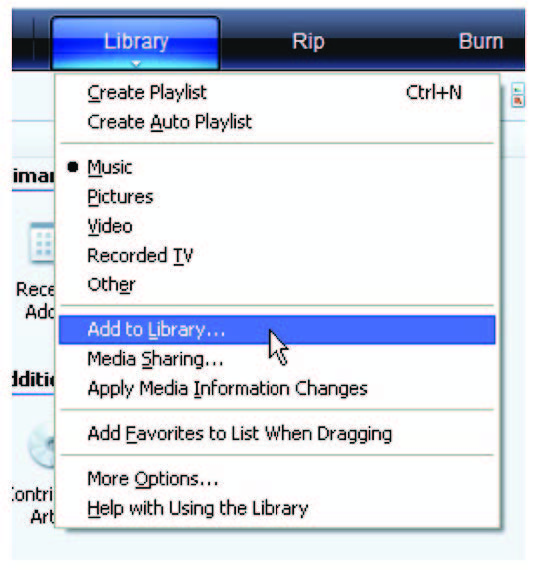
- You will see the following view:
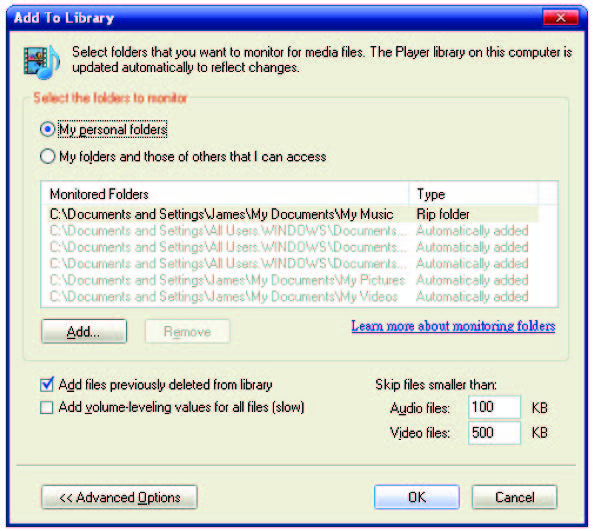
- Click on the add button select the media folder on your computer, and then click the OK button. For example, you can put all the music files in the directory D:\Music, so you just need to add the folder to the share list.
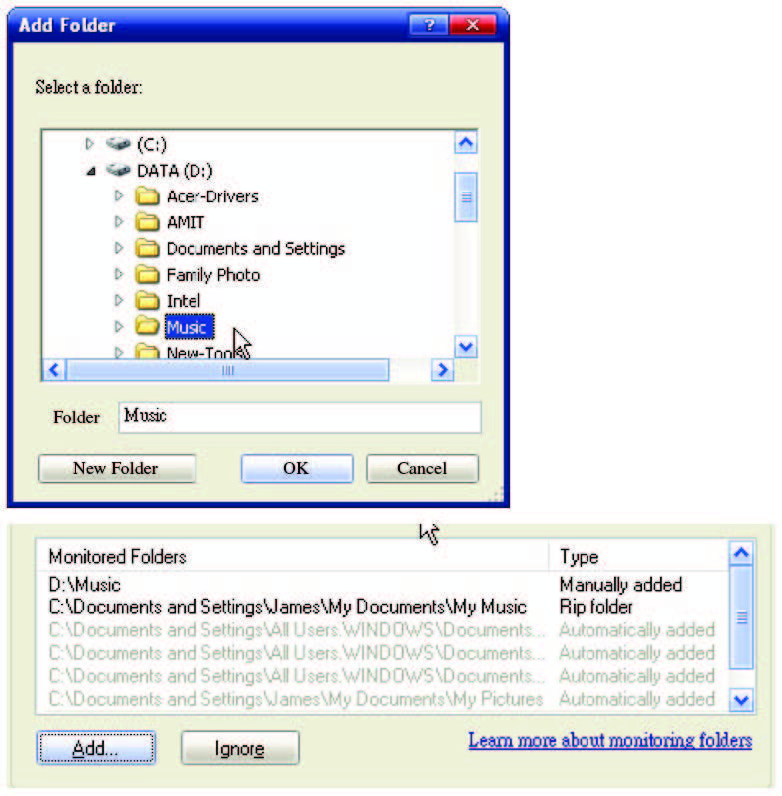
- You will see the specified folder included in the WMP11 monitor folder lists.
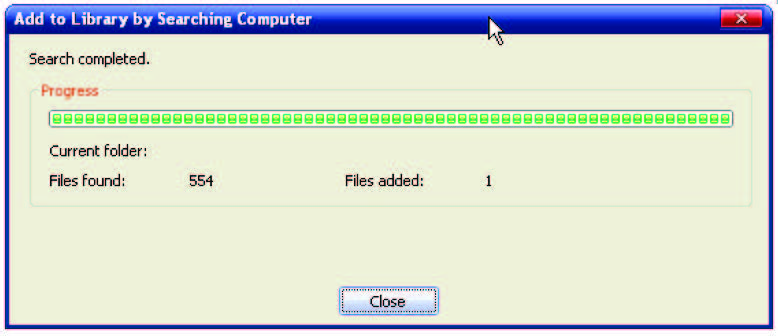
- Then press the OK button. A pop-up window will appear and show you the WMP11 is searching for the media files.
- When it finished, click on the “Close” button.
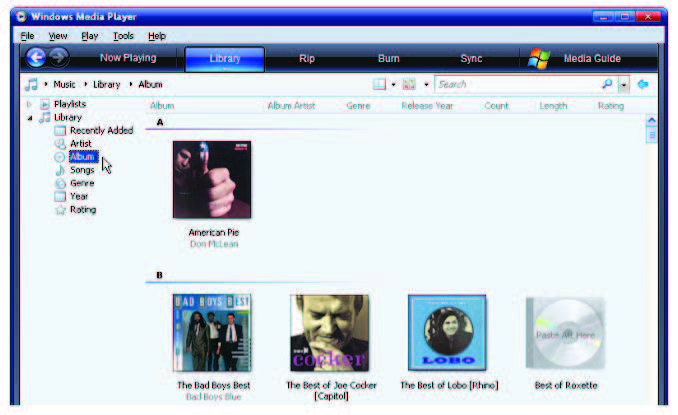
- Now, you can browse and manage your media content with the WMP11 Library Manager.
Step 4. Share the WMP11 media library.
- Similar to Step 3, click on the “Media Sharing” item to activate the media sharing function.
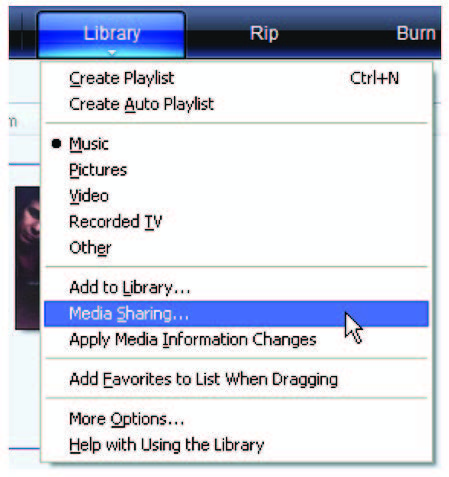
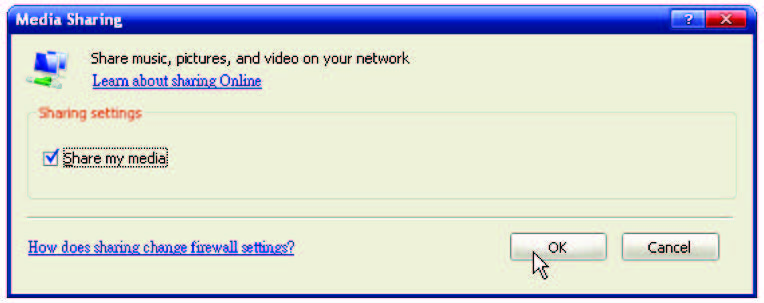
- The following dialog windows will appear.
- Check the “Share my media” checkbox and click on the “OK” button.
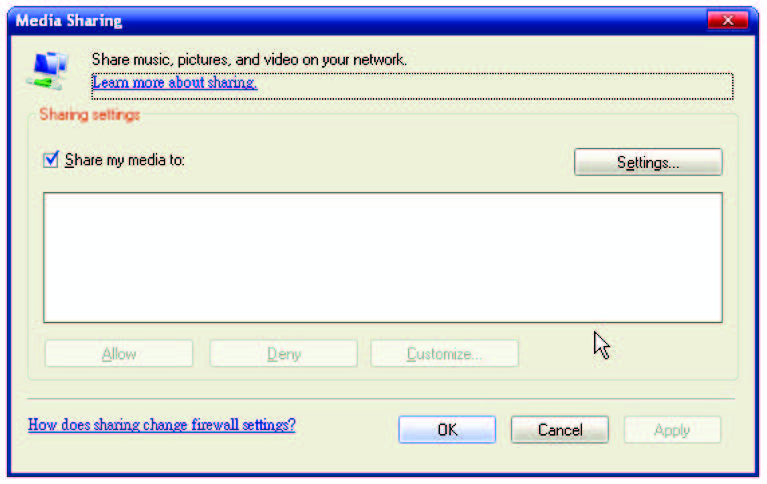
- The WMP11 will try to discover the available network devices in your LAN.
- The following display showed that no device is found at this moment.
If AIRMM01F is already connected to your home network, you will see the following display WMP11 found a network device named “Aluratek AIRMM01F”.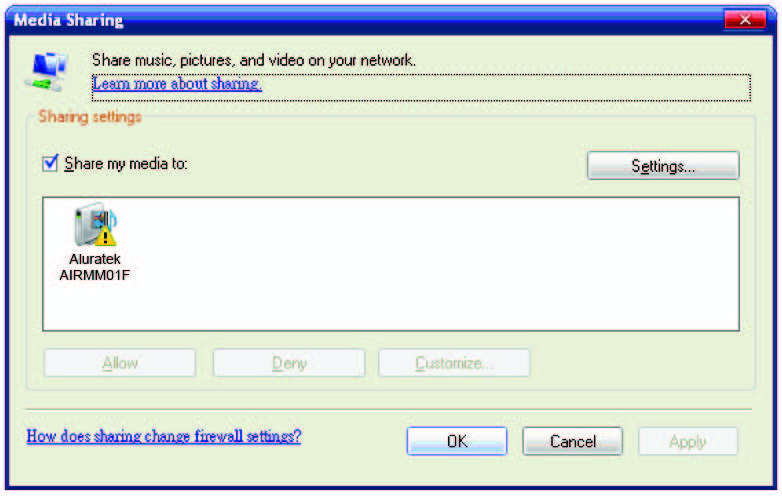
Step 5. Manage the setting of sharing media.
- Click on the “Settings” button, and specify the name of the WMP11 server to be displayed on your AIRMM01F.
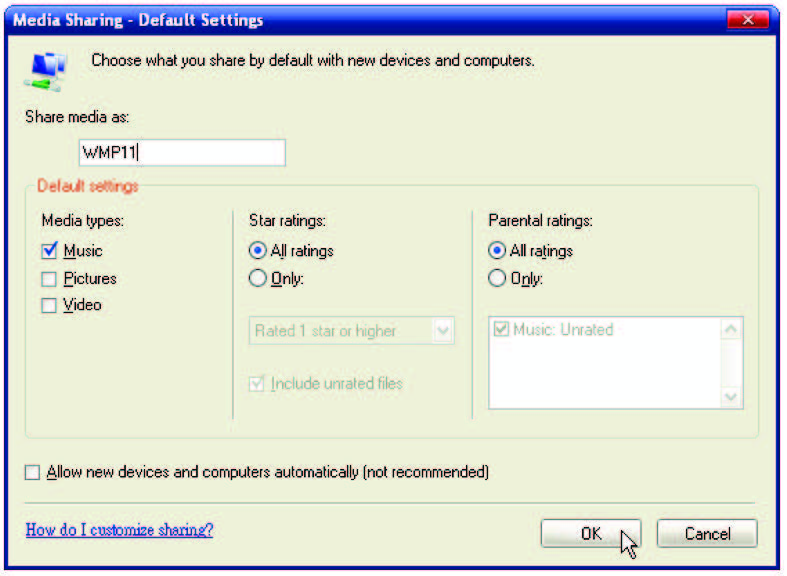
Then, press OK to exit.
Step 6. Authorize the access from your AIRMM01F.
The WMP11 provides a simple access control setting. When WMP11 detects a new network device (as the final screen in Step 4), you have to decide whether you want to allow or deny the requests from that device.
- Please select the device icon and then click on the “Allow” button to grant further streaming requests from that device. Then you will see that the device icon state changed consequently.
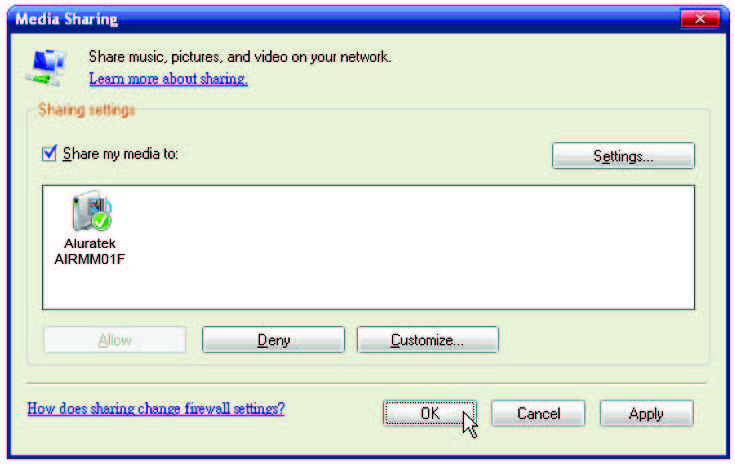
- Then, press the OK button to apply the setting.
There is another approach to managing the access for your network devices. There will be a small icon appearing on the Windows XP status bar to alert you to WMP11 found network devices.
- Double-click on it to manage the access for the devices.
- Then press “Allow”.
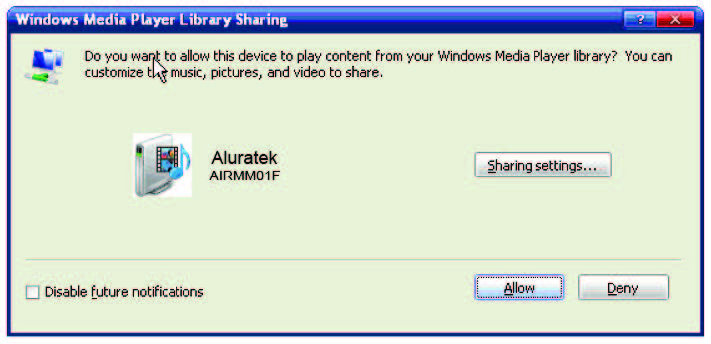
Listen to Music via WMC 2.0
Install & Connect to Windows Media Connect V2.0 Please follow the steps below:
Step 0. Download the WMC server.
- Please download the Windows Media Connect (WMC) installation file, wmcsetup.exe, from the Microsoft website.
- Install the wmcsetup.exe without any changes needed.
- Just click on ‘next’ to finish the installation.
Step 1. Activate WMC.
You can find a newly installed file icon “Windows Media Connect” from the Windows XP Program list.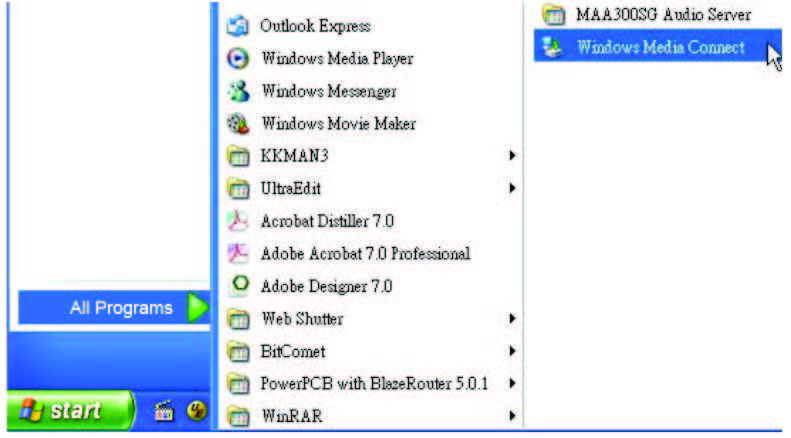
Click on this program to activate WMC.
Step 2.
You will see a pop-up window, asking to “select the device you want to allow access to your computer”. Just skip it by pressing the ‘next’ button.
Step 3.
Then, you will be asked to select the folders you want to share with your devices.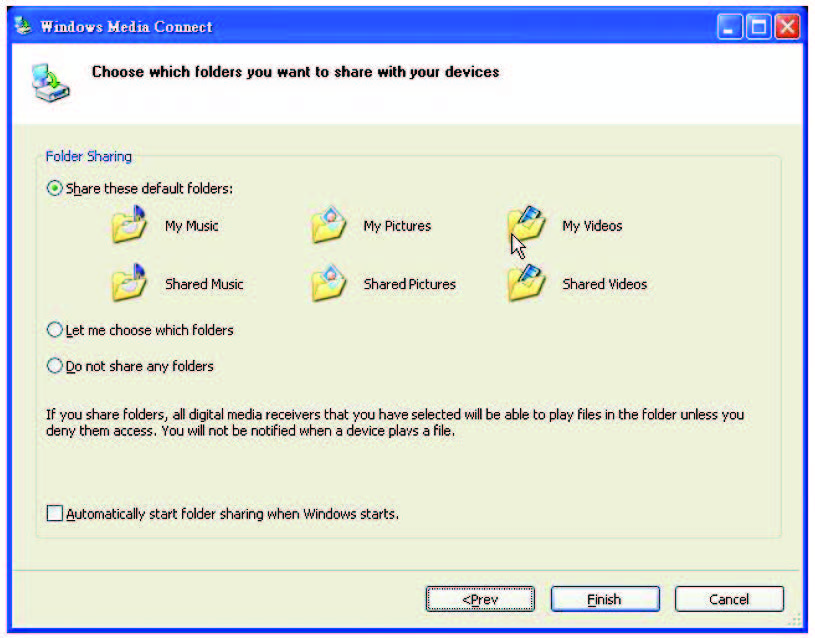
Select the desired folder for your computer. For example, you can put all the music files in the directory D:\Music, so you select “Let me choose which folders” and add the folder to the share list.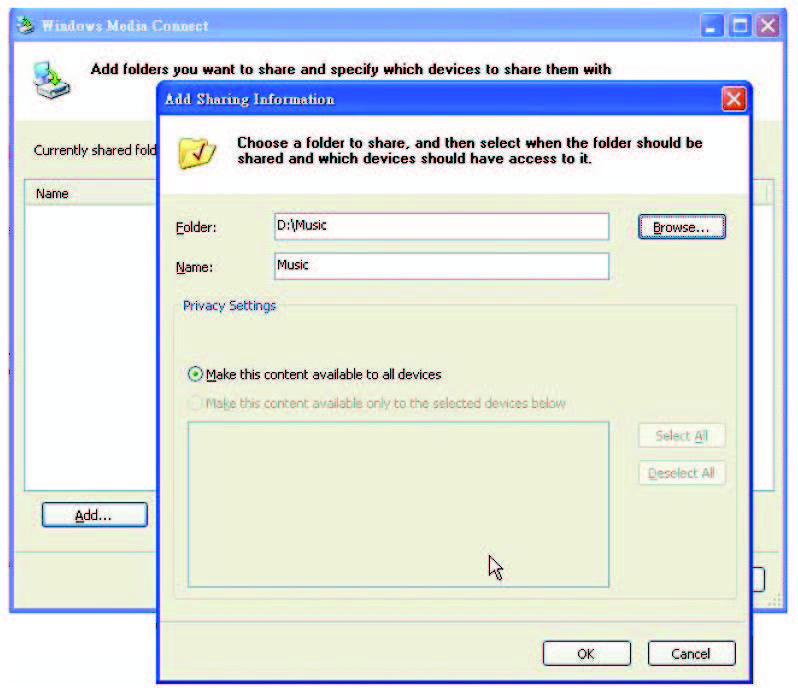
Finally, press ‘Finish’ to finish the setup of the Windows Media Connect. Then you can see a small icon on the lower right corner of the startup bar.
Step 4. Establish the connection between AIREC01F and the WMC server.
- From AIRMM01F, select the “Media Server” function from the main menu (or press the hotkey “Media Player” on the remote controller), and then AIRMM01F will start the server discovery process. After a few seconds, it will find server like “PC_Hostname: 1: Windows Media Connect”.
- Then press the ‘OK’ button to try to connect to the server.
You will see the AIRMM01F screen shows “ Connecting…”. At the same time, you will see the following prompt on your PC: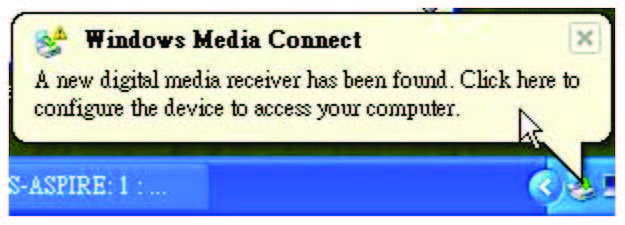
It means that WMC detected an unauthorized device trying to access the content of the WMC server. You just double-click on the WMC icon to allow access from the device.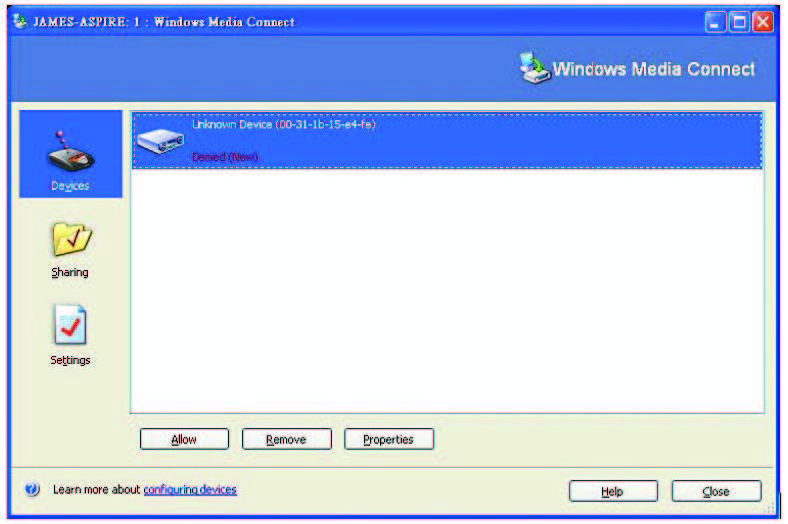
Select the device and then click on the ‘Allow’ button.
Then, press the ‘close’ button to finish the authorization process. At this moment, AIRMM01F can get the contents or service from the WMC server. You can browse the list and play the music you want.
Technical Support
If you need further assistance, please contact the Aluratek support department prior to returning this device.
E-mail: support@aluratek.com
Web: www.aluratek.com/support
Local (Irvine, CA): 949-419-6504
Toll-free: 1-866-580-1978
Radio and TV Interference Statement
WARNING!!! This equipment has been tested and found to comply with the limits of a Class B digital device, pursuant to part 15 of the FCC rules. These limits are designed to provide reasonable protection against harmful interference in a residential installation This equipment generates, uses, and can radiate radio frequency energy and, if not installed and used in accordance with the instruction, may cause harmful interference to radio communications. However, there is no guarantee that interference will not occur in a particular installation. If this equipment does cause harmful interference to radio or television reception, which can be determined by turning the equipment off and on, the user is encouraged to try to correct the interference by whatever measures may be required to correct the interference.
Warranty
Aluratek warrants this product against defects in material or workmanship for 1 Year from the date of purchase. This warranty becomes invalid if the factory-supplied serial number or “warranty void” sticker has been removed or altered on the product. This warranty does not cover:
- Cosmetic damage or damage due to acts of God
- Accident, misuse, abuse, negligence, or modification of any part of the product.
- Damage due to improper operation or maintenance, connection to improper equipment, or attempted repair by anyone other than Aluratek.
- Products sold AS IS or WITH FAULTS.
IN NO EVENT SHALL ALURATEK’S LIABILITY EXCEED THE PRICE PAID FOR THE PRODUCT FROM DIRECT, INDIRECT, SPECIAL, INCIDENTAL, OR CONSEQUENTIAL DAMAGES RESULTING FROM THE USE OF THE PRODUCT, IT’S ACCOMPANYING SOFTWARE, OR IT’S DOCUMENTATION. Aluratek makes no warranty or representation, expressed, implied, or statutory, concerning its products, contents, or use of this document and all accompanying software, and specifically disclaims its quality, performance, merchantability, or fitness for any particular purpose. Aluratek reserves the right to revise or update its product, software, or documentation without obligation to notify any individual or entity.
Aluratek, Inc. 12A Mauchly Irvine, CA 92618 sales@aluratek.com 949.419.6504 • office 949.419.6477 • fax
FAQs About Aluratek Internet Radio Alarm Clock
A radio alarm clock is what?
An alarm clock and radio receiver are combined in a clock radio. The clock often has a buzzer alarm and can be set to turn on the radio at a specific time to wake the user. Clock radios are typically kept on the nightstand.
How are alarm clocks operated?
The majority of analog alarm clocks include two metal bells at the top and a little hammer in between them. The hammer knocks the bells to produce the alarm sound that awakens the sleeper.
Why is the use of alarms?
A mechanism that emits an auditory, visual, or other alarm signal to notify someone of a situation that needs immediate attention is known as an alarm device.
How often does a clock signal occur?
Either a time interval (measured in seconds) or a frequency (measured in Hertz) is used to characterize this period. For instance, if a clock runs at a frequency of 1 MHz and a time interval of 1 106 s, its frequency is 1000000 cycles per second (cps).
Are alarm clocks electrical devices?
Digital clocks are powered electronically, either by a battery or by the AC electricity that comes from a wall outlet. Digital wristwatches utilize batteries because they are portable, unlike digital wall clocks, which often use an electrical outlet. Either sort of power source can be used to power a digital alarm clock.
Who or what sets the alarm?
The brain of the alarm system is the control panel. It performs the decision function by analyzing the data it gathers from numerous sensors and taking appropriate action. The control panel, for instance, will not react if a door or window is opened while the system is disarmed.
What are the alarm system’s three primary components?
The three layers of a fundamental alarm system are perimeter protection, area protection, and spot protection. The first line of defense in identifying a potential invader is perimeter security. Doors, windows, vents, and skylights are frequently where alarm sensors on the perimeter are located.
What is the clock’s speed?
The number of times per second that a circuit runs is known as clock speed, and the central processing unit (CPU) is most often used to describe it. Cycles per second, or hertz, is the unit of measurement. All other variables being equal, the processing power increases with increasing clock speed.
What is a clock’s voltage?
Clocks from American Time are available in 24-volt AC and 120-volt AC versions. The clocks operate within a range of voltages, much as the practical working voltages of electrical systems can change.
What are the names of alarm sensors?
To detect motion, infrared sensors use infrared light. When motion is detected by a security system, an alarm, light, or alert are set off. Active and passive infrared sensors are the two types of infrared sensors most frequently seen in security equipment.
For More Post Visit: Manuals Dock

