
TP-Link AX1800 Wi-Fi 6 Router
About TP-Link
TP-Link, a leading manufacturer of dependable networking hardware and accessories, was established in 1996 and is present in all facets of modern life. IDC, an analytical agency, has ranked the company as the top seller of Wi-Fi equipment for continuous 12 years*, with distribution to more than 170 nations and services to billions of people globally.
With a track record of stability, performance, and value, TP-Link has chosen a range of products to satisfy every user’s networking requirements. Now, as the connected lifestyle continues to develop, the business is growing now to meet and surpass demands for the future.
Product Overview
TP-Link AX router, with next-generation 802.11ax Wi-Fi Technology, achieves Wi-Fi performance at its ultimate level. The revolutionary combination of OFDMA and 1024QAM improves throughput by 4 times and dramatically increases the whole network capacity and efficiency. It’s also backward compatible with 802.11a/b/g/n/ac.
Moreover, it is simple and convenient to set up and use the TP-Link router due to its intuitive web interface and the powerful Tether app.
Appearance
Top Panel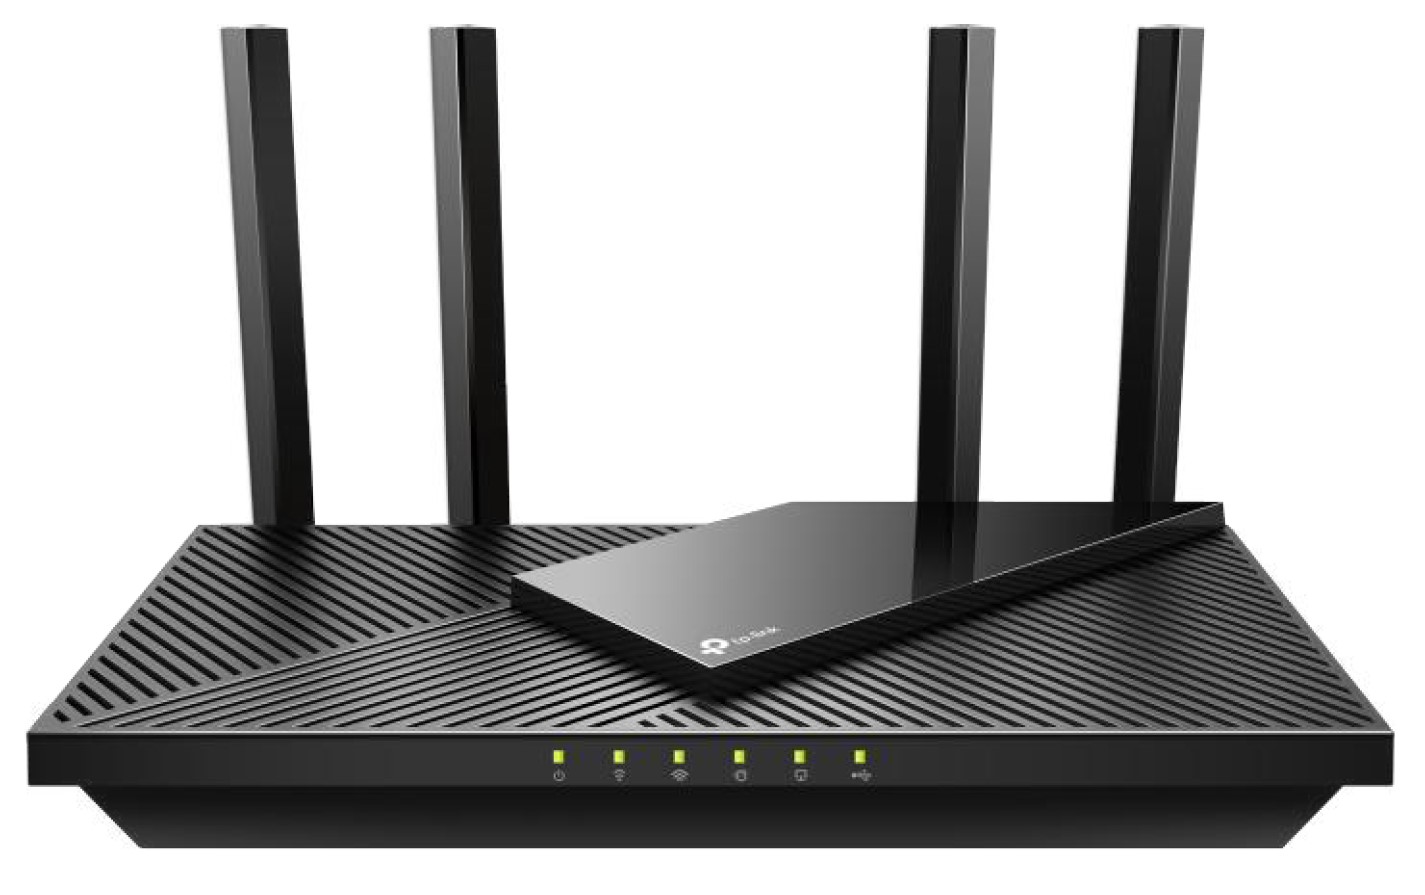
The router’s LEDs (view from left to right) are located on the front. You can check the router’s working status by following the LED Explanation table.
LED Explanation

The Back Panel
The following parts (view from left to right) are located on the back panel.
Button and Port Explanation
![]()
Connect the Hardware
Position Your Router
- The product should not be located in a place where it will be exposed to moisture or excessive heat.
- Place the router in a location where it can be connected to multiple devices as well as to a power source.
- Make sure the cables and power cord are safely placed out of the way so they do not create a tripping hazard.
- The router can be placed on a shelf or desktop.
- Keep the router away from devices with strong electromagnetic interference, such as Bluetooth devices, cordless phones, and microwaves.
Connect Your Router
Before you start, unplug the power to turn off your modem, if any, and remove the backup battery if it has one. Place the router horizontally and orient the antennas vertically.
Follow the steps below to connect your router.
If your internet connection is through an Ethernet cable directly from the wall instead of through a DSL / Cable / Satellite modem, connect the Ethernet cable to the router’s WAN port, and then follow steps 3 and 4 to complete the hardware connection.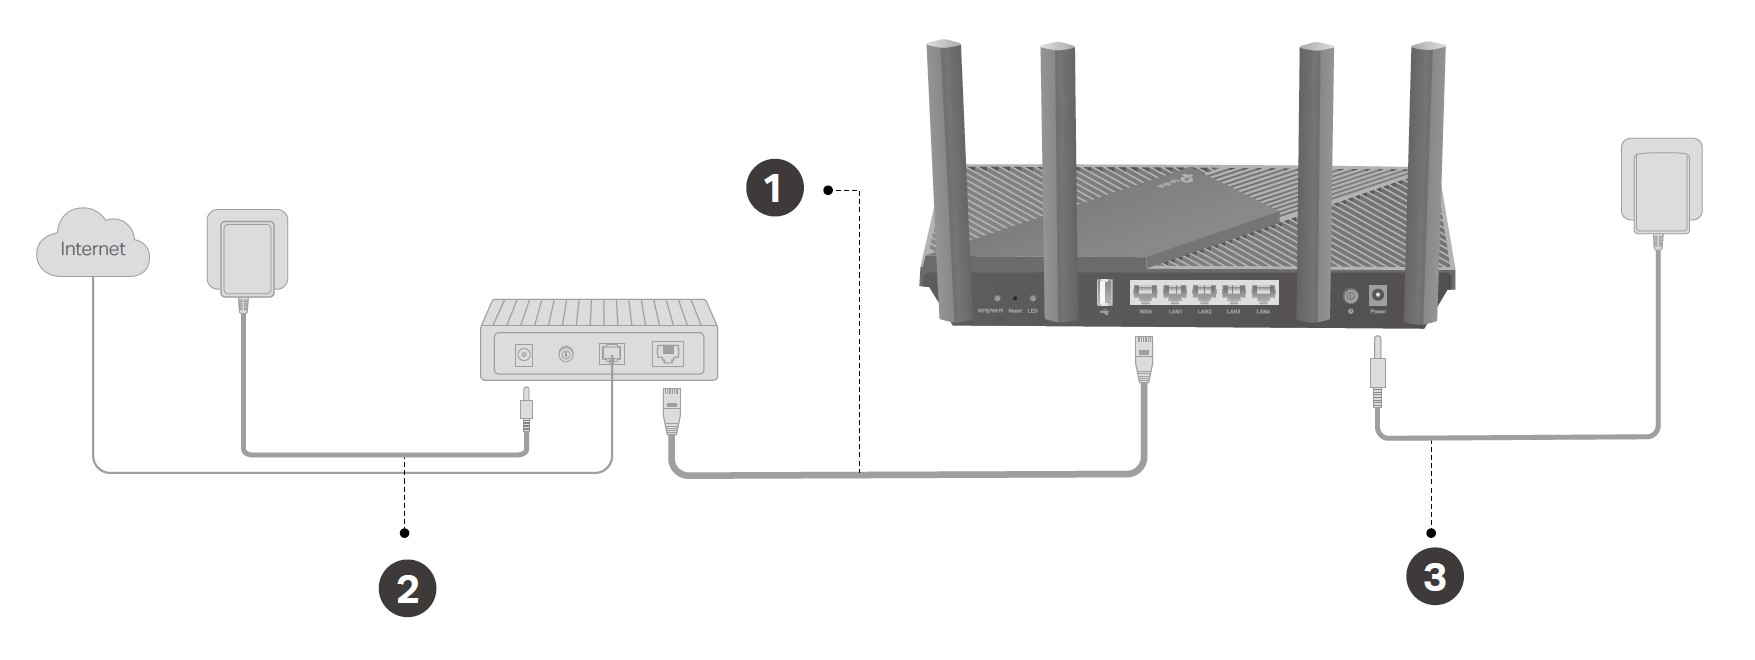
- Connect the powered-off modem to the router’s WAN port with an Ethernet cable.
- Turn on the modem, and then wait about 2 minutes for it to restart.
- Connect the power adapter to the router and turn on the router.
- Verify that the hardware connection is correct by checking the following LEDs.

Note: If the 2.4GHz LED and 5GHz LED are off, press and hold the WPS/Wi-Fi button on the back for more than 2 seconds, then release the button. Both the LEDs should turn solid on. - Connect your computer to the router.
- Method 1: Wired: Turn off the Wi-Fi on your computer and connect the devices to the router via an Ethernet cable.
- Method 2: Wirelessly:
- Find the SSID (Network Name) and Wireless Password printed on the label at the bottom of the router.
- Click the network icon of your computer go to Wi-Fi Settings of your smart device, and then select the SSID to join the network.

-
Method 3: Use the WPS button: Wireless devices that support WPS, including Android phones, tablets, and most USB network cards, can be connected to your router through this method.
-
Tab the WPS icon on the device’s screen. Here we take an Android phone for instance.
-
Within two minutes, press the WPS button on your router.
-
Log In to Your Router
With a web-based utility, it is easy to configure and manage the router. The web-based utility can be used on any Windows, Mac OS, or UNIX OS with a Web browser, such as Microsoft Internet Explorer, Mozilla Firefox, or Apple Safari.
Follow the steps below to log in to your router.
- Set up the TCP/IP Protocol in Obtain an IP address automatically mode on your computer.
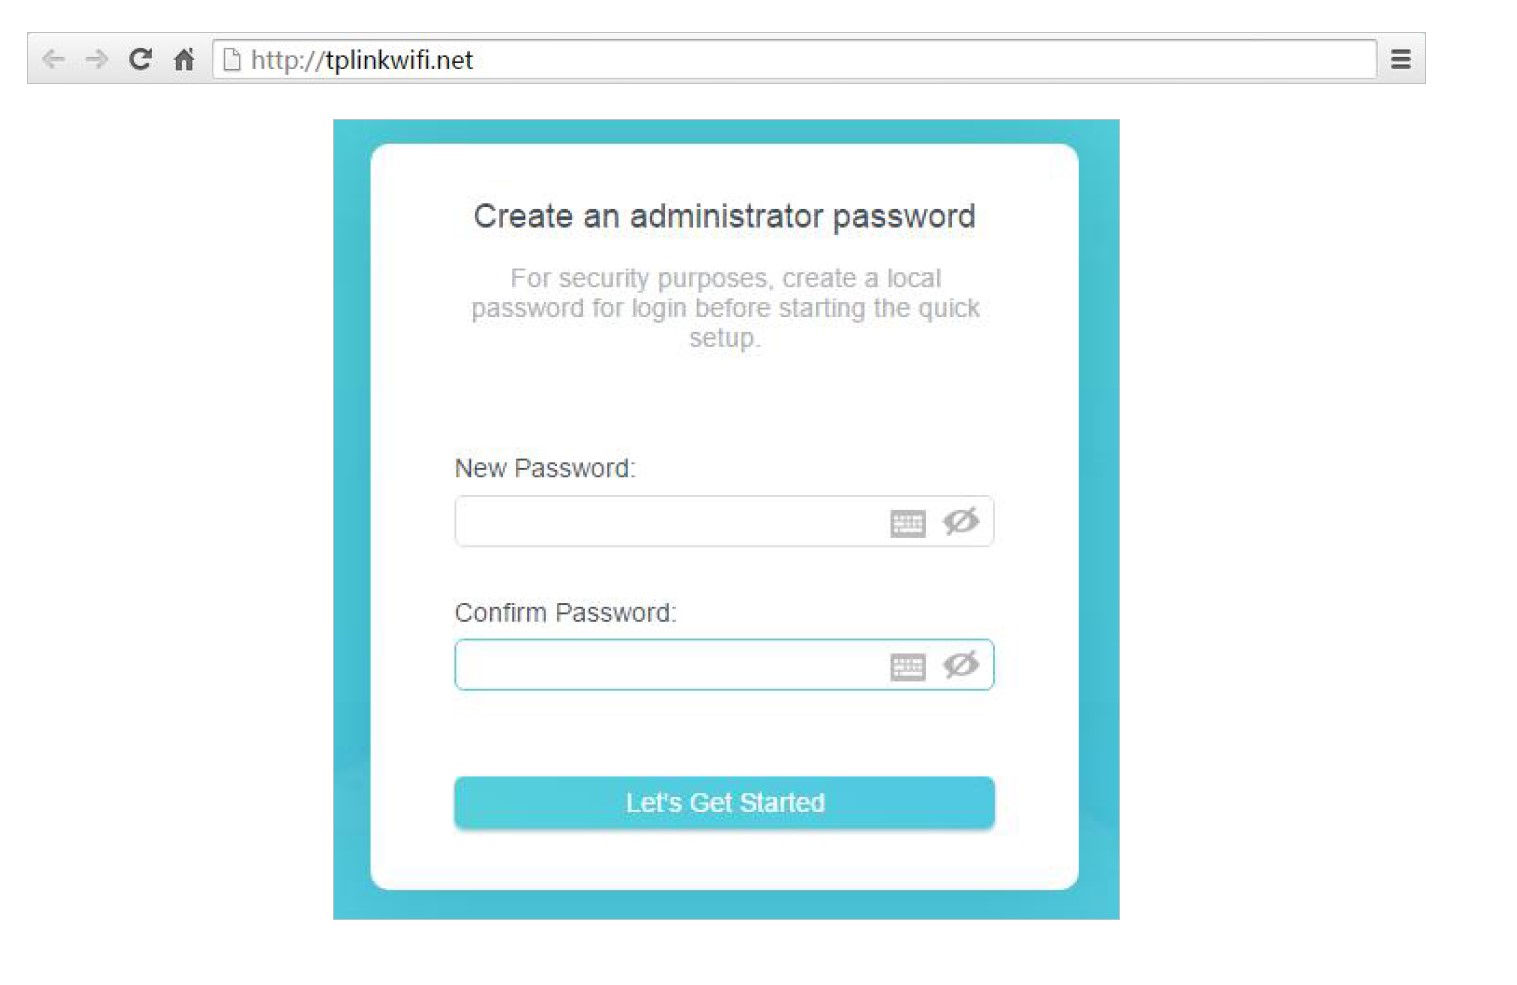
- Visit http://tplinkwifi.net, and create a login password for secure management purposes. Then click Let’s Get Started to log in.
Set Up Internet Connection
Use Quick Setup Wizard
The Quick Setup Wizard will guide you to set up your router.
Tips: If you need an IPv6 internet connection, please refer to the section of Set Up an IPv6 Internet Connection.
Follow the steps below to set up your router.
- Visit http://tplinkwifi.net, and log in with the password you set for the router.
- Follow the step-by-step instructions to complete Quick Setup configuration or go to Advanced > Quick Setup for configuration to connect your router to the internet. Then follow the step-by-step instructions to connect your router to the internet.
- To enjoy a more complete service from TP-Link (remote management, TP-Link DDNS, and more.), Log in with your TP-Link ID or click Sign Up Now to get one. Then follow the instructions to bind the cloud router to your TP-Link ID.

Quick Setup Via TP-Link Tether App
The Tether app runs on iOS and Android devices, such as smartphones and tablets.
- Launch the Apple App Store or Google Play store and search “TP-Link Tether” or simply scan the QR code to download and install the app.

- Log in with your TP-Link ID. If you don’t have the TP-Link ID, create one first.
- Connect your device to the router’s wireless network.
- Launch the Tether app, tap the + button, and select Router > Wireless Router. Follow the steps to complete the setup and connect to the internet.
- Connect your devices to the newly configured wireless networks of the router and enjoy the internet!
Manually Set Up Your Internet Connection
In this part, you can check your current internet connection settings. You can also modify the settings according to the service information provided by your ISP.
Follow the steps below to check or modify your internet connection settings.
- Visit http://tplinkwifi.net, and log in with your TP-Link ID or the password you set for the router.
- Go to the Internet.
- Select your internet connection type from the drop-down list.

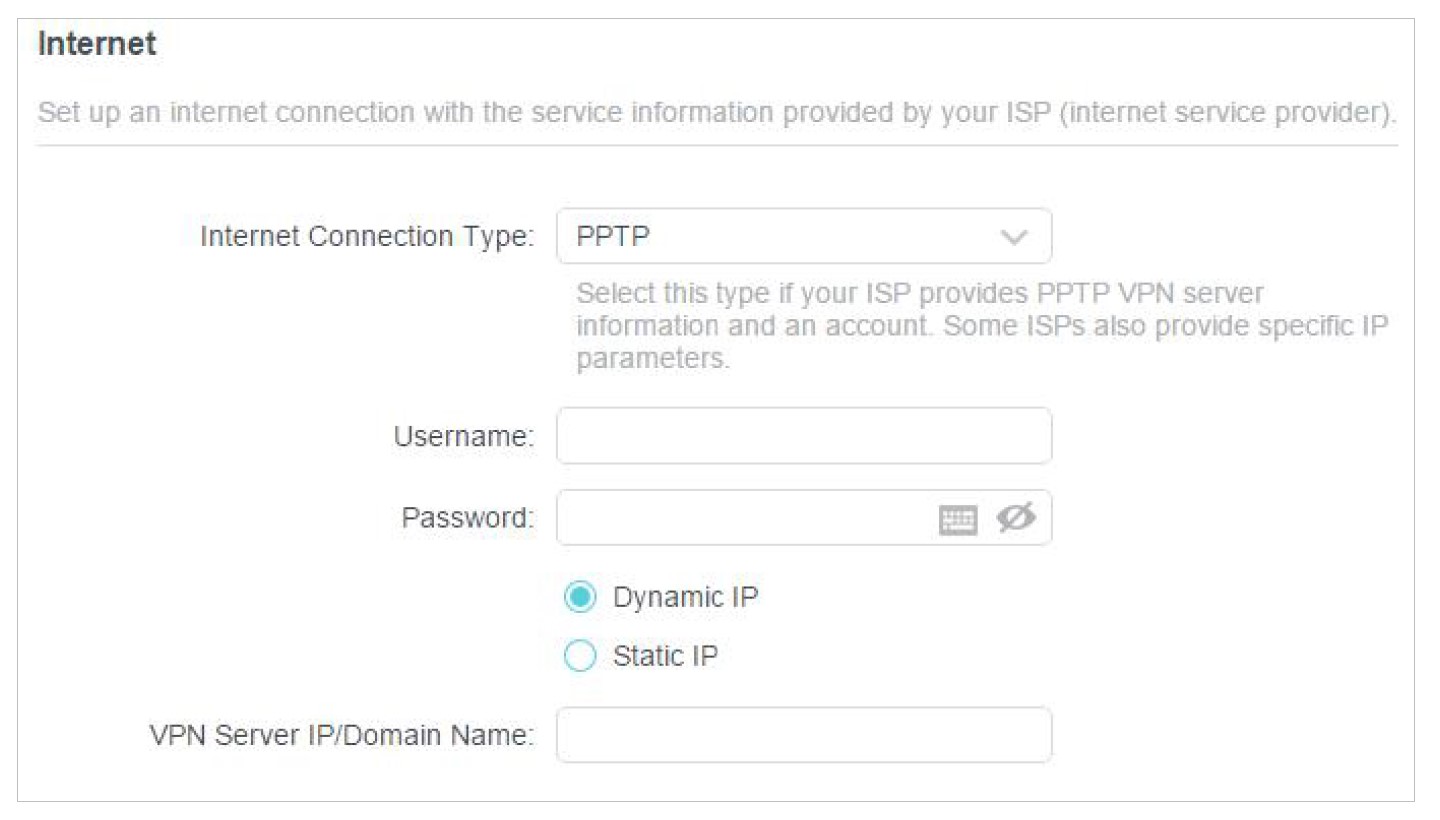
- Follow the instructions on the page to continue the configuration. Parameters on the figures are just used for demonstration.
- If you choose Dynamic IP, you need to select whether to clone the MAC address. Dynamic IP users are usually equipped with a cable TV or fiber cable.

- If you choose Static IP, enter the information provided by your ISP in the corresponding fields.

- If you choose PPPoE, enter the username and password provided by your ISP. PPPoE users usually have DSL cable modems.

- If you choose L2TP, enter the username and password and choose the Secondary Connection provided by your ISP. Different parameters are needed according to the Secondary Connection you have chosen.

- If you choose PPTP, enter the username and password, and choose the Secondary Connection provided by your ISP. Different parameters are needed according to the Secondary Connection you have chosen.
- If you choose Dynamic IP, you need to select whether to clone the MAC address. Dynamic IP users are usually equipped with a cable TV or fiber cable.
- Click Save.
Tips: If you use Dynamic IP and PPPoE and you are provided with any other parameters that are not required on the page, please go to Advanced > Network > Internet to complete the configuration.
Manage the Router
Upgrade the Firmware
TP-Link aims to provide a better network experience for users.
We will inform you through the web management page if there’s any updated firmware available for your router. Also, the latest firmware will be released at the TP-Link official website www.tp-link.com, and you can download it from the Support page for free.
Note:
- Back up your router configuration before the firmware upgrade.
- Do NOT turn off the router during the firmware upgrade.
Online Upgrade
- Visit http://tplinkwifi.net, and log in with your TP-Link ID or the password you set for the router.
- When the latest firmware is available for your router, the upgrade
 icon will display in the top-right corner of the page. Click the icon to go to the Firmware Upgrade page.
Alternatively, you can go to Advanced > System > Firmware Upgrade, and click CHECK FOR UPGRADES to see whether the latest firmware is released.
- Focus on the Online Upgrade section, and click UPGRADE if there is new firmware.

- Wait a few minutes for the upgrade and reboot to complete.
Tips: If there’s a new and important firmware update for your router, you will see the prompt notification on your computer as long as a web browser is opened. Click UPGRADE, and log in to the web management page with the username and password you set for the router. You will see the Firmware Upgrade page.
Local Upgrade
- Download the latest firmware file for the router from www.tp-link.com.
- Visit http://tplinkwifi.net, and log in with your TP-Link ID or the password you set for the router
- Go to Advanced > System > Firmware Upgrade.
- Focus on the Local Upgrade section. Click BROWSE to locate the downloaded new firmware file, and click UPGRADE.
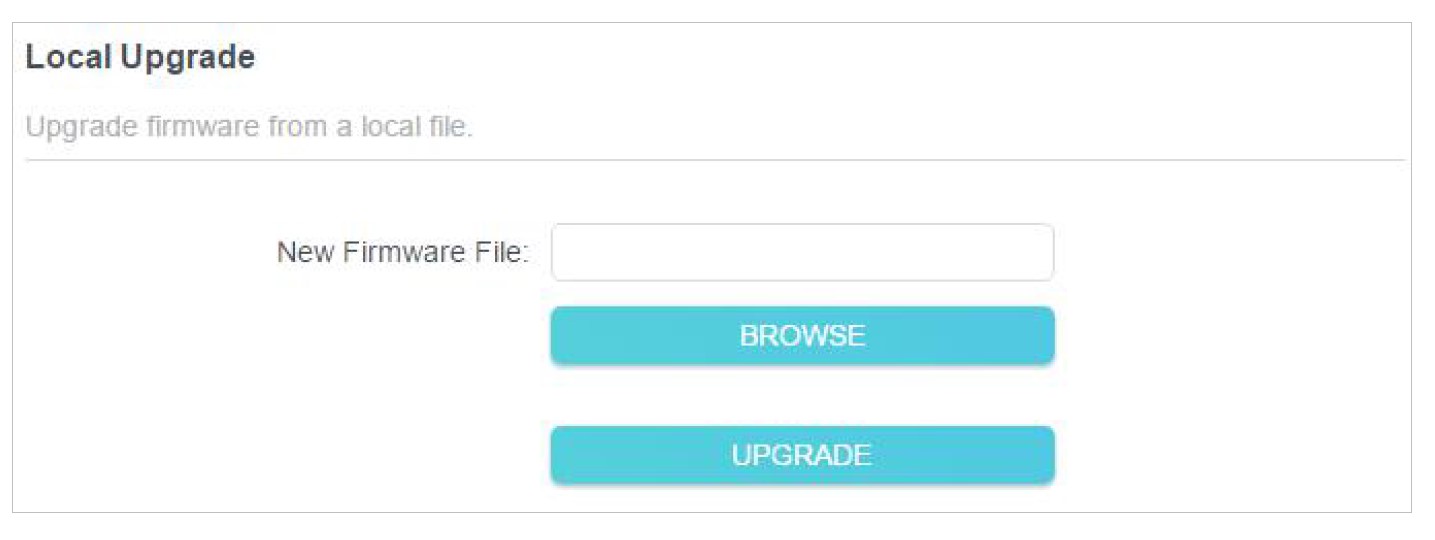
- Wait a few minutes for the upgrade and reboot to complete.
Note: If you fail to upgrade the firmware for the router, please contact our Technical Support.
Backup and Restore Configuration Settings
The configuration settings are stored as a configuration file in the router. You can backup the configuration file to your computer for future use and restore the router to previous settings from the backup file when needed. Moreover, if necessary you can erase the current settings and reset the router to the default factory settings.
- Visit http://tplinkwifi.net, and log in with your TP-Link ID or the password you set for the router.
- Go to Advanced > System Tools > Backup & Restore.
To backup configuration settings:
Click BACK UP to save a copy of the current settings to your local computer. A ‘.bin’ file of the current settings will be stored on your computer.
To restore configuration settings:
- Click BROWSE to locate the backup configuration file stored on your computer, and click RESTORE.

- Wait a few minutes for the restoring and rebooting. Note: During the restoring process, do not turn off or reset the router.
To reset the router except for your login password and TP-Link ID:
- In the Factory Default Restore section, click RESTORE.

- Wait a few minutes for the resetting and rebooting.
Note:
- During the resetting process, do not turn off the router.
- After resetting, you can still use the current login password or the TP-Link ID to log in to the web management page.
To reset the router to factory default settings:
-
- Click FACTORY RESTORE to reset the router.

- Wait a few minutes for the resetting and rebooting.
- Click FACTORY RESTORE to reset the router.
Note:
- During the resetting process, do not turn off or reset the router.
- We strongly recommend you backup the current configuration settings before resetting the router.
Change the Login Password
The account management feature allows you to change your login password on the web management page.
Note: If you are using a TP-Link ID to log in to the web management page, the account management feature will be disabled. To manage the TP-Link ID, go to Advanced > TP-Link ID.
- Visit http://tplinkwifi.net, and log in with the password you set for the router.
- Go to Advanced > System > Administration and focus on the Change Password section.
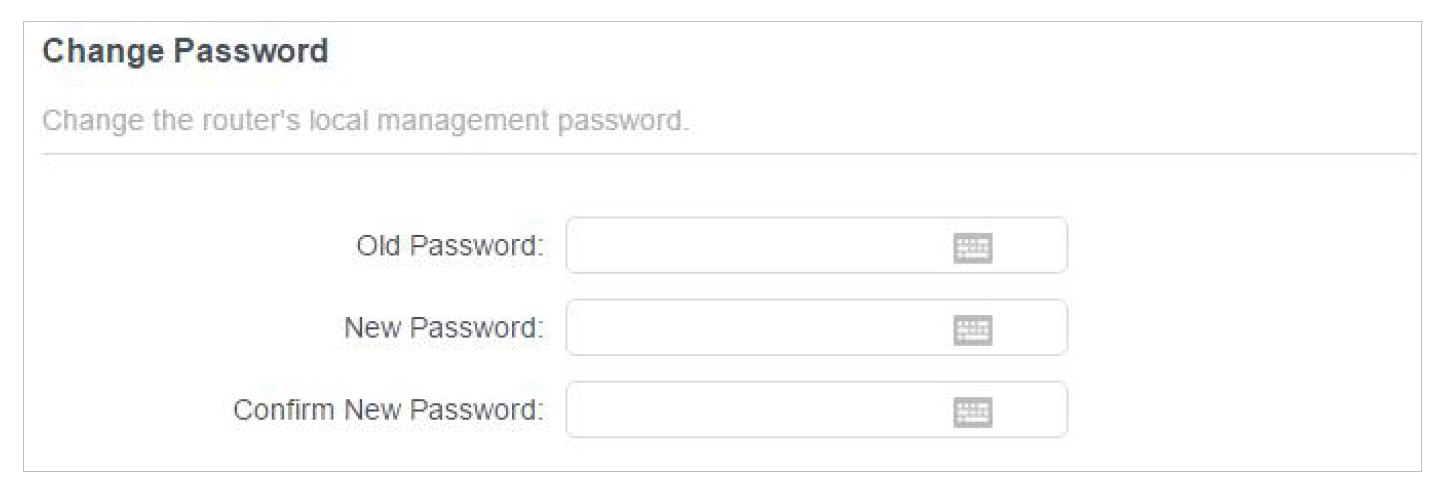
- Enter the old password, then a new password twice (both case-sensitive). Click SAVE.
- Use the new password for future logins.
Password Recovery
This feature allows you to recover the login password you set for your router in case you forget it.
Note: If you are using a TP-Link ID to log in to the web management page, the Password Recovery feature will be disabled. To manage the TP-Link ID, go to Advanced > TP-Link ID.
- Visit http://tplinkwifi.net, and log in with the password you set for the router.
- Go to Advanced > System > Administration and focus on the Password Recovery section.
- Tick the Enable box of Password Recovery.
- Specify a mailbox (From) for sending the recovery letter and enter its SMTP Server address. Specify a mailbox (To) for receiving the recovery letter. If the mailbox (From) to send the recovery letter requires encryption, Tick the Enable box of Authentication and enter its username and password. Tips:
- SMTP server is available for users in most webmail systems. For example, the SMTP server address of Gmail is smtp.gmail.com.
-
Generally, Authentication should be enabled if the login of the mailbox requires a username and password.

- SMTP server is available for users in most webmail systems. For example, the SMTP server address of Gmail is smtp.gmail.com.
-
Click SAVE.
To recover the login password, please visit http://tplinkwifi.net, click Forgot Password? on the login page, and follow the instructions to set a new password.
Local Management
This feature allows you to limit the number of client devices on your LAN from accessing the router by using the MAC address-based authentication.
- Visit http://tplinkwifi.net, and log in with your TP-Link ID or the password you set for the router.
- Go to Advanced > System > Administration and complete the settings In the Local Management section as needed.
Access the router via HTTPS and HTTP:
Tick the Enable box of Local Management via HTTPS to access the router via HTTPS and HTTP, or keep it disabled to access the router only via HTTP.
Allow all LAN-connected devices to manage the router:
Select All Devices for Local Managers.
Allow specific devices to manage the router:
- Select All Devices for Local Managers and click SAVE.

- Click Add Device.

- Click VIEW CONNECTED DEVICES and select the device to manage the router from the Connected Devices list, or enter the MAC address of the device manually.
- Specify a Description for this entry.
- Click SAVE.
Set the Router to Reboot Regularly
The Scheduled Reboot feature cleans the cache to enhance the running performance of the router.
- Visit http://tplinkwifi.net, and log in with your TP-Link ID or the password you set for the router.
- Go to Advanced > System > Reboot.
- Tick the Enable box of Reboot Schedule.

- Specify the Reboot Time when the router reboots and Repeat to decide how often it reboots.
- Click SAVE.
FCC compliance information statement
- Product Name: AX1800 Wi-Fi 6
- Router Model Number: Archer AX21

- Responsible party:
TP-Link USA Corporation, d/b/a TP-Link North America, Inc.- Address: 145 South State College Blvd. Suite 400, Brea, CA 92821
- Website: http://www.tp-link.com/us/
- Tel: +1 626 333 0234
- Fax: +1 909 527 6803
- E-mail: sales.usa@tp-link.com
This equipment has been tested and found to comply with the limits for a Class B digital device, pursuant to part 15 of the FCC Rules. These limits are designed to provide reasonable protection against harmful interference in a residential installation. This equipment generates, uses, and can radiate radio frequency energy and, if not installed and used in accordance with the instructions, may cause harmful interference to radio communications.
However, there is no guarantee that interference will not occur in a particular installation. If this equipment does cause harmful interference to radio or television reception, which can be determined by turning the equipment off and on, the user is encouraged to try to correct the interference by one or more of the following measures:
- Reorient or relocate the receiving antenna.
- Increase the separation between the equipment and the receiver.
- Connect the equipment to an outlet on a circuit different from that to which the receiver is connected.
- Consult the dealer or an experienced radio/ TV technician for help.
This device complies with part 15 of the FCC Rules. Operation is subject to the following two conditions:
- This device may not cause harmful interference.
- This device must accept any interference received, including interference that may cause undesired operation.
Any changes or modifications not expressly approved by the party responsible for compliance could void the user’s authority to operate the equipment.
Note: The manufacturer is not responsible for any radio or TV interference caused by unauthorized modifications to this equipment. Such modifications could void the user’s authority to operate the equipment.
FCC RF Radiation Exposure Statement
This equipment complies with FCC RF radiation exposure limits set forth for an uncontrolled environment. This device and its antenna must not be co-located or operating in conjunction with any other antenna or transmitter.
“To comply with FCC RF exposure compliance requirements, this grant is applicable to only Mobile Configurations. The antennas used for this transmitter must be installed to provide a separation distance of at least 25 cm from all persons and must not be co-located or operating in conjunction with any other antenna or transmitter.”
We, TP-Link USA Corporation, have determined that the equipment shown above has been shown to comply with the applicable technical standards, FCC part 15. There is no unauthorized change is made to the equipment and the equipment is properly maintained and operated.
FCC compliance information statement
- Product Name: I.T.E. Power Supply
- Model Number: T120150-2B1
- Responsible party:
TP-Link USA Corporation, d/b/a TP-Link North America, Inc.
- Address: 145 South State College Blvd. Suite 400, Brea, CA 92821
- Website: http://www.tp-link.com/us/
- Tel: +1 626 333 0234
- Fax: +1 909 527 6803
- E-mail: sales.usa@tp-link.com
This equipment has been tested and found to comply with the limits for a Class B digital device, pursuant to part 15 of the FCC Rules. These limits are designed to provide reasonable protection against harmful interference in a residential installation. This equipment generates, uses, and can radiate radio frequency energy and, if not installed and used in accordance with the instructions, may cause harmful interference to radio communications.
However, there is no guarantee that interference will not occur in a particular installation. If this equipment does cause harmful interference to radio or television reception, which can be determined by turning the equipment off and on, the user is encouraged to try to correct the interference by one or more of the following measures:
- Reorient or relocate the receiving antenna.
- Increase the separation between the equipment and the receiver.
- Connect the equipment to an outlet on a circuit different from that to which the receiver is connected.
- Consult the dealer or an experienced radio/ TV technician for help.
This device complies with part 15 of the FCC Rules. Operation is subject to the following two conditions:
- This device may not cause harmful interference.
- This device must accept any interference received, including interference that may cause undesired operation.
Any changes or modifications not expressly approved by the party responsible for compliance could void the user’s authority to operate the equipment.
We, TP-Link USA Corporation, have determined that the equipment shown above has been shown to comply with the applicable technical standards, FCC part 15. There is no unauthorized change is made to the equipment and the equipment is properly maintained and operated.
FAQS About TP-Link AX1800 Wi-Fi 6 Router
The AX1800 Wi-Fi 6 router can connect how many devices?
twenty attached devices
How quickly is the wireless TP Link AX1800?
1.8 Gbps
What is the TP Link AX1800’s device capacity?
A TP-Link AX1800 should be able to support up to 20 devices. Nevertheless, it can be altered based on your router usage.
What is the Wi-Fi 6 AX1800’s top speed?
With speeds up to 1.8Gbps and more capacity to handle more devices on your network, the NETGEAR® 4-Stream AX1800 WiFi 6 Router—built with the most recent iteration of WiFi 6 technology—ensures that you can enjoy lightning-fast Internet connections on all of your devices.
What is Wi-Fi 6’s maximum capacity?
9.6 Gbps
Why is AX1800 used?
These figures represent the routers’ combined maximum bandwidth in megabits per second, which includes both 2.4 GHz and 5 GHz bands. In principle, an AX1800 router, for instance, should be able to send and/or receive data at up to 1800 Mbps.
What is Wi-Fi 6’s maximum capacity?
Wi-Fi 6 (802.11ax) offers better speeds than Wi-Fi 4 and 5, which it replaced. As a matter of fact, it can give a theoretical maximum throughput speed of 9.6 Gbps, as opposed to the 3.5 Gbps and 600 Mbps of Wi-Fi 5 (802.11ac) and Wi-Fi 4 (802.11n), respectively.
Can you use the TP-Link AX1800 as an access point?
Select Access Point under Advanced > System > Operation Mode, then hit Save. Rebooting the router will activate Access Point mode. 3. After the router has restarted, use an Ethernet cable to link it to your wired router.
Can you extend with the TP-Link AX1800?
Regarding the TP-Link AX1800 Mesh Dual Band Range Extender – RE605X, which you raised in your query: Since this is a range extender, the same SSID (network name) and password will be used to extend the signal of an existing Wi-Fi network.
How far can the AX1800 throw a beam?
According to Netgear, it has an AX1800 rating and may increase Wi-Fi coverage in a home’s 1,500 square feet.
For more manuals by TP-Link, Visit Manualsdock
[embeddoc url=”https://manualsdock.com/wp-content/uploads/2023/08/TP-Link-AX1800-Wi-Fi-6-Router-User-Guide.pdf” download=”all”]


